Durable Paper Pinhole Exposure Calculator
thingiverse
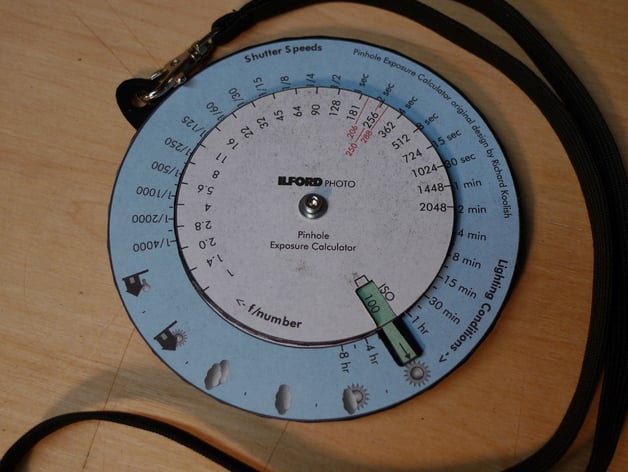
If you don't have (or use) a light meter, Richard Koolish's clever mechanical calculator can help you select an exposure time for tiny aperture (pinhole) cameras, which require lengthy exposure times. These disks are designed around Ilford's version:http://www.ilfordphoto.com/Webfiles/2011106152612113.pdf Which is attributed to Mr. Koolish, but freely downloadable (and included in the source files for this thing). ...but there are others:http://www.rahji.com/pdf/koolish.pdf http://static.freewebstore.org/templates//79100/myimages/pinhole_camera_exposre_calculator.pdf http://www.rahji.com/wordpress/2007/05/12/pinhole-exposure-times/ ATTENTION This work is licensed under the Creative Commons - Attribution - Non-Commercial license. This license applies only to the files and documents available for download from the Thing Files section of this Thing.All other related content (photographs, videos, and verbiage such as contained in "Description" or "Instructions" ) are excluded from this license. with all rights reserved, unless specifically available for download This notice constitutes a clarification, not a change, to licensing for this design. Instructions The large disk is oriented to fit (barely) on a 6x6 print bed if you have one of the smaller printers. Alternately, you could experiment with scaling down the PDF and the 3D-printed parts. Assembly should be obvious, but here's how I did it. Print the disks; print the calculator page. Dress the center holes of the 3d printed parts with a 3mm / 1/8-inch bit. Cut out the paper disks (with a hole compass, if you have one). Don't amputate the arrow! Smooth the top surfaces of the disks (sandpaper / file) Carefully glue the paper disks on the smoothest side of of the 3D printed disks. I used Elmer's spray adhesive, which gives you some time to scootch and twist the paper precisely into position. Align the pointer on the paper with the tab on the middle disk; align the ISO windows on the top disks, but don't cut out the window on the paper until they are glued together. Yes, I know the windows are different shapes. Clean the paper from the center holes, and assemble the disks with a 3mm / 1/8-inch bolt, locknut, and washers. A handy lanyard hole lets you hang the calculator around your neck or from your tripod, keeping the device at ready. This calculator does not factor reciprocity failure into the exposure calculation - a necessary lengthening of exposure time to get a desired exposure, and is a unique property of your particular film choice. More info:http://www.geofflawrence.com/reciprocity_failure.html Google "reciprocity failure for _myfilm". The Pinhole Designer program ( http://www.pinhole.cz/en/pinholedesigner/ ) can generate a corrected exposure chart for many different films, but then you wouldn't need this calculator... Shoot some pinhole photos!
With this file you will be able to print Durable Paper Pinhole Exposure Calculator with your 3D printer. Click on the button and save the file on your computer to work, edit or customize your design. You can also find more 3D designs for printers on Durable Paper Pinhole Exposure Calculator.