Dustshoe (suction) for 80mm HF-Spindle (CNC) - NEW: V2!
thingiverse
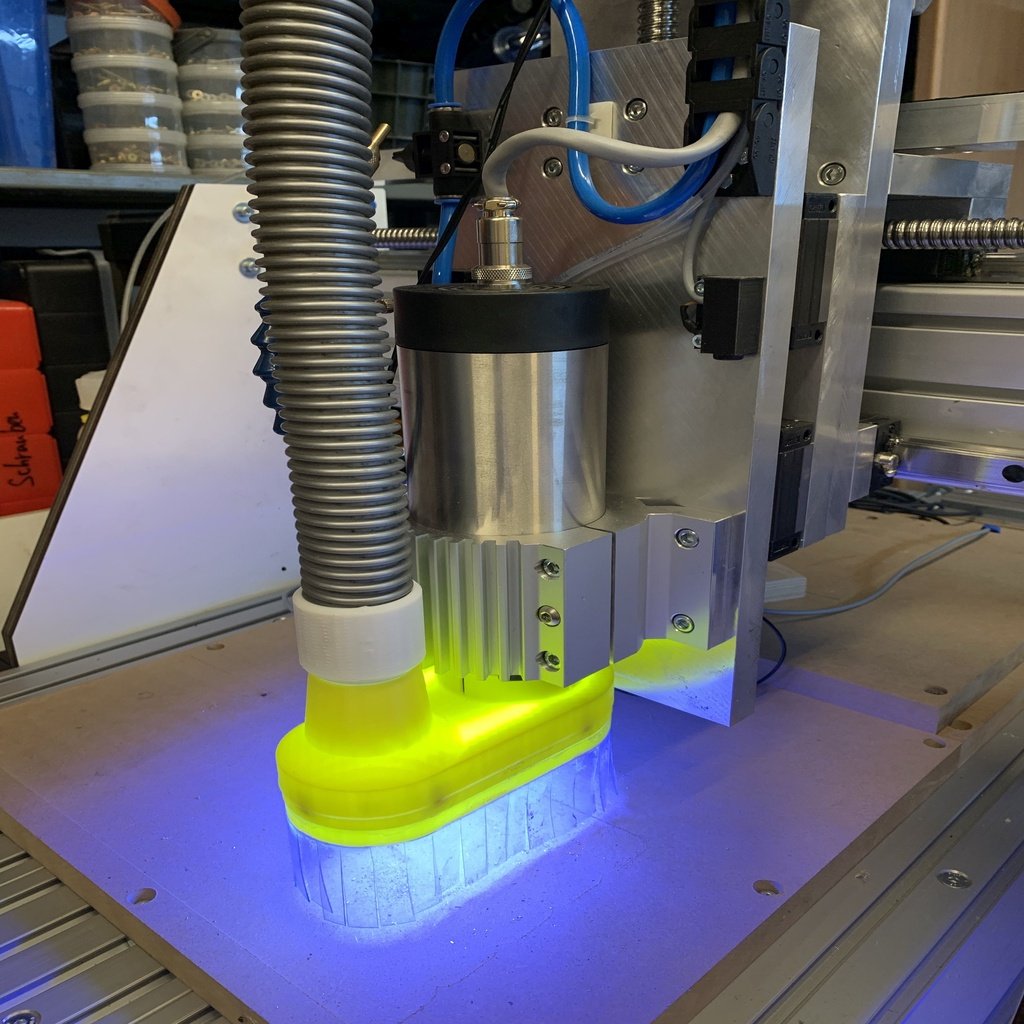
Edit 28.11.2019: Ich habe die Absaugung aufgrund der eigenen Erfahrungen nochmals verbessert (V2): - 3-teilige Konstruktion - so lassen sich die Teile ohne Stützstrukturen drucken - das Oberteil wird mit dem Mittelteil mitttels 4 Stück Senkkopfschrauben M4x10 verschraubt. - Umlaufender Rand am Mittelteil - so verschiebt sich das Unterteil unter keinen Umständen - Magnete beidseitig (Mittelteil und Unterteil) - so stärkere Haltekraft für das Unterteil (unbedingt beim einkleben der Magnete auf deren Polarität achten!) - Zweireihige Schürze im Unterteil: Ich habe zuerst einen Streifen 0,5mm Weich-PVC angeklebt, dann in passenden Abständen (ca.12-15 mm) diesen eingeschnitten. Dann einen weiteren Streifen auf den ersten geklebt und diesen ebenfalls eingeschnitten - allerdings jeweils versetzt zu den Schnitten der ersten Lage! So entsteht eine sehr dichte und doch flexible und transparente Schürze. Für meine CNC-Fräsmaschine mit 1,5kw-HF-Spindel (Luftgekühlt) habe ich eine Absaugung konstruiert. Das besondere daran: - Unterteil einfach abnehmbar (Magnethalter) - Beleuchtung innerhalb der Absaugung (LED-Band). Das Oberteil wird direkt an dem Flansch der HF-Spindel befestigt. Hierzu wird eine pasende Schlauchschelle benötigt. Im Oberteil sind (EDIT:) 6 Stück Neodym-Magnete (8x2mm) eingeklebt. Innerhalb des (EDIT:) Mittelteils gibt es einen 10mm breiten Absatz, an dem sich passendendes LED-Band (Wasserdicht!) ankleben lässt. Das Kabel wird durch eine anzubringende Bohrung im Oberteil nach außen geführt. Im Unterteil befinden sich ebenfalls 6 Stück Neodym-Magnete (8x2mm) - sie dienen der Befestigung am Oberteil. Ich habe als Schürze transparentes PVC (0,5mm dick) verwendet und mit Sekundenkleber angeklebt (siehe EDIT oben!). I ch habe das Unterteil mehrfach gedruckt und mit verschieden langen Schürzen beklebt - so kann ich je nach Fräserlänge das passende Unterteil ansetzen. Zusätzlich wird also benötigt: - Schlauchschelle (ca. 70mm) - 12 Stück Neodym-Magnete 8x2mm - 4 Stück Senkkopfschrauben M4x10mm - PVC weich, transparent (0,5 mm dick) - LED-Lichtband (ich habe dieses verwendet: https://www.ebay.de/itm/DC12V-5M-5054-SMD-LED-Streifen-Licht-Stripe-Leiste-Band-Lichterkette-Warmwei%C3%9F-DE/174043998975?ssPageName=STRK%3AMEBIDX%3AIT&var=472859739035&_trksid=p2057872.m2749.l2649) Für eure Anpassung an die vorhandene Spindel habe ich die CAD-Zeichnung als .step-Datei angefügt. Viel Spaß beim nachbauen! ________________________________ Edit 28.11.2019: I have again improved the suction based on my own experience (V2): - 3-part construction - so the parts can be printed without support - the upper part is screwed to the middle part with 4 pieces countersunk screws M4x10. - Circumferential edge at the middle part - so the lower part shifts under any circumstances - Magnets on both sides (middle part and lower part) - so stronger holding power for the lower part (always pay attention to their polarity when gluing the magnets!) - Double-breasted apron in the lower part: I first glued a strip of 0.5mm soft PVC, then at appropriate intervals (ca. 12-15 mm) this cut. Then another strip glued on the first and this also cut - but each offset to the sections of the first layer! This creates a very dense yet flexible and transparent apron. For my CNC milling machine with 1.5 kW HF spindle (air-cooled), I have designed a suction. The special thing about it: - lower part easily removable (magnet holder) - Lighting within the suction (LED strip). The upper part is attached directly to the flange of the HF spindle. For this purpose a fitting hose clamp is needed. In the upper part are (EDIT :) 6 pieces of neodymium magnets (8x2mm) glued. Within the (EDIT :) middle section, there is a 10mm wide heel to which matching LED tape (Waterproof!) Can be attached. The cable is guided through a hole to be mounted in the upper part to the outside. In the lower part are also 6 pieces of neodymium magnets (8x2mm) - they are used for attachment to the upper part. I've used transparent PVC (0.5mm thick) as apron and stuck it on with superglue (see EDIT above!). I I have printed the lower part several times and covered it with aprons of different lengths - so I can put on the matching lower part depending on the length of the milling cutter. In addition, you will need: - Hose clamp (about 70mm) - 12 pieces of neodymium magnets 8x2mm - 4 countersunk screws M4x10mm - PVC soft, transparent (0.5 mm thick) - LED strip light (I've used this: https://www.ebay.de/itm/DC12V-5M-5054-SMD-LED-strip-light-strip-bar-band-light-wire-warm-white- DE / 174043998975? ssPageName = STRK% 3AMEBIDX% 3AIT & var = 472859739035 & _trksid = p2057872.m2749.l2649) For your adaptation to the existing spindle, I added the CAD drawing as a .step file. Have fun building!
With this file you will be able to print Dustshoe (suction) for 80mm HF-Spindle (CNC) - NEW: V2! with your 3D printer. Click on the button and save the file on your computer to work, edit or customize your design. You can also find more 3D designs for printers on Dustshoe (suction) for 80mm HF-Spindle (CNC) - NEW: V2!.