Dweenabox: Portable microcontroller workstation
thingiverse
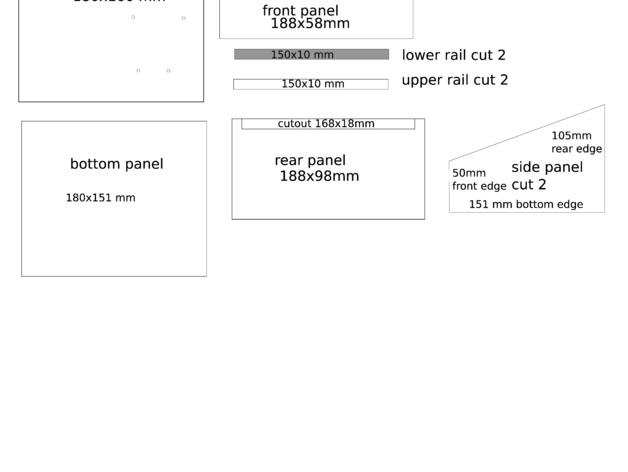
This is a portable, self-contained workstation for working with an Arduino or other microcontroller. I designed it for our local library system which wishes to install the Arduino IDE on some of their publich workstations, and offer Arduino boards and associated accessories at the front desk for in-library checkout. This box has a sliding lid that stores the controller and a breadboard inside the box to protect them when the lid is closed (inverted.) The lid includes a lip which closes the clearance gap in the rear when the lid is inverted, and creates a vertical lip in front to trap parts when it is in use. Inside is room to store jumpers, USB cable, power adapter (for use when not connected to the host computer), and a small parts box for LEDs, transistors, resistors, and basic chips like a shift register. There should be room for most components that you would need to run through the basic Arduino tutorials such as those on the Adafruit Learning System. The holes in the lid/work surface are sized for an Uno, with a half-size breadboard beside it. The lid will accomodate a full-size breadboard, but in that case you mount it sideways. EDIT: I have uploaded a version of the svg broken into 3 letter-size pages, for those who have to paste the pattern to a board and cut it out by hand. Note that the one duplicate piece, the side panels, is shown once in mirror so that you can orient all paper to the inside and thus not deface the outside of your box. I should have this printed and cut out tomorrow, to test the fit. UPDATE: Splatspace now has a working laser cutter, so I can start working on making a laser-cuttable version of this, with slots and tabs. Instructions The svg file contains all parts and dimensions. Use the pattern by gluing it to the wood and cutting out by hand, or CAM it for cutting out with a CNC router or laser. The pieces are sized for 3-ply craft plywood, 3-4 mm thick. Assemble with wood glue as follows (see images for location of parts): Lay the bottom panel flat and glue the two side pieces to the short edges of the bottom panel. Then glue the front and rear panels to this assembly. When dry glue the bottom rails flat to the inside of the side pieces approx 4 mm below the upper lip. When that is dry lay the lid in place and use its position to glue the lip on at the proper angle so that it closes the 20mm gap at the rear. Glue the upper rails to the top edges of the side panels. Make sure you don't glue the lid in place. Attach breadboard and microcontroller to the work surface so that they are protected inside the box when the lid is inverted. WORK IN PROGRESS: The box in the photos is my hand-built prototype. I have not yet cut one out using these svgs as a guide. I will post images of that as soon as it is done. I will upload a #d-printable version, although printing is probably not the most efficient way to make this. A printable version does have the option of printing parts dividers in situ. Another Splatspace member has offered to modify these parts for tab-and-slot construction, suitable for a laser cutter. I will upload those when done as well.
With this file you will be able to print Dweenabox: Portable microcontroller workstation with your 3D printer. Click on the button and save the file on your computer to work, edit or customize your design. You can also find more 3D designs for printers on Dweenabox: Portable microcontroller workstation.