Dyson Cyclone V10 Animal Attachment System
thingiverse
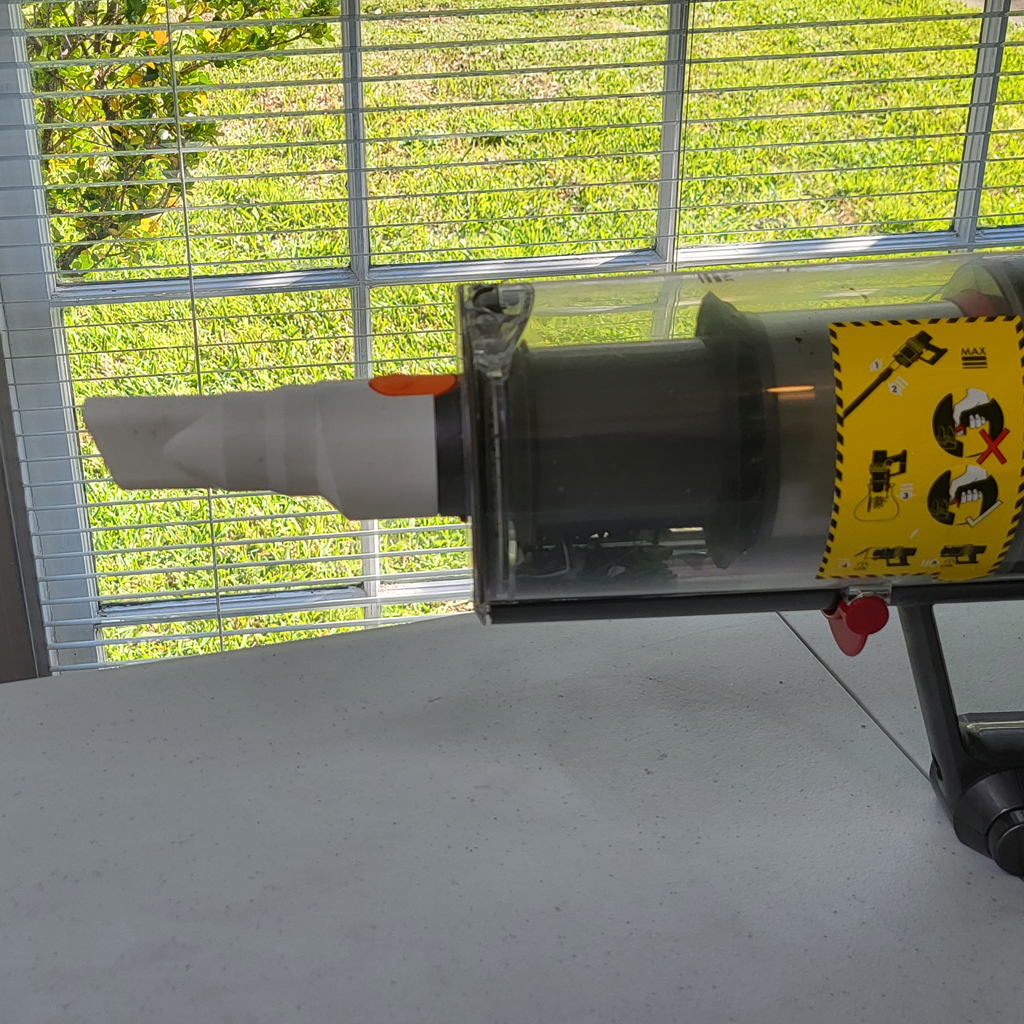
A system for custom attachments to the Dyson v10 Animal. Right now, there is only support for one nozzle, but maybe more nozzles will be added later; but, the entire system currently exists to support multiple nozzle types - just modify the nozzle part after the threads. ## Parts Required Four parts should be printed: - **Attachment** - The part that connects every other piece and interlocks with the vacuum. This does not contain a nozzle but has threads to support screwing a nozzle piece on. - **Button** - The locking mechanism and release button. - **Nozzle** - The nozzle. - **Plug** - The plug to block dust ingress to the button after it has been installed. And there are three extra non-3D-printed parts needed: - a [ballpoint pen](https://www.amazon.com/gp/product/B089JYV7BT) spring - A M3x5 socket cap screw - An M3x3 grub screw ## Print instructions The parts should already be in the correct orientation - see Thingiverse STL renders for the correct print orientations. Use a brim for the nozzle part and the attachment part. I recommend a 3mm radius. ## Assembly Product Note All parts are meant to be assembled once as a single product. The threads between the nozzle and attachment may wear out if used repeatedly. While the nozzle can be screwed and unscrewed from the attachment, it is recommended to screw it on once and always leave it connected (as if they were a single print). You may even want to go as far as gluing them together at their seam after the entire product is assembled. ## Assembly instructions https://youtu.be/AuZHjRuNbng 1. Print all parts. Remove brim material. - An attachment, nozzle, plug, and button. 2. In the attachment, there is a region where the button should go and a hole where the spring should stand. Put the spring there and add the button on top. 3. Push the button down and insert the M3 screw. The button should lift all the way up when the screw is screwed in far enough. - 3a - Test pressing the button to ensure it goes down and resets via the spring. - 3b - Test putting the attachment into the vacuum to ensure it locks and releases smoothly. 4. Insert the plug to seal off the region that allowed access to insert the M3 screw. 5. Insert the grub to lock the plug to the attachment. Feel free to use force to thread the grub in a diagonal direction if it makes things easier. 6. Optional: Seal off the seams around the plug. Good choices of sealant are gasket RTV silicone, caulking, or glue. 7. Screw the nozzle onto the attachment. 8. Optional - permanently glue the nozzle to the attachment by applying glue on the outside seam where they connect. 9. Attachment is ready for use. ## Updates * 2023/04/09 - Wrong attachment file was uploaded. v1 model updated.
With this file you will be able to print Dyson Cyclone V10 Animal Attachment System with your 3D printer. Click on the button and save the file on your computer to work, edit or customize your design. You can also find more 3D designs for printers on Dyson Cyclone V10 Animal Attachment System.