E-3D Mount - Creator Bot 3D by - 3D Printer Works
thingiverse
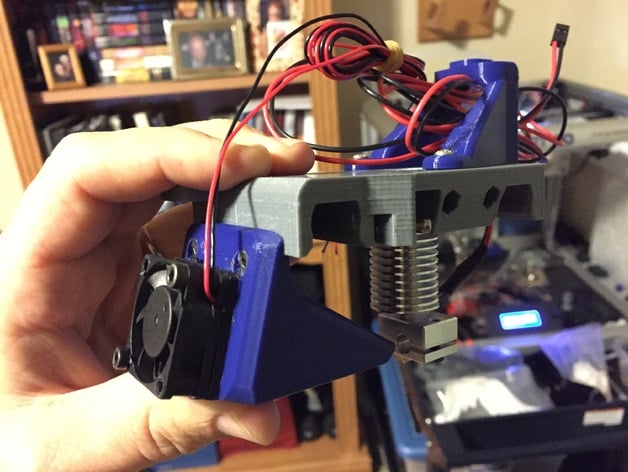
UPDATE 28APR2015: Main/First Hot End Installed and Working - http://3dprinterworks.boards.net/post/1456 UPDATE: Reinforced the carriage to make it stronger and more durable, adding Slave carriage for dual simultaneous printing (still under development). If you have a single head printer or 1-E3D Jtype hot end, you can use this mount alone and start printing immediately. Additional features include: Fan Duct added for 30mm 12v Fan Teaser photo of the Slave Design printed two identical objects at once on the same print bed available now You will need to acquire these hardware components: Two 3x45mm clamps to secure the halves together 2x 3mm lock nuts Secure the Belt: Note that you should attach the right end of the belt X-Axis belt before assembling the two halves. Do not over tighten the set screws. 2x 12mm screws Mount the Cable Chain Guide 4x 3x 10mm screws (attach Fan) Slave Carriage (still in development/testing) includes a carbon fiber rod, springs, and screws. y-harness to slave extruder motors also required for completion. Print The carriage top down - With supports (Ben's default setting in SLIC3R worked fine. Turn the print temp on the ABS down to 238 and leave the bed temp at 110 for the duration of the print. Let the bed completely cool, and your part will come right off without glue or tape. Print the cable chain holder upright - No supports required, 20 infill, ABS or PLA, the bottom of the chain will rest on the top of the support, and you will run a provided plastic bolt from top to bottom through the hole. There are two holes in the front of the carriage for the planned part's cooling duct mount. Note: There is a discrepancy between the uploaded files and the pictures, this is a work in progress. Instructions Hot End Assembly - wiki.e3d-online.com/wiki/E3D-v6_Assembly Important note: Apply thermal grease on the barrel threads into the cooling fans for better heat distribution and prevention of jamming due to improper cooling. Carriage Parts to print available at www.thingiverse.com/thing:755560 Modify Slice Settings: Speed is Your Friend! Retraction settings - 2mm Print Speeds: Avoid speeds below 40mm/s, or you may end up with jammed extruders. If filament remains in the hot end when the print is finished, it could help prevent jamming during the restart. ///////USE AT OWN RISK/////// START G-Code G28 ; Home all axes G1 Z10 F5000 ; Lift nozzle G92 E0 ; Zero extruded length G1 E105 F225 ; Load/Purge nozzle with 5mm of filament G92 E0 ; Zero the extruded length END G-CODE M140 S0 ; Shut off bed G1 E-100 ; Retract filament by 100mm M104 S0 ; Turn off temperature G1 X225 Y225 ; X and Y axis Back Right Corner M84 ; Disable motors ///////USE AT OWN RISK/////// Print in ABS with a 30% infill and supports. I used Ben's default setting in SLIC3R, with the print temp set to 238 and bed temp at 110. You will need to: Mount half of the carriage with the motion belts first. Drill out the holes for easier assembly (three mm hardware will fit nicely). Trim the belt channel for a smoother print. Electrical Components Reuse the heater from your Creator bot. Use the E-3D Thermistor (don't forget to update Merlin) Remove the extra creator bot heater and thermistor Important note: Run auto tune once installation is complete and update PID in config.h. My New PID: P: 32.40 I: 3.80 D: 69.01 You will need to modify the firmware to reduce the max Z-height by four inches, X offset to ten millimeters, and add a fabrication or acquire a longer screw for the end-stop. My max z is currently set at two hundred five millimeters, but that's okay as I only print small objects. Once complete, run a test print
With this file you will be able to print E-3D Mount - Creator Bot 3D by - 3D Printer Works with your 3D printer. Click on the button and save the file on your computer to work, edit or customize your design. You can also find more 3D designs for printers on E-3D Mount - Creator Bot 3D by - 3D Printer Works.