E3D REVO MONSTER MOON BUGGY
prusaprinters
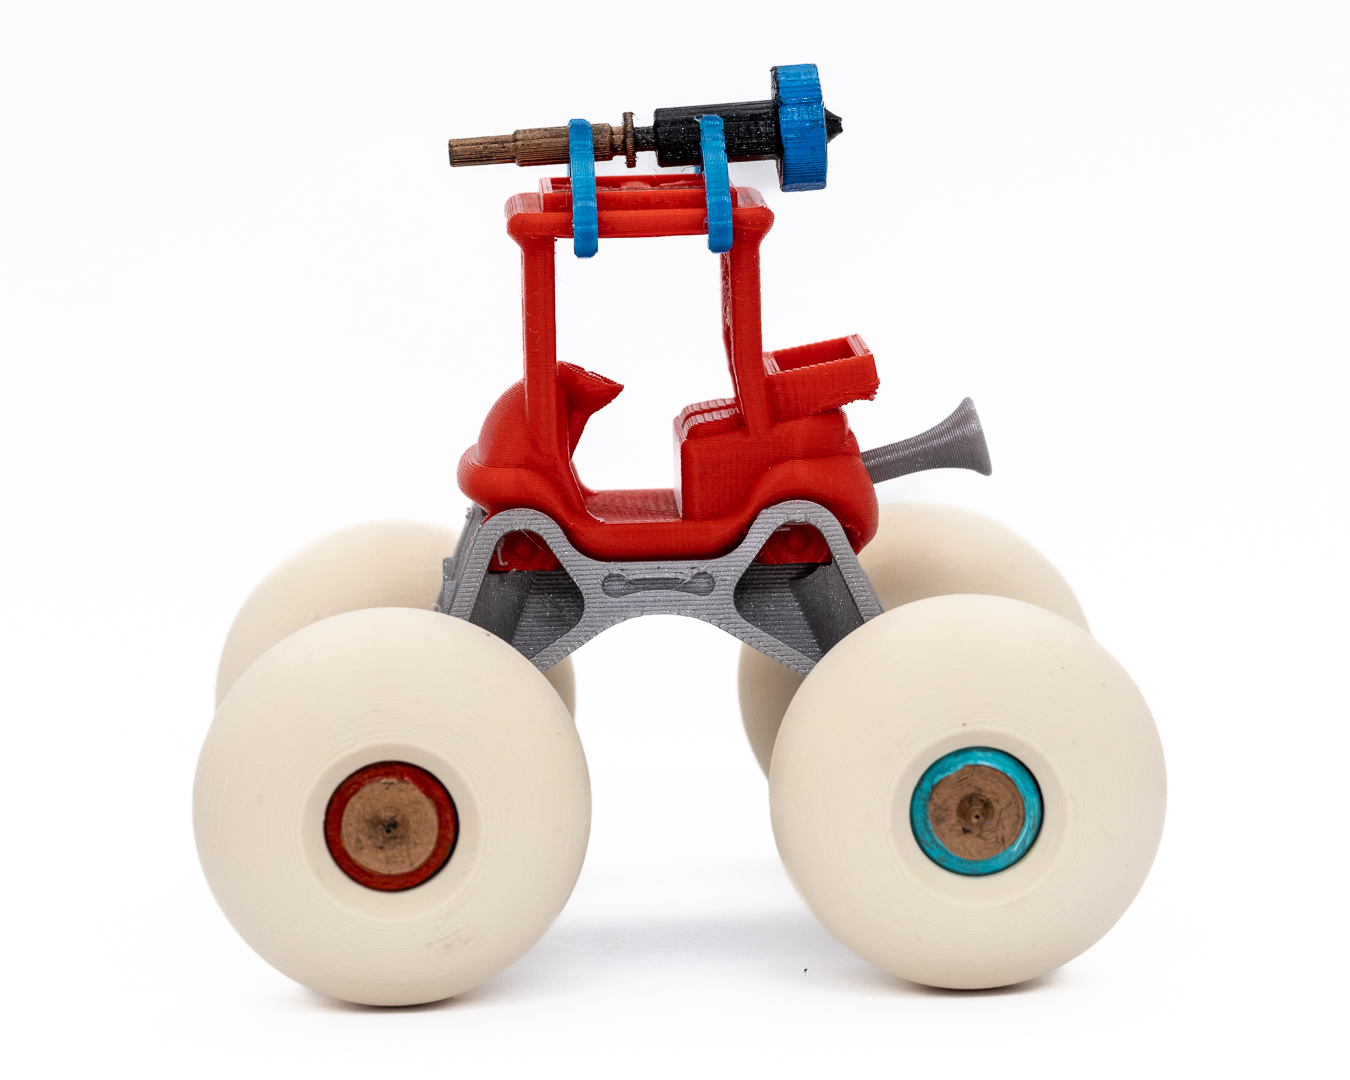
<p>E3D's buggy is cute enough, but the wheels don't actually go round and it feels very childish pretending they do while delivering your REVO nozzle to your printer. With this monster moon buggy adapter, you can “make the noise” with wheels that are big enough to ride over any challenge that your office desk can provide. Each one can carry a single replacement REVO nozzle, so if you have a collection you will require a fleet.</p><p><strong>HOW TO MAKE YOUR OWN.</strong><br><strong>NO SUPPORTS - SIMPLE PRINTING.</strong></p><ul><li><strong>THE BUGGY</strong><br>Download from<a href="https://www.printables.com/model/275117-e3dbuggy-a-3d-printer-stress-test"> HERE</a> and print as neatly as you can. I'm going through “one of those phases” at the moment so I printed mine at 0.15 layer height with a 0.4 nozzle. With Prusament Lipstick Red PLA. <br><br><i><strong>No mods are necessary</strong></i> to the buggy file!<br> </li><li><strong>THE EXHAUST</strong><br>The very first mod you need to make is to the buggy's exhaust system. Sound doesn't travel in space, and electric vehicles don't have exhaust stacks, but at least you can look the part (and maybe make your own brrrrrrm brrrrrm noises).<br>Mine is in Prusament Galaxy Silver PLA(more on that later) printed with variable layer heights (because I love that neat finish at the end of the trumpet!) Use a brim to be sure and do trim it neatly before pushing it in snug!</li></ul><figure class="image image-style-align-center image_resized" style="width:50%;"><img src="https://media.printables.com/media/prints/319799/rich_content/45a242c8-271d-4cdb-a08b-ee42646f73cb/22-11-19-at-10-00-52.jpg#%7B%22uuid%22%3A%22bac14ddf-659b-4e46-a012-d8f412c27ade%22%2C%22w%22%3A1350%2C%22h%22%3A1080%7D"></figure><p> </p><ul><li><strong>THE REVO RACKS</strong><br>The racks just slide on from the front and rear of the roof. The .3mf file attached has a 4mm brim, but I printed mine without any - they are a little trickier than they look because there's almost no surface area. I printed a test pair with no problems, then had three failures on the way to the final. If you are patient and have a meticulously clean bed, you'll be OK. Printed in Prusament Asure Blue PLA at 1.5mm layer height because I forgot to change the slicer settings.<br> </li><li><strong>THE REVO ObXidian NOZZLE</strong><br>I wouldn't stake my life on the accuracy, but it will do till the real thing arrives. <br><br><strong>VERSION “A” SHOWN ABOVE AND IN ALL THE PHOTOS </strong>is<strong> </strong>printed in two halves with variable layer heights, 0.4mm Nozzle in Prusament Galaxy Black PLA, and stuck together with a light smear of superglue. The copper-brass bit is metallic sharpie, the coloured heat insulator is poster paint. <br><br><strong>THE BEST VERSION (BELOW) </strong><br>Print the two halves, colour the nozzle to suit your taste, then slide the insulator (printed separately) over the shaft. Note the scale in the photo is not correct, but it's not important enough to rephotograph (the model has been corrected) but it's not a micro-mm perfect replica either - if you want engineering I suggest you visit E3D! <br> </li></ul><figure class="image image-style-align-center image_resized" style="width:50%;"><img src="https://media.printables.com/media/prints/319799/rich_content/6ec6fd3b-17e6-4501-b1ec-9b212cf75694/22-11-23-at-15-47-22-edit.jpg#%7B%22uuid%22%3A%225b7895af-e21b-4caf-86f6-17841fea2c3d%22%2C%22w%22%3A1350%2C%22h%22%3A1080%7D"></figure><p><br> </p><ul><li><strong>THE CHASSIS</strong><br>Don't be deceived by it's appearance, the chassis is easy to print and is a wonderfully tight snap-fit. Trim off any loose layer material around the wheel arches, don't worry about the tiny ragged bits, they help to make the wheels fit perfectly snug but look a little odd in the slicer. To assemble angle the back wheels into place and press firmly to locate the front ones in their carrier.<br><br>I printed this with a 0.15 layer height because I wanted it to be as neat as possible. You should print it with the same settings as your Buggy print to ensure an exact fit.<br><br>Printed in Galaxy Silver Prusament and a 0.4 nozzle.</li></ul><figure class="image image-style-align-center image_resized" style="width:50%;"><img src="https://media.printables.com/media/prints/319799/rich_content/3d715174-c738-4b4d-b42d-eab1efb12057/22-11-19-at-09-58-04.jpg#%7B%22uuid%22%3A%22e1ed0b42-3576-41ff-97b0-ff50cf021330%22%2C%22w%22%3A1350%2C%22h%22%3A1080%7D"></figure><figure class="image image-style-align-center image_resized" style="width:50%;"><img src="https://media.printables.com/media/prints/319799/rich_content/25c29b7b-974c-4447-86dc-6ae6122a1153/22-11-19-at-10-01-58.jpg#%7B%22uuid%22%3A%22c6038f5d-9bff-4a5f-9b81-e10d8d6e9a60%22%2C%22w%22%3A1350%2C%22h%22%3A1080%7D"></figure><ul><li><strong>THE AXLES</strong><br>The axles have a flat spot so they can be easily printed - I used variable layer height because I was still in that mood, and they look really nice, but will never be seen again.<br>Galaxy Black PLA because they are on the same plate as the hub caps.<br> </li><li><strong>THE WHEELS</strong><br><br>In the meantime, these are printed in two halves so they look really nice (this is where variable layer heights really comes into it's own). The little gluing pins are a bit of overkill but they make it easy to keep the two halves correctly located when the glue goes on - use a little Super Glue, no need to go crazy. Wait for the glue to dry before you put them on the axles - we want them to spin freely after all! Mine are printed in Made for Prusa Beige PLA.</li></ul><figure class="image image-style-align-center image_resized" style="width:50%;"><img src="https://media.printables.com/media/prints/319799/rich_content/3b46b294-91fd-4f2b-adc6-488a3b8c862b/22-11-19-at-09-19-56.jpg#%7B%22uuid%22%3A%2220985034-2cd5-4f33-8b14-e9dce8c374a3%22%2C%22w%22%3A1350%2C%22h%22%3A1080%7D"></figure><p> </p><ul><li><strong>THE REVO HUBS AND FINAL ASSEMBLY</strong><br><br>No actual Revo Nozzles were harmed in the making of this buggy, but the wheels and axles are hopefully sized to fit the real deal so if anyone is keen I'll add some grub screws to the axle shafts to hold them in place. (Serious offer!)<br><br>The hubcaps push gently onto the end of the axles, but a <i>little </i>superglue on the end of the axle (not enough to spill onto the wheels please!) will avoid intergalactic missing-wheel catastrophes. Hubcaps are printed in Galaxy Black Prusament PLA, with sharpie and poster paint colours, but I'm not too happy with the paint job so might fiddle with some paper cutouts or perhaps a two-piece hub.<br><br><strong>NEW HUBS V2 - NO PAINTING REQUIRED </strong>(If you have enough colours in your filament stash) - Print the hubs and fit the insulators from behind BEFORE fitting them to the wheels. These are MUCH nicer than my painted version.<br> </li></ul><figure class="image image_resized image-style-align-center" style="width:50%;"><img src="https://media.printables.com/media/prints/319799/rich_content/bad26c49-7553-4311-aeec-de982cba666b/22-11-24-at-12-27-35.jpg#%7B%22uuid%22%3A%22a9b253d1-d011-47c4-a040-732c0f07c667%22%2C%22w%22%3A1350%2C%22h%22%3A1080%7D"></figure><p><br> </p><ul><li><strong>REALLY IMPORTANT</strong><br>Have fun! <br> <br> </li></ul>
With this file you will be able to print E3D REVO MONSTER MOON BUGGY with your 3D printer. Click on the button and save the file on your computer to work, edit or customize your design. You can also find more 3D designs for printers on E3D REVO MONSTER MOON BUGGY.