E3D v6 hot-end mod for Da Vinci 1.0
thingiverse
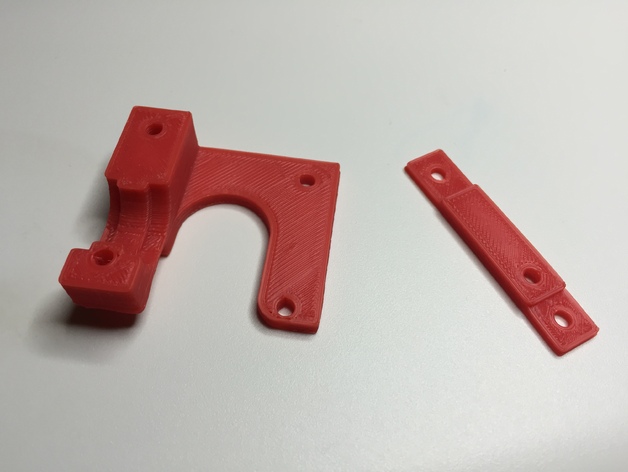
This is a remix of thing:608560, which performs well but in my opinion could benefit from a more robust assembly to enhance the stability of the hot-end and the carriage itself. I've modified the lower part and the spacer (which originates from the original v2 design). The upper part and the drilling template remain the same models found in the original v1 mod. Update: I've created a custom layer cooling fan duct to pair with this mod: http://www.thingiverse.com/thing:822476 Instructions Bill of Materials: E3Dv6 1.75mm Universal (Direct or Bowden), or the new Lite6 version. 2 x 30mm M3 screws (35mm would also work, I believe) and optionally a few washers. You want the upper and lower parts to be as stable as possible, so don't skimp on the infill, use 50% or higher. Use the drilling template to drill holes in the carriage that allow raising the stepper. This requires removing the X carriage, for which you'll also need to detach the left Y carriage from its rod (just pull it off). Then unscrew the stepper motor from the carriage, place the drilling template lined up with the existing holes and drill the 3 missing ones. Finally, use a utility knife or something similar to make a semi-circular cut into the plastic of the carriage, as shown in the picture of thing:608560. This is required for the stepper to fit on its new position. To reduce friction at the pivot of the metal bracket that holds the idler wheel, I recommend adding a washer like in my picture (I simply super-glued it to the plastic). Assemble everything back tightly and make sure the stepper's gear is well aligned with the throat of the E3D. Depending on your printer's accuracy you might need to sand or shim the lower part for this. The short PTFE tube going down to the gear that you can see in the pictures is optional but highly recommended to facilitate filament loading. To install this, I used a soldering iron to soften and widen the tube and then applied super-glue. The breakout PCB board may be attached in various ways. Mine is simply zip-tied for now, but I'm working on another piece to do this better. Update: A little while ago I designed a custom holder for the breakout PCB, which is nicer than having it just zip-tied. I've uploaded the model, which could be easily extended to even make use of the filament sensor, should anyone ever want to do that. However, as of today I've just gotten rid of this PCB -since it's not actually necessary- and made straight connections for the fan and the thermistor using quick-release connectors. See the pictures with and without it. Read the volvivo thread below (page 4) to find out the wire mapping (warning: the 1.0 and the 1.0A use different wires and/or colors for each thing!) You may find more details about installing this mod in this thread over at the Voltivo forum Also, check out this amazingly detailed step-by-step installation guide on YouTube that someone has made!
With this file you will be able to print E3D v6 hot-end mod for Da Vinci 1.0 with your 3D printer. Click on the button and save the file on your computer to work, edit or customize your design. You can also find more 3D designs for printers on E3D v6 hot-end mod for Da Vinci 1.0.