E3D V6 Hot end Mount for Ormerod
thingiverse
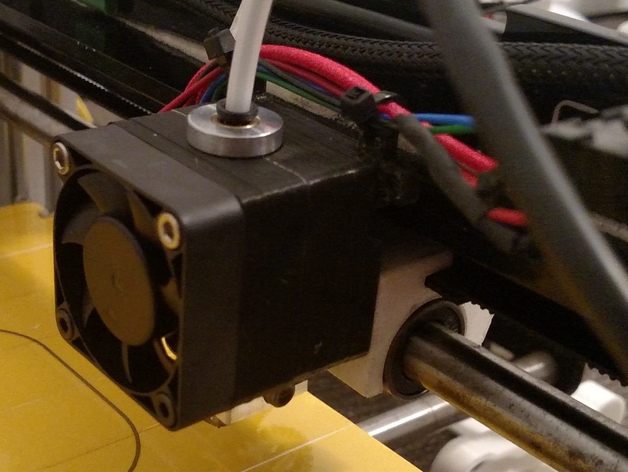
Mount for ED3's V6 all metal hot end for RepRapPro's Ormerod 3d printer. It is a direct replacement for the standard Ormerod hot end. No Z axis height is lost switching to this mount. The assembled hot end with a 11x40mm fan installed measures 42x40mm and weighs 83g. The Stock Ormerod Hot end with it's 20x40 fan Measures 52x58mm and is 96g. A 35% infill was used for both hot end's printed parts. The V6 assembly is both smaller and lighter then the standard Ormerod hot end. I have had no issues in testing. Printing at 180c for PLA there was no visible effect on any of the mount parts. I have not printed any ABS, however I kept it at 250c for 1 hour and there was no visible change on the PLA mount, however I still suggest printing the mount in ABS if you will be using higher temps. Instructions 1x E3D V6 hot end 1x 10x40mm fan 2(4) M3x40 cap head screws(2 recycled from stock hot end) 2(4) M3 Nuts 2 M3x12 Countersunk screws(recycled from stock nozzle mount) E3D-v6 All Metal HotEnd Instructions for assembling and commissioning the E3D V6 can be found here http://e3d-online.com/E3D-v6-Assembly. I highly recommend completing this before installing the V6 on the printer. Use the follwing line in your config.g file to configure the Duet to use the Semitec 104GT2 thermistor that comes with the V6 kit. M305 P1 T100000 R1000 B4267Users with the updated Duet with 4k7 thermistor series resistor will need to use a R value of 4700 The M305 command is only supported in Firmware Version 0.78c or higher Duet Firmware Ensure you are running version 0.78c of the RepRap Firmware or newer. The latest version is available at https://github.com/reprappro/RepRapFirmware . There are various forks available. I personally use DC42's Fork. Mount First print the Nozzle mount and Fan duct. Remove the old hot end and nozzle mount while retaining the M3x40 screws and M3x12 counter sunk screws you will need these for the new assembly. Take the new Nozzle mount and place 4 M3 nuts into the captive slots on the back. Then using the M3x12 screws, mount it to the X carriage. Take the E3D V6 hot end and and place it into the fan duct, ensure you have your wires on the desired side of the assembly(Tie holes are on both sides of the nozzle mount). place the fan on the flat side of the fan duct and insert the 3Mx40 screws, align it with the nozzle mount and push them through to engage the M3 nuts. Tightening the screws will secure the parts around the hot end.
With this file you will be able to print E3D V6 Hot end Mount for Ormerod with your 3D printer. Click on the button and save the file on your computer to work, edit or customize your design. You can also find more 3D designs for printers on E3D V6 Hot end Mount for Ormerod.