E3D V6 improved fan adapter with modded Prusa MK3 Layer Cooling
thingiverse
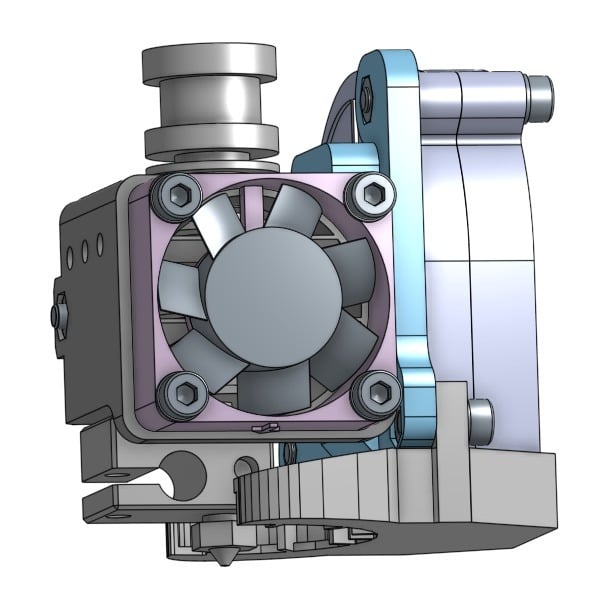
### 2018-09-07 update: This major update has been months in the making (on and off). A further delay occurred due to switching from Onshape to Fusion 360, resulting from Onshape's change of terms. Many sacrificial prototypes were necessary, along with calculations and modeling, which included a new 30mm fan adapter and nozzle/layer fan outlet. * New 30mm fan clip (v3.50) - Significantly improved cooling of the lower part of the heatbreak results in smaller retractions, less heat-creep, and faster times to ambient temperature. The main improvements are: 1. A more optimized air-flow cone maintains a low footprint and weight while maintaining a strong structure. 2. An added venturi effect tunnel provides better cooling of the heatbreak. 3. Indexing/insert tabs were added - The model can now grip the heatsink (even without a screw) and is always indexed at the same height. Print settings: 0.2mm layer height, 0.4mm extrusion width, 15% infill, 4 perimeters. * A left-handed version will be provided over the next few days. * A new nozzle/layer fan outlet (v3.5L3) - Improved airflow is divided into different height levels based on direction. The front part aims higher, just below the exit of the hotend, while the sides are dispersed jets aimed downwards and forwards. I recommend printing this in ABS or PC/Nylon X as it's longer outlets means it is exposed to more heat (I have printed without a silicone sock for testing purposes - but I do recommend using one). Print settings: 0.12mm layer height, 0.4mm extrusion width, 15% infill, 4 perimeters. ### Original post: After encountering problems with retractions on my E3D V6 and going through a rigorous testing process, I reached the conclusion that there is a problem with the standard cooling. If attached as intended - most of the airflow goes to the upper part of the heatsink which is not very practical, as it causes the transition zone to be higher than it could/should be. After designing a few fan holders and playing with the direction of the air - I settled on this design. It blows air to the lowest part of the heatsink and where the throat contacts the heatsink. This allows you to do shorter retracts (at least in my experience), and has eliminated any problems I was having with PLA related clogs due to the full metal path. I then wanted to try a few different layer cooling solutions. I started with the excellent Fang by Lion4H (he was kind enough to supply me with a modded version for my earlier testing). You can check it out here - https://www.thingiverse.com/thing:2175956 and I highly recommend it for anyone trying a first layer cooling solution above all others. My only problem with it, was that it was too focused - meaning that printing an extreme small overhang at faster speeds caused the problematic areas to receive very little wind for a very short amount of time. So I went in search of other solutions (Diii, Ciii, Prusa MK2, etc...) but none were giving me good results when printing at 100mm/s and above. When the Prusa MK3 was released I immediately started testing with it's new cooler - and after a few modifications (for better airflow, and a stronger connection mainly) I settled on something I was happy with. Being a big believer in open-source, I'm sharing the complete design via Onshape - so you can basically do with it as you will (within the limitations of the license - which is very permissive). The fan holder was modeled in Fusion 360, and so was imported as a step file into the design. I hope to have the time to re-create the model in Onshape and to then replace that current import. You can check it out here - https://cad.onshape.com/documents/fa9d2c92fc5fa4cfced6d32c/w/724d95ccf4edcc5b3c95359c/e/ec243d25a6057a7f96d04ce0 .step files are also provided for easier modifications, and if another file format (supported by Onshape) is needed - please let me know. I also have an adapter plate for that fan holder that fits with the radial Fang - if there's interest I can release that as well.
With this file you will be able to print E3D V6 improved fan adapter with modded Prusa MK3 Layer Cooling with your 3D printer. Click on the button and save the file on your computer to work, edit or customize your design. You can also find more 3D designs for printers on E3D V6 improved fan adapter with modded Prusa MK3 Layer Cooling.