E5GCC Ender5 Glass Corner Clamps
thingiverse
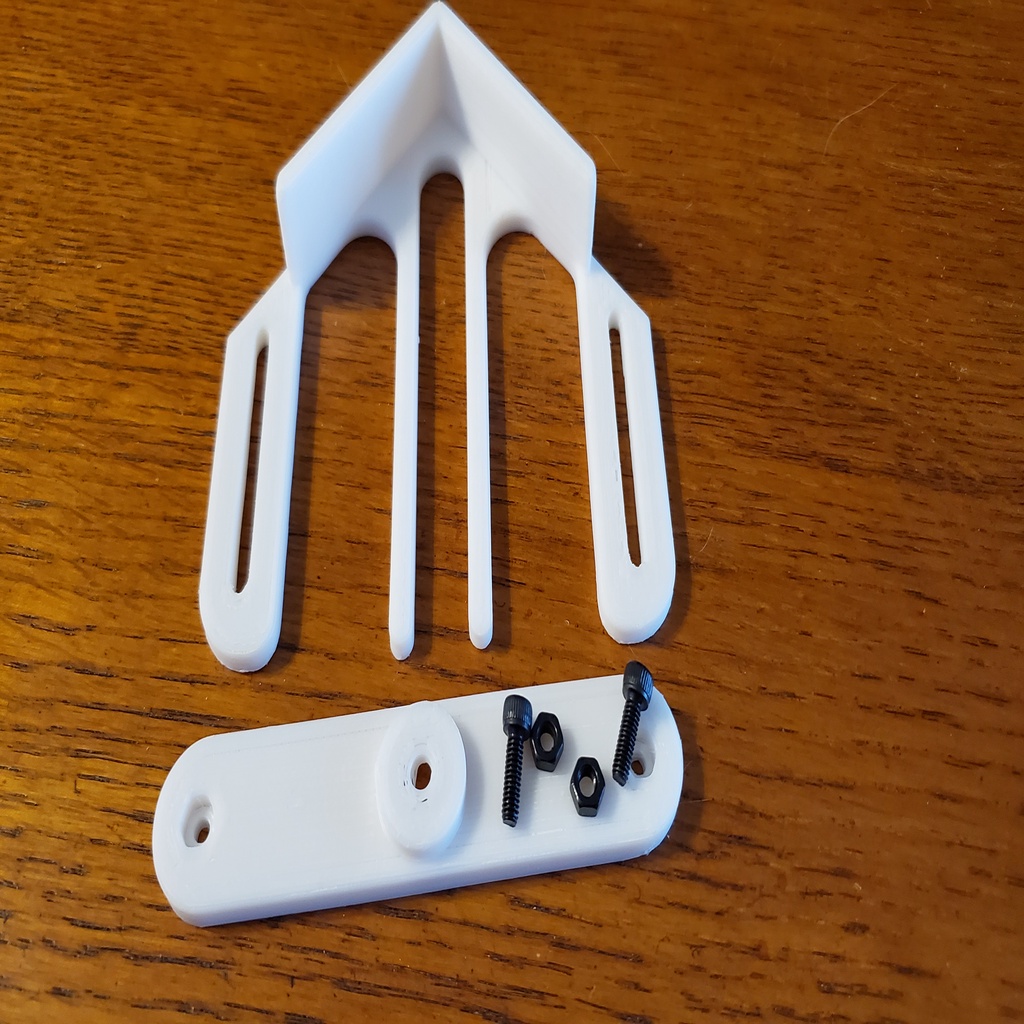
Do you want a glass/mirror/other print surface and HATE those paperclips? Do you want to use UNCUT 300x300 or 12inx12in glass/mirrors of various thicknesses? Do you want to be able to securely hold your print surface and swap to an alternative one or size? If you answered YES at least once, you're in the right place! (Quick note: Most of the pictures show an early prototype of the Adjustable corners, but everything assembles/functions the same). This thing was specifically designed for the original Ender 5 - I have no idea if it will fit Ender3's or any other printer. Since I'm still learning Fusion360, the corner piece is not a clean loooking as I'd like but it is fully functional. Additionally this thing will fit with stock, yellow or red upgrade springs (which I highly recommend if you don't want you bed knobs moving after you level the bed). https://www.amazon.com/gp/product/B013G5V9O6/ref=ppx_yo_dt_b_asin_title_o03_s00?ie=UTF8&psc=1 If you want increased hotend visibility, you can also install the outside version of my Ender 5 Visible Hotend #2 - E5VH2 thing. (The inside version will not work). https://www.thingiverse.com/thing:3760726 On to the the thing at hand... * Remove your bed leveling knobs then gently removed you print bed assembly. * If necessary superglue your bed/knob screws to the plate, they were basically taped in place on my machine. * Insert the M3 nuts into the Oval Mounts - Tighten down with your screws if you print is too snug. * Install the oval mounts between your springs and the under bed surface at approximately 45 degrees. * Snug up your knobs. * Slide one of the rear Corner parts onto your printer. I'd suggest starting with the rear right corner with the heated bed wires. If you bought 2 hex head screws on the hole closer to the center. Loosely insert both screws for now. * Set your mirror/glass/etc onto the heated bed. Be sure to remove the stock flexible sheet. You can leave the magnetic sticker in place if you want. * Install the other 3 corners loosely. * Adjust the clamps in towards you mirror. Snug one corner. Push the mirror towards that corner and hold the opposite corner tight while you snug those screws even tighter. * Do the same with the other 2 corners. * Wiggle you corners/mirror to get it centered/squared and not hitting anything. * While pushing on opposite corners, snug down those corner pieces but don't break your printed parts. * MANUALLY BRING YOU PRINT SURFACE UP TO THE LIMIT SWITCH AND ADJUST THE SMALL KNOB. * RELEVEL YOUR BED. * Don't blame me if you crack your mirror or damage anything because you forgot those 2 steps. * Enjoy your Ender5 with a 235x235 upto 300x300 print surface. NOTES: This does not increase your print size or the heat zone. The outer edges of a 300x300 mirror get warm but NOT hot. This mod does not require any cutting or permanent modifications. BONUS: You can zip tie your heat bed's wires to the corner assembly as your wire strain relief. This Thing fits with my current Ender 5 mods and will fit with future ones as well. P.S. This thing perfectly fits MY machine. Manufacturing, machining and assembly tolerances may require some filing of the plastic Clamps.
With this file you will be able to print E5GCC Ender5 Glass Corner Clamps with your 3D printer. Click on the button and save the file on your computer to work, edit or customize your design. You can also find more 3D designs for printers on E5GCC Ender5 Glass Corner Clamps.