Eachine E010(S) TX04 Camera Holder
thingiverse
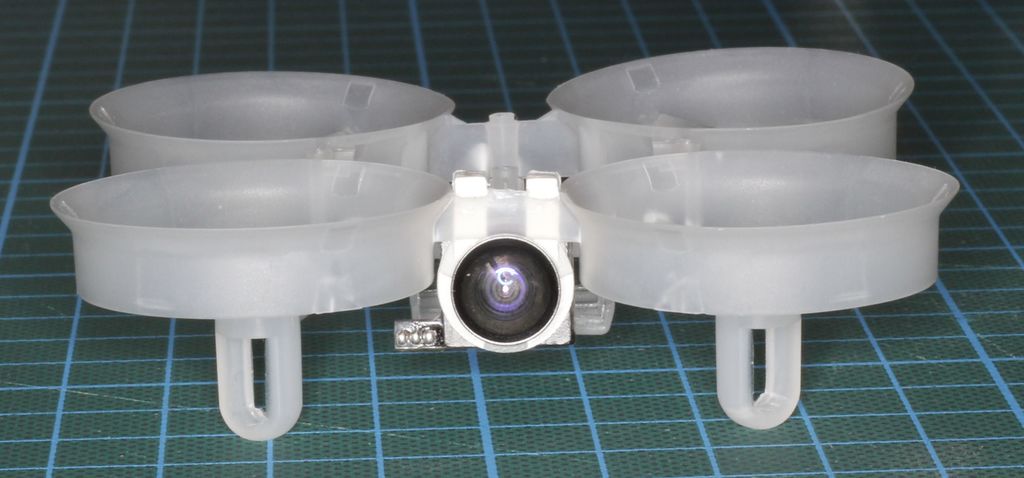
### Eachine TX04 Camera Holder for the Eachine E010 frame A Camera Holder for the Eachine TX04 camera (FPV) to be mounted between the ducts of the Eachine E010 quadrocopter frame. (The E010 / E010S / E010E are all the same frames) The angle at which the camera is mounted can be configured freely, in the pictures i use a 5° mount. This is meant to be printed on a FDM printer with PLA filament and it weighs 0.2 grams. The goal is to mount the camera as protected as possible and as center as possible on the frame, while allowing for different camera angles. For this the Eachine TX04 camera is seemingly perfect, the boards are separable while the camera module itself is as small as possible. Note that the camera will show a little bit of the frame ducts in the picture, but it is really only a very small part of the picture. #### PLEASE READ THE FOLLOWING This is a very challenging print: * You will need skills in printing, soldering, cutting, gluing and overall handling small parts * If your printer strings the cleanup can take a lot of time * Everything you will handle is incredibly small * The camera can be easily destroyed if you are not careful enough (The camera has SMD parts that are smaller than a millimeter!) * Soldering the wires is challenging in itself, you will need a very fine soldering tip (Max. 1mm) * The transmitter board needs to be attached between the battery holder and the controller board * Everything needs to be mounted backwards on the frame since the bar that is used to attach the camera is on the backside of the frame * Please check if your board can be mounted backwards BEFORE you do anything else. (My E010S board works perfectly backwards). If yours does not fit backwards i suggest buying the "Eachine Beecore F3_EVO_Brushed (has no telemetry)" or the "ACROWHOOP V2" board instead. #### What to do 1. First you need the holder itself, it is a fast 9 minute print in fine print quality. 2. Clean any stringing up, take special care of the parts that grip the frame itself, since they are overhangs which cannot be printed with support your printer will most likely print 1 or 2 layers of garbage there, you have to clean up the groove with a scalpel or other fine knife 3. Try on the holder onto the camera lens, you should be able to bend it open to snap it over the neck of your lens 4. The lens clips should grab directly under the widest part of the lens, if the spacing is off change the corresponding setting in the OpenSCAD file and re-print the holder 5. Now try to attach the holder to the frame itself, it should be a tight fit while not bending the frame bar too much, if it does not fit correctly change the corresponding setting in the OpenSCAD file and re-print the holder 6. Separate both boards of the camera carefully with "Flush Cutters", DO NOT use normal thick wire cutters, they smush the material more than really cutting anything, alternatively you can de-solder the pins holding the two boards together 7. Cut off the upper lip (The one with two solder pins, NOT the one with three solder pins) extending off the camera board like shown on one of the pictures above, again best use Flush Cutters here 8. Solder a 3-wire cable between both boards in the length you need (Something around 2.5 cm, don't cut them too short), BE CAREFUL of the order of the wires, otherwise you fry your camera! 9. Attach the camera to the frame as shown above, glue the transmitter board on top of the battery compartment with double sided tape, or if you are adventurous try hot glue (Although the transmitter gets pretty hot) 10. Re-attach your motors and your controller board BACKWARDS. That means that the new "forward" is now pointing to the original "backwards" side of the frame. Your controller board will only attach with 3 screws. To attach the controller board it can be a good idea to use anti-vibration rubber stand-offs, you can get them from Banggod if you search for "E010S" ### I destroyed My copter / My camera / My fingers / My whatever, what now? I am sorry to say it, but you are on your own. I will and cannot give any guarantees or further help at all. Ye have been warned! ### Have fun tinkering!
With this file you will be able to print Eachine E010(S) TX04 Camera Holder with your 3D printer. Click on the button and save the file on your computer to work, edit or customize your design. You can also find more 3D designs for printers on Eachine E010(S) TX04 Camera Holder.