Easiest Clay/Paste Extruder
thingiverse
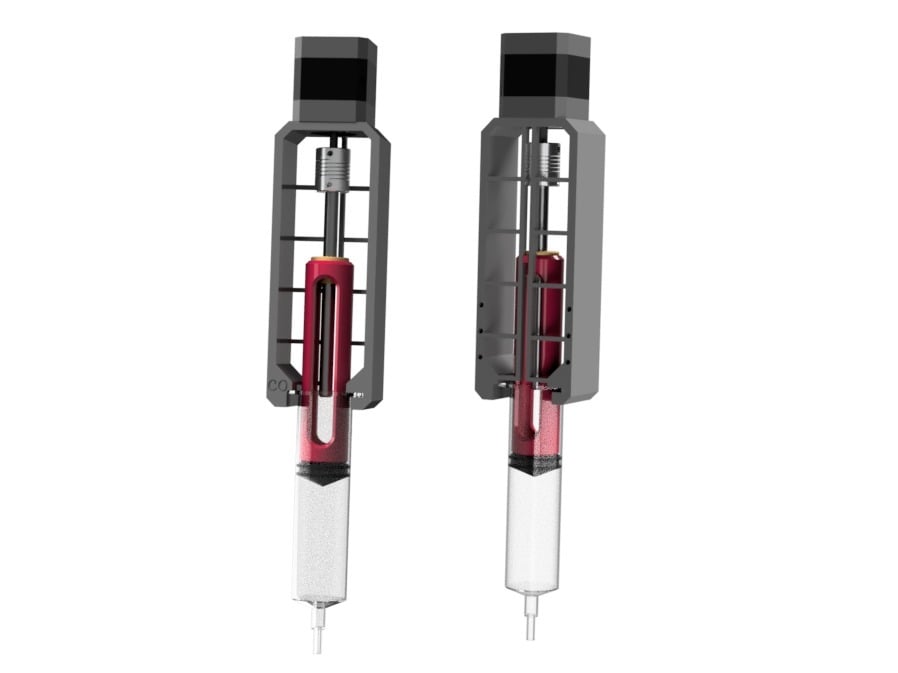
## **Preface** This clay/paste extruder is part of a video series ([part 1](https://youtu.be/Q3A4NqTPOYY) & [part 2](https://www.youtube.com/watch?v=Pr8Ii3d5fqI)) which I've published on my YouTube channel. I recommend watching the video to understand how these parts are meant to be used, although it should be pretty straightforward. --- ## **What is this thing?** This is an extruder with which you can print anything that has the viscosity similar to toothpaste or peanut butter. It's intended use is to print clay with, but you can also have a lot of fun printing with pancake batter or nutella. That octopus from the pictures is printed with peanut butter, for example. --- ## **Design goal** The main design goal of this extruder was to make it as simple as possible to print, to assemble and to use: Only two printed parts are needed plus a mount to mount it to your printer, which you will likely have to design by yourself. A mount for my [Transform3r 3D Printer](https://www.thingiverse.com/thing:3092418) is provided. You will not have to change anything in the firmware. Only some slicer settings will have to be changed. --- ## **Bill of Materials** * Nema 17 stepper motor (~10€) * 130mm T8x2 lead screw (single flute, 2mm pitch, 8mm diameter) with brass nut (~10€) * 5mm to 8mm shaft coupler (~4€) * 60ml FREKA CONNECT ENLock or ENFit Syringe (from Fresenius Kabi) (~1,50€) --- ## **What to print?** You'll have to print the plunger (Plunger_vxx.stl) and the frame (Frame_vxx.stl) plus a mount to mount the extruder to your printer. If you're using an ENFit Syringe, you can attach a 3D printable nozzle (FREKA_ENfit_Nozzle_vxx.stl). The nozzle diameter is 1mm and can either be drilled to the size you want or changed by within the file, because the F360-File is provided. --- ## **Setup** * The mechanical setup is shown in my video and can be derived from the pictures * The motor cable has to be plugged in where the regular extruder motor is usually plugged in * At 10:16 I show how to calculate the extrusion multiplier/flow rate which you will have to change in your slicer. If you don't feel like calculating, you can also change the extrusion multiplier with trail and error. Slicer settings: * Change the extrusion multiplier/flow rate * Set your nozzle diameter to the diameter of the nozzle that you're using * Edit the start-Gcode to prevent the printer from Z-homing (;G28). You will have to home manually. If your printer is moving into a strange direction when starting the print, try adding G92 X0 Y0 Z0 to your start-Gcode. That will set the current stepper positions to 0. * Adjust things like layer thickness & speed
With this file you will be able to print Easiest Clay/Paste Extruder with your 3D printer. Click on the button and save the file on your computer to work, edit or customize your design. You can also find more 3D designs for printers on Easiest Clay/Paste Extruder.