Easter Egg Maker 2016 for Customizer ("Egg-O-Matic")
thingiverse
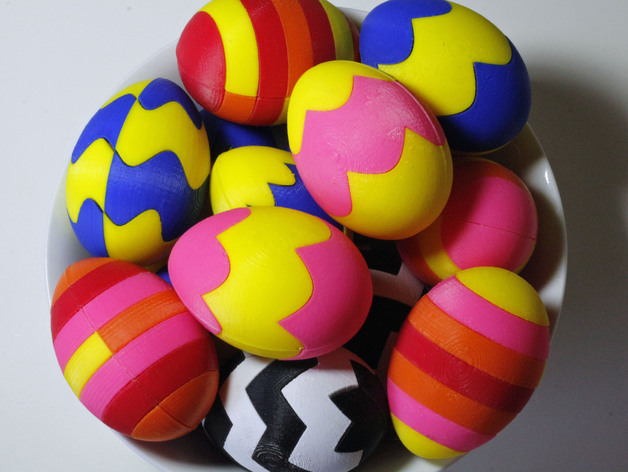
Easter Egg Maker 2016 - "Egg-O-Matic" "It Slices!!! It Dices!!! It makes fancy colored Easter Eggs!!! Try THAT with a brush and roller. Here's Easter Egg Maker 2016, "Egg-O-Matic" for customizer and OpenSCAD. The great thing is you can make MULTI-COLORED eggs on any printer. For example, to make 2 color eggs, you would print the SAME stl file twice, once in each color. Swap the pieces around and you'll have enough to make 2 eggs in 2 colors. You can swap the pieces around a lot of different ways depending on the number of cuts. How to Use Egg-O-Matic in Customizer Step 1 - Adjust the size and shape - the default settings are for a standard 60mm hen's egg. If you're making Easter eggs, go straight to Step 2. If you want to make other sized eggs or other shapes, check out the 'Size and Shape' tab. You can adjust the settings to get anything from a perfect sphere to a blimp in exactly the size you need. Step 2 - Choose how many pieces. First, decide how many cuts you want on the long axis of the egg. The more cuts take slightly longer to print and are more complicated to work with. For kids, stick to lower numbers. For more cuts, consider making the egg a little bigger. Step 3 - Choose a cutter. You have three different style cutters: flat, linear, and radial. The flat cutter is best for making stripped or checked patterns. The linear cutter moves in a straight line and produces unusual patterns on the egg surface that aren't the same all around the egg. The radial cutter produces the same pattern all around the surface. Step 4 - Choose a wave pattern for making cuts. Pick from sine, abs(sine), tri, saw, or square wave. You'll also need to choose how many cycles for the cutter to make and the amplitude of the cut. Tip: To make flat diagonal cuts, use the sine cutter with cycles set to 1 and adjust the AMP to control the angle of the cut. Step 5 - Choose how many cuts around the egg. This determines how many color changes you can have going around the egg. This is usually two for a bisected egg, but you can crank it up for a checkered egg and other effects. Keep in mind this multiplies the number of pieces and makes each piece smaller. Please post your creations so we can start a library of designs. Let us know if you have any problems or requests. For those interested in learning how this works, I'll be putting a code walk-through up on my blog at ricswika.com over the next few days. HAPPY EASTER 2016!!!! Version 1.3.28.0 - Centered absin wave so pieces are more even on that setting
With this file you will be able to print Easter Egg Maker 2016 for Customizer ("Egg-O-Matic") with your 3D printer. Click on the button and save the file on your computer to work, edit or customize your design. You can also find more 3D designs for printers on Easter Egg Maker 2016 for Customizer ("Egg-O-Matic").