Easy backlash calibration (experimental)
thingiverse
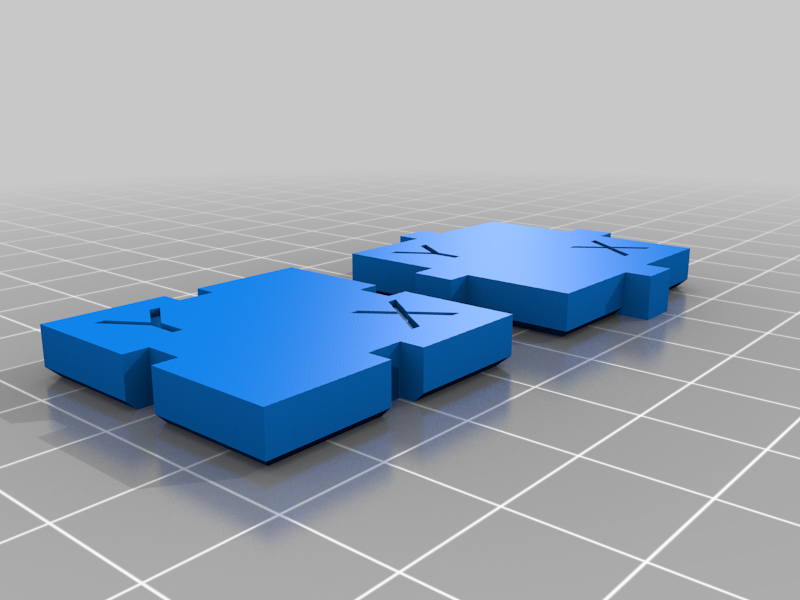
I've been building and developing my Dollo3D printers for over two years, using both extensively to print functional parts with loose tolerances. However, I recently started noticing inconsistencies, particularly in circles, which led me to explore backlash compensation. To combat backlash, I needed to determine its amount, so I looked at Thingiverse's offerings related to backlash. As usual, a design idea had already formed in my mind before trying any existing solutions. Keep in mind that this is still an experiment, as I've only tested it on one printer, which may have other factors affecting the results. Results show 0.1 on X and 0.25 on Y for the one printer I've tested, which seems sufficient for that machine. My backlash measurement involves two models: pro-backlash and anti-backlash. Both are basic cubes with added or removed pieces on each side. Pro-backlash is a model that exhibits backlash when changing print head direction at cube corners. The cubic indents ensure that the previous direction on the new axis has been opposite, requiring the head to deal with backlash. Anti-backlash is the opposite of pro-backlash, with cubic extrusions ensuring that the previous direction on the new axis has been the same as the new direction, accounting for backlash. To use this accurately, print the pro_backlash and anti_backlash models separately without backlash enabled. To save time, you can print them in the same print, which should also work. Measure both model's X and Y sides (they're marked on the models) and compare the results: pro_backlash should have less length than anti_backlash, with the difference being the backlash compensation needed. For best results, measure on both edges of each axis to account for travel moves and seams that might affect backlash. An extra verification step is to print the models with the applied backlash value. If my reasoning is correct, there shouldn't be any differences in length between the models' axes. Let me know if this works or not. My initial solution was a Python script generating print movements, but it turned out too cumbersome and probably wasn't as accurate, so I'm hoping this would serve as a quick and reliable method of backlash measurement. OpenSCAD source: https://github.com/spegelius/3DModels/blob/master/Calibration/backlash.scad
With this file you will be able to print Easy backlash calibration (experimental) with your 3D printer. Click on the button and save the file on your computer to work, edit or customize your design. You can also find more 3D designs for printers on Easy backlash calibration (experimental).