Easy Filament Dehydrator Remix
prusaprinters
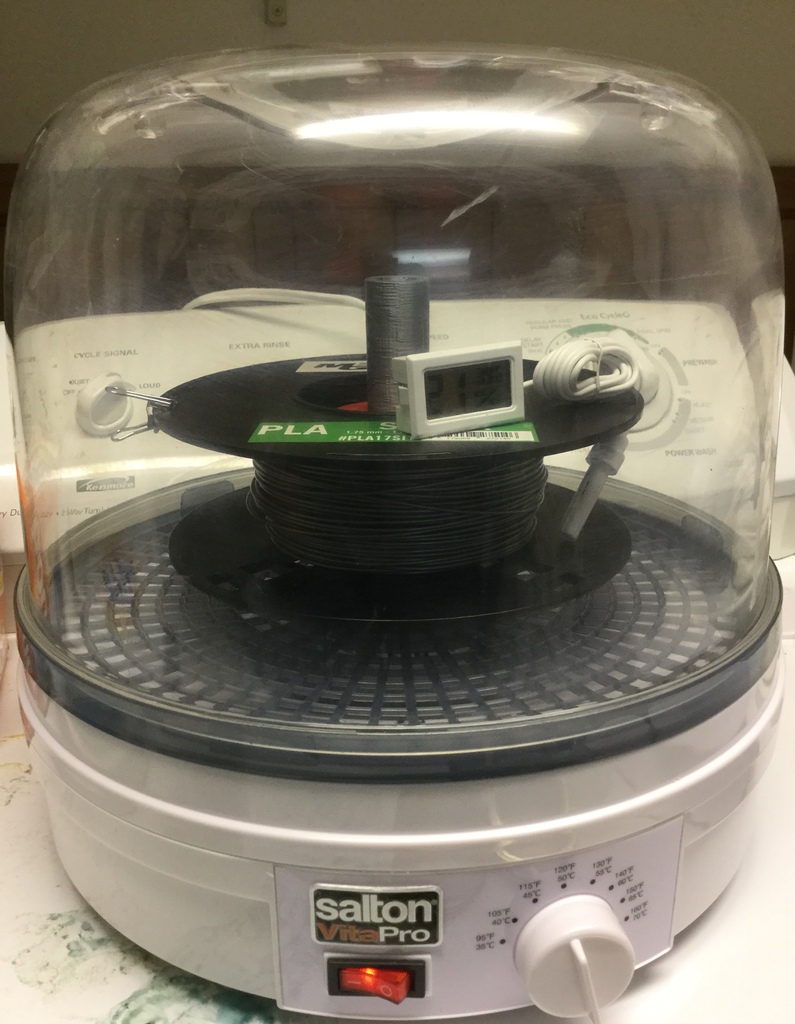
<p>I liked Thingismith's remix of Tinkerman's original design, but I also wanted to take advantage of the 26mm diameter reel inserts and spool holder on which I have standardized my own Ender 3 ecosystem.</p><p>In this remix, there is only one part to print and install to hold the filament reel, once you have the applicable pair of reel adaptors (ref my Thing: 3783495 or my Print 128653) installed on the reel to be dried.</p><p>NOTE: I also tossed-in a temperature and humidity sensor because I didn't trust the dehydrator vendor's temperature controls to be precise. It looks like my unit runs a little colder than the numbers on the dial, for instance. I could not find specifications for the temperatures at which the sensor will work correctly, so you may prefer to leave the meter outside the dryer & just run the sensor inside.</p><p>CAUTION: I used PLA to print my parts, because I only worked with PLA, at the time. If you work with filaments that need to be dried at higher temperatures, you may want to print the parts in PETG, ASA or ABS. (You may also want to use a different dehydrator, if this one does not go hot enough to dry those filaments.)</p><p>TIP: Take the handle off the cake carrier dome, to provide two vent holes. The dehydrator uses a fan to circulate air through the dryer.</p><h3>Print Settings</h3><p><strong>Printer Brand:</strong></p><p>Creality</p><p><strong>Printer: </strong></p><p>Ender 3</p><p><strong>Rafts:</strong></p><p>Doesn't Matter</p><p><strong>Supports: </strong></p><p>Yes</p><p><strong>Resolution:</strong></p><p>0.16mm</p><p><strong>Infill: </strong></p><p>20%</p><p><strong>Filament:</strong> MG Chemicals Premium PLA SIlver</p><p><br> </p><p><strong>Notes:</strong></p><p> </p><p>Needs support underneath both the base and the snoot. ZigZag worked well.</p><p>How I Designed This ===================</p><p>I first printed all the parts of Thing:2648645, then when I understood that design, I decided to combine a simplified version of my spool holder with Thingismith's base, eschewing all of the other parts except the snoot and cap.</p><p>My design simply mounts the 26mm diameter spool holder directly to the dehydrator, replacing the vendor's plastic plate. You can install it using 2x#4 1/2"" pan head screws, or ream-out a shallow 5/16" diameter countersink through the bottom layer at each of the two mounting holes and re-use the original 3/8" screws.</p><p>Thingismith's base thing includes a circular track into which the bottom tray sits. (I could have just left that tray out, since the cake carrier dome fits inside the dehydrator with room to spare, but I think the end product looks better with the bottom tray installed.)</p><p>The snoot will install exactly as it does in Thing:2648645, but I found that the original cap was too small to screw onto the snoot, so I scaled that thing up to 17.37mm in outside diameter.</p><h3>Purchased Parts</h3><p><strong>These are the parts I bought to assemble the dehydrator itself - just unbox and assemble</strong></p><p>Salton makes the dehydrator for several other brands, including Flexion.<br>I can confirm that a Better Homes & Gardens cake carrier dome fits like a glove onto the Salton VitaPro dehydrator.</p><p>I bought the cake carrier at a US Walmart, for $14.88 in the summer of 2019. <a href="https://www.walmart.com/ip/Better-Homes-Gardens-Round-Cake-Carrier-Clear/49239350">https://www.walmart.com/ip/Better-Homes-Gardens-Round-Cake-Carrier-Clear/49239350</a></p><p>I bought the Salton dehydrator from a Montreal Walmart, for $54.96 Cdn. <a href="https://www.walmart.ca/en/ip/salton-vitapro-food-dehydrator-dh1454/6000187742641?cmpid=sem_google_en_pla_none_868526848_42591590806_None&gclsrc=aw.ds&&gclid=EAIaIQobChMIsdTJ5Jbk4wIVx5yzCh0YPgBhEAYYASABEgKz-_D_BwE&gclsrc=aw.ds">https://www.walmart.ca/en/ip/salton-vitapro-food-dehydrator-dh1454/6000187742641?cmpid=sem_google_en_pla_none_868526848_42591590806_None&gclsrc=aw.ds&&gclid=EAIaIQobChMIsdTJ5Jbk4wIVx5yzCh0YPgBhEAYYASABEgKz-_D_BwE&gclsrc=aw.ds</a></p><p>Optional: I also bought a couple of self-contained PM-35 Temperature/Humidity sensor-display units from Abra electronics, to monitor the dehydrator's performance. They seem to work at 40+deg C, and they offer a bit of insurance against the risk of a faulty or inaccurate thermal control on the dehydrator. <a href="https://abra-electronics.com/test-equipment-tools/meters/digital-panel-meters/pm-35-digital-thermometer-with-lcd-display.html">https://abra-electronics.com/test-equipment-tools/meters/digital-panel-meters/pm-35-digital-thermometer-with-lcd-display.html</a></p><h3>Updates</h3><p><strong>Dec 2019 - Add 4 slots at the top</strong></p><p>I have had a few months using this dehydrator, now. I was having trouble seeing much improvement printing filament that I had “dried”decided the two small screw holes from where I removed the handle from the top were probably not sufficient to ensure exhausting of the moist warm air. After studying the original dehydrator lid, I decided to carve four exhaust slots of 1/4”x 1” each around the edge where the walls curve into the lid. Now I am seeing a clear improvement when drying PLA and PETG.</p><p> </p><p> </p><p> </p><p> </p><p>Category: 3D Printer Accessories</p>
With this file you will be able to print Easy Filament Dehydrator Remix with your 3D printer. Click on the button and save the file on your computer to work, edit or customize your design. You can also find more 3D designs for printers on Easy Filament Dehydrator Remix.