Easy Mendel Open Y Carriage (w detachable print bed)
thingiverse
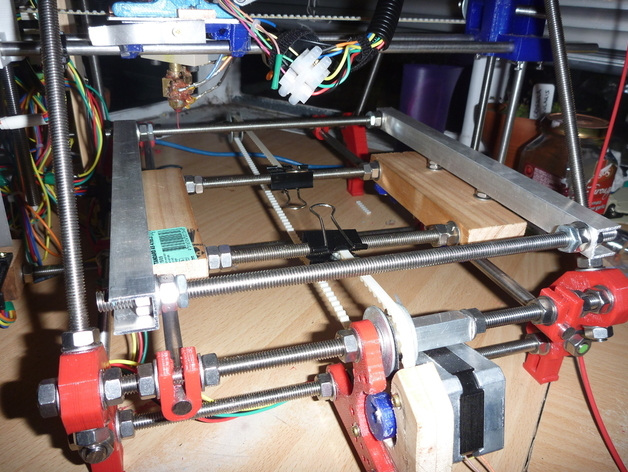
This open Y carriage is "designed" to allow an ordinary clothes iron to be used for heating the bed. It can be easily removed (when cold), plus it makes connecting and tensioning the y axis belts heaps easy. Originally, I had a few more ideas of where it was going, but as I don't have many special tools, and I wanted to print more than bother too much, I ended up with this. As it has mainly been a hack without a clear path, I didn't take heaps of photos on the way. It would be easier to build with a drill press, although with a drill press there are probably better designs anyway. Tools required are a hacksaw and a hand drill. Steady hand optional. Instructions Need: about a metre of M8 threaded rod (or 5/16 or whatever else is left over) 24 M8 nuts (and some washers as appropriate) 2x 140mm 20mmx40mm wood M6 (or smaller) bolts/threaded rod, and at least 8 nuts about 500mm of U Channel Aluminium which holds M8 nuts snuggly in the "U" some 3mm aluminium sheet for print bed 2x 32mm Foldback clips 2x 19mm foldback clips Y Carriage bushings/bearings as normal. Cut four (4) M8 threaded to the length of the width of your print bed will be. For fun My Prusa frame vertexes are 250mm apart so I made these 240mm - but haven't figured out how to (or needed) use all that print area anyway. Cut two (2) sections of U Channel aluminium the length of your bed (me - 240mm). These could be shorter, but doesn't hurt to be this long. cut two (2) lengths of the 20mm x 40mm wood to 140mm. Drill holes at both ends of the U Channel. You can choose how best to do this. I find measuring once and drilling 2 or 3 times not an issue. That the nuts fit snugly into the U of the Channel means if you drill the holes too large they are automatically centred. to make sure they are mostly square I did drilled three ends and then bolted the end with two holes together so that the last hole lines up with its 'partner'. Do a similar thing with the wood pieces, making the holes travelling through the widest section of the piece - ie its a 40mm 'deep' hole. Once again with a hand drill this is a pain, but if you make the hole larger then nuts will square it for you. Connect the 2 pieces of U Channel together with threaded rod to make a square shape (top of "U" facing out - IMPORTANT), with two sets of nut on the inside to lock them in place. Do the same with the wood, making a rectangle. Since the lengths of threaded rod should be the width of your aluminium print bed, the U Channel and the wood should line up to some degree. Now line up your print bed with the U Channel piece and the wood piece. Adjust the nuts on the threaded rod such that the edges of the bed, the U Channel and the wood are flush and lock the nuts. Now line the two shapes so that the wooden part is centred down the length of the U Channel piece. Clamp with whatever is at hand. Put the print bed to the side for later. By eye (or "measurement" if you're like that), drill two holes into the wood, about 32mm from either end, such that as you go through the wood you will hit the U Channel at a point where your M6 or otherwise bolts will go and can fit a nut. For this step you might like to also consider how you'd like to level your bed. I tried using bolts and was considering springs, but talking to others it looks like the printer itself is pretty level and so the 'levelling nuts' and as low as they go are redundant, therefore the U Channel is bolted directly to the wood. Attach your bushing as you would normally. Generally mine fit between the vertical M8 threaded rod and the vertical M6 "levelling" bolts. Eventually I will replaced these with linear bearings, but is irrelevant. Now spread the y axis smooth rods apart until they are the distance of your bushings or bearing. Mine are about 190mm apart. Jam the Y Carriage on. Loop the y axis belts around the M8 threaded rod which holds the wood together and use the 32mm foldback clip around the loop to hold in place. Adjust as appropriate by loosening and reapplying the clips. Test it moves freely. Slid your aluminium print bed on. As we used it to align things before the U Channel will line up with the edge and using the 19mm fold back clips, attach. This could also hold glass as well with a larger foldback clip. Done-la. Almost... Eventually I will be (counter sink) bolting an iron to the bottom of the aluminium. I have a cheap one ($13 - the ones they sell to students). And I have been cutting the plastic parts off such that the 240V is protected, but fits in the space available. Maybe photos later. For the time being, as it is winter in Oz and the bed is too cold for the first layer to stick nicely, before I start, I sit an ordinary clothes iron on the top of the bed and let that heat up. This print bed is easily detachable for cleaning etc. With an iron attached it may be a little fiddley. A change of orientation of the M6 bolts or using threaded rod will allow the easy removal of the U Channel section. Although, it's not clear if there is a need for this.
With this file you will be able to print Easy Mendel Open Y Carriage (w detachable print bed) with your 3D printer. Click on the button and save the file on your computer to work, edit or customize your design. You can also find more 3D designs for printers on Easy Mendel Open Y Carriage (w detachable print bed).