Easy printing Electric Violin.
thingiverse
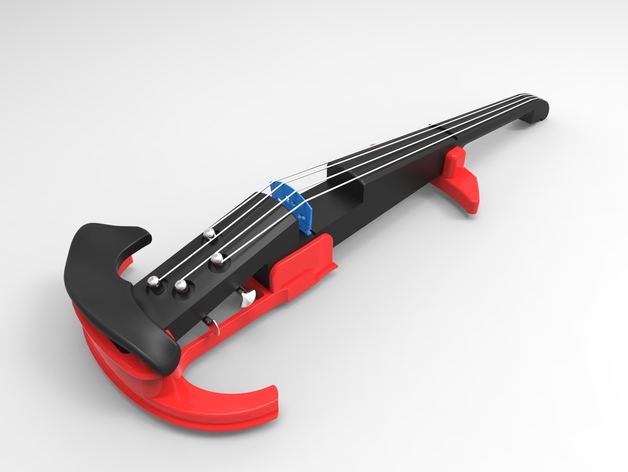
Thanks to Stepan83 for the Elviolin.http://www.thingiverse.com/thing:745940 its design has inspired me. In this version: I modified some parts to facilitate printing without supports I have given a different and modern look. And I've added a integrated chinrest support. All parts can be printed without supports, except for the chinrest Recomended printing parameters: 5 Shell thickness. 4 top down solid thickness. 20 to 30 % infill 0.20mm. layer heights. If you print on ABS filament, you can use acetone or PVC pipe glue to bind the parties. If you print on PLA, then use a epoxi glue. You can use a sanding papper and patching paste for automotive jobs to leave a smooth surface to paint on color of your choice. Dont forguet to use a primer paint before the application color. you can find on ebay the electronics. Find as electric violin pickup. Use a 9.5mm threaded rod as steel core to stronger the violin body. Instructions Instructionshttp://www.thingiverse.com/thing:745940/#instructions materials list: Printed parts - 6pcs bridge - 1pcs sound pickup - 1pcs electronic preamp - 1pcs guitar pegs - 4pcs metal rod M8x370 - 1pcs screws: m4x25 - 9pcs m4x50 - 1pcs m4x40 - 2pcs m3x8 - 4pcs (for pegs) m2x10 - 4pcs (for electronic preamp) nuts: m4 - 12pcs m3 long nut - 4pcs for hot installation in holes (for pegs screws) m2x10 - screws for electronic preamp I melt it directly in plastic
With this file you will be able to print Easy printing Electric Violin. with your 3D printer. Click on the button and save the file on your computer to work, edit or customize your design. You can also find more 3D designs for printers on Easy printing Electric Violin..