Zero slop/play magnetic CNC/3D printer pen plotter/adapter/holder V4
thingiverse
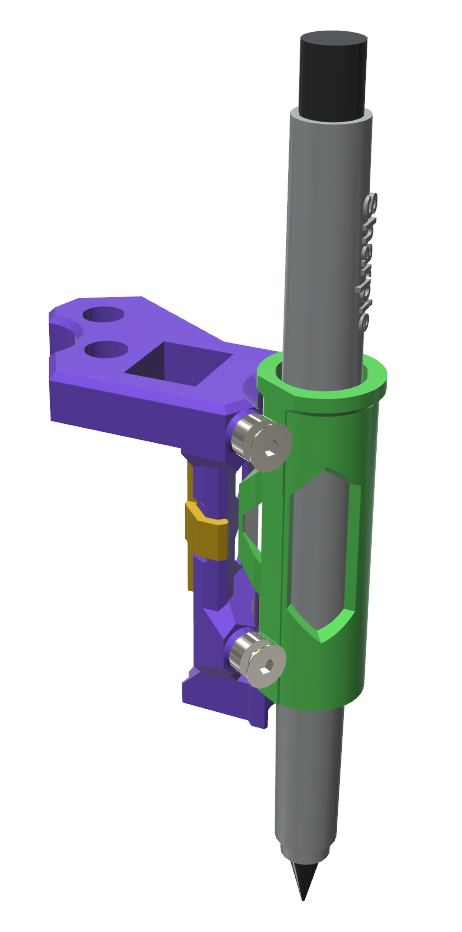
Zero slop/play CNC/3D printer pen plotter/adapter/holder V4 ============================================================ Magnetic version of https://www.thingiverse.com/thing:5253665 The pen sleeve is held against the four bearings by magnets placed in the main body and in the pen sleeve. The pen is gently inserted from the bottom of the round sleeve (the pens body is tapered) just enough so that it doesn't fall back out. The drawing pens I use are either a Sharpie ultra-fine tip permanent marker (0.65mm'ish line width) or a 0.3mm (or as desired) technical drawing pen that requires filling with ink (for fine PCB detail), but you can modify the pen sleeve design to suit whatever drawing pen you like. The main body can easily be modified to fit other printers/cnc's. This particular design fits directly onto the Anycubic Kossel Linear Plus delta end-effector. Ensure the 4 main body bearings are at the proper angles and nice and straight, otherwise the tube won't be as free to move up and down. Also don't tighten the 4 counter sunk bearing screws too much, otherwise the bearings won't rotate properly. I allow them to wobble ever so slightly (barely visible). 10% infill with 3 walls/top/bottom seems more than enough. Parts list: =========== 5 off 10mm * 5mm * 2mm, N42 (or stronger) rectangular neodymium magnet .. https://www.ebay.co.uk/itm/293605146143 or https://www.ebay.co.uk/itm/184762649535 or https://www.ebay.co.uk/itm/114837639106 etc 2 off M3 14mm hex screw (replace fixing screws to the print head/end effector) 4 off M3 12mm hex countersunk screw 4 off MR63ZZ, 3mm inner, 6mm outer, 2.5mm wide bearing 1 off Sharpie Ultra-Fine Tip (I use black) or such like 1 off M3 tap for threading the four holes for the bearing screws. Notes: ====== No M3 nuts are used, the plastic is threaded using the M3 tap after printing. Insert 4 of the 10x5x2 magnets into the back of the main body (or 8 if using the 1mm magnets), all south poles or all north facing the pen sleeve. Insert 1 of the 10x5x2 magnets into the pen sleeve (or 2 if using the 1mm thick magnets), south or north pole facing the main body depending on how you orientated the main body magnets. The main body magnets do there upmost to re-arrange themselves, so you'll have to be firm, patient and clever enough to out-wit them. I place another strong magnet where the pen sleeve normally sits to help hold the main body magnets in-place as I add them and then as I carefully push the holding clip over them. You could replace the main body magnets with a single 20mm*5mm*4mm N42 - if you can find one. but TREAT THE MAGNETS WITH RESPECT. THEY ARE STRONG, DEVIOUS, VERY HURTFUL and MAKE YOU BLEED ! You need to evenly and gently smooth the 4 flat areas on the pen sleeve that the 4 bearings touch so that it will slide up and down very smoothly, otherwise the ridges from the 3D printing will prevent smooth movement. Place a flat file on a table top and rub the pen sleeve along the file to achieve the nice flat sides. Take your time and all will be fine. To find the exact pen line width, I use a small gcode test file (Pen_Width_Test.gcode) which I've added to the rar file. Run the test with your pen in-place, then looking at the result under a magnifying glass, microscope, smart phone or whatever, count the number of lines back from the widest spaced end to the one that starts to touch it's neighbour line. Then look in the gcode test file to see what the pen line spacing was at that particular line.
With this file you will be able to print Zero slop/play magnetic CNC/3D printer pen plotter/adapter/holder V4 with your 3D printer. Click on the button and save the file on your computer to work, edit or customize your design. You can also find more 3D designs for printers on Zero slop/play magnetic CNC/3D printer pen plotter/adapter/holder V4.