Eclipson EBW-160 detachable wing parts
thingiverse
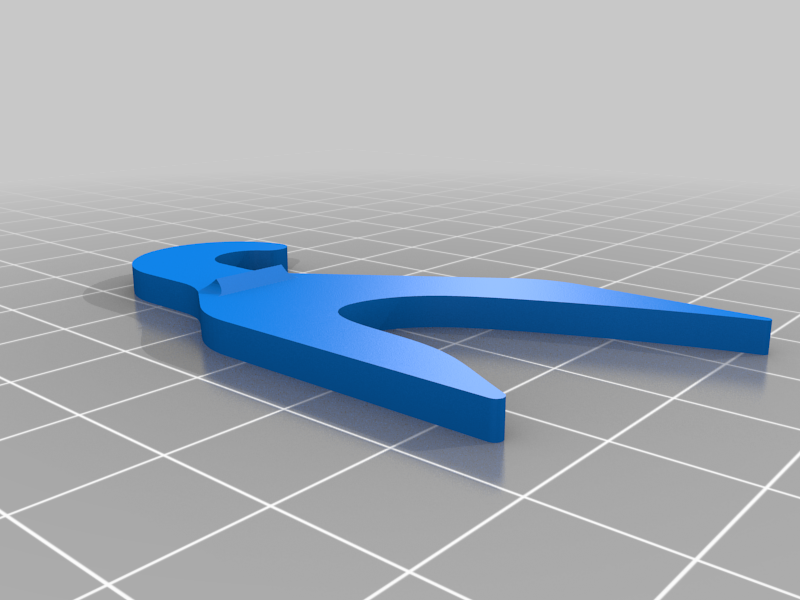
The EBW-160 has a 53" wingspan. This was to large for me. I needed to print this so that I could store and transport. *** Update *** Uploaded a new part to help stabilize near the fuse rear of the wing. Motor mount. I will redo this to a physical item and better print, but this will work. I also drilled a small hole to fit a pin through the CF wing support through the CF tube. This pin will hold the wings from "flapping". There was too much play in the CF support allowing the wing to move up/down. I also moved from a rubber band to a piece of rope, so there is no give in the tied pieces.. I did realize that I didn't need to tie the wings together now that there is a pin within each wing support. It will hold the wings together as well as support it. However I don't risk it. I still use the string to hold it together as a safe measure. Lastly I covered the camera hole. I tested both ways and didn't see a significant difference, but I still leave it covered. The three modifications worked just as if it were glued. The mods took away all the instability that it was having a max throttle and banking. for even more stability, I have sliced 10mm off the fuse on each side, and printed the 10mm strip in PLA. This took away more flex I was getting from the LW-PLA instability. ** Original ** I have take parts from another Eclipson model (MXS-R) and remade them to fit into the wing and fuse of the EBW. I have modified a 12mm strip from the wing3.stl to use as a "sleeve" where the wing meets the fuse. Motor_mount - 40% infill, top/bottom layers 4 CF_fitting_half - print using settings C from Eclipson CF_fitting_half_75P - print using settings C from Eclipson Hook - print 2 using settings C. Wing_3_L_sleeve - print using setting A and "spiralize outer contour" (under special modes) to ensure that the print is only the outer portion. Break off any extra items that get printed. Wing_3_R_sleeve - print using setting A and "spiralize outer contour" (under special modes) to ensure that the print is only the outer portion. Break off any extra items that get printed. CF_fitting_half gets placed before the fuse join. Align the straight edge to the back wall and the outer edge to the edge of the fuse. Match placement on the wing side. You want to make sure when the two pieces meet there is a little space as possible - none is best. CF_fitting_half_75P get placed as far to the rear of the fuse, matched on the wing side. Hollow CF tubes helps keep weight down: CF_fitting_half - takes a 8mm carbon fiber tube. Best if it is 8mmx6mm CF_fitting_half_75P - takes a 6mm carbon fiber tube. Best if it is 6mmx4mm Put a small bead of glue around the outside of the top of Wing 3. This will give adhesion when you slide the sleeve over. Slide the sleeve so that at least 50% over hangs the wing. This over hang will slide over the fuse when the two pieces meet. Glue the hook, fuse/battery access side up to each CF_fitting_half on the wing side. This will be held together by rubberband. Additional Access: I used the door hooks to attach to the wing cover. 3 on the front and 1 with handle on the rear. This allows me to access the CF tube fitting, if having trouble getting into place, without un/screwing anything **Optional: Use CA glue on the inside edge of wing3 to make the edge stronger and stand up better. Put a good bead of CA glue along the inside of the wing3 and let it dry. Make sure no CA glue over hangs the edge. This bead is to make the edge stronger to the wear and tear of taking off and putting on the wing. **Note: make sure not to test fit the wing while glue is drying. **Assistance Request: This takes 2 carbon fiber tubes to complete. It would be great if someone, who had better 3D knowledge, to create the tubes necessary to be printable in PETG or ABS. If there is someone that can help with this let me know so that we can either add to this mod, or link to the files. Bed Size: All Eclipson models are made printable on Ender3. The sleeve should fit on the plate with some bed adjustments. I am using an ender5 and had to modify the bed size to 224mm in order to get this to fit the wing3 stl. However, the sleeve alone should fit fine. Coming Soon: I am also printing modification series to this build. If it works better, I will post new STLs and directions. Wing 3 print split - I am noticing wear and tear on the LW-PLA with the constant separation of the wing. To better with-stand this I am going to print the bottom 40mm in PLA+ and the remainder in LW-PLA. This should give a stronger join between the fuse and the wing. V3 - Keeping the weight down: I am also going to try a V3 where the left and right side of the fuse are PLA+ and the rest is LW-PLA. This will make the join stronger but keep the weight down. This does create more pieces for gluing and aligning; but the end results is a beautiful wing, easy to store and transport! The benefit of this detachable wing version is that you can change up the fuse build and reuse the wings with each different fuse.
With this file you will be able to print Eclipson EBW-160 detachable wing parts with your 3D printer. Click on the button and save the file on your computer to work, edit or customize your design. You can also find more 3D designs for printers on Eclipson EBW-160 detachable wing parts.