EE Electrical Breadboard Cabinet Stackable Case - Parts - UPDATED Control Panel and Cabinet Wall Support
thingiverse
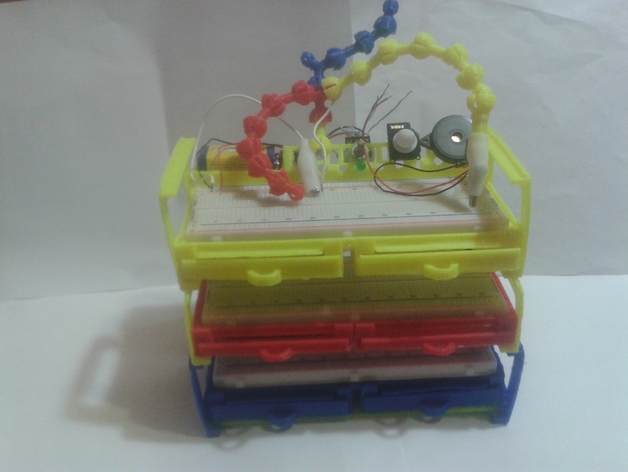
I've come across a variety of breadboards, blocks, and cases that could potentially meet my needs. However, I still haven't found one that's useful enough to make me feel comfortable with it. One option that does seem to fulfill my requirements is the foldable breadboard/Arduino case, which I also designed and printed myself. This setup includes a mounted breadboard, control panel for mounting parts, and spare parts case with drawers. The control panel is specifically designed for mounting LEDs, switches, potentiometers, and other components. To assemble this, you'll need the following parts: breadboard tray floor, two drawers, two standard center parts, two standard side parts, one control panel, and a glue gun. The two standard side parts are glued under the sides of the tray to serve as legs. The drawers are temporarily slid in to adjust and glue in the standard center parts at the bottom center of the tray. The control panel is then glued onto the rear of the tray. Once dry, the drawers can be slid back into place. For tentacle probes, you can refer to another project: EE electrical tentacle probes for EE and Arduino cabinet (1711909). These cases are also stackable, allowing you to create a shelving system. To do this, you can either mount stack legs on the board sides individually or build a cabinet to slide the tray-drawer boards into. To create a shelf, attach multiple stack legs vertically to the desired height and then horizontally using a bottom shelf with a support floor wall part in the rear. Finally, slide the boards into the shelves. I hope this setup proves useful! Printer Settings: * Printer Brand: RepRap * Printer: Mendel * Rafts: Doesn't Matter * Supports: Doesn't Matter * Resolution: 0.2mm - 0.8mm Nozzle Tips Notes: I printed these parts on a Mendel RepRap with 1.75mm fiber using a 0.8mm nozzle tip and 0.5mm layer height setting. You can use any nozzle tip from 0.2mm to 0.8mm without issues. Printing time ranged from 10-30 minutes per part, and rafts are recommended for these parts. Be cautious when removing the parts as they may be fragile. Post-printing: Some parts may have burrs that need filing to finish. If bolts seem loose, a glue gun can help secure them in place. How I Designed This: I used Tinkercad to design this setup and incorporated custom Meccano parts into my project. Custom Section: * 1669029 - Meccano Base Parts Plates Struts Angles * 1695615 - Geared Motors to Meccano Lego Conversion Parts * 1695691 - Motorized Robotics Kit Meccano Lego Compatible Parts * 1698141 - Shark Octopus Robotic Motorized Meccano Lego Compatible * 1698144 - Zilla Land Shark Robotic Motorized Meccano Lego Compatible * 1698145 - Robo Shark Motorized Meccano Lego Compatible * 1666009 - Meccano Insect Robot Parts 1 * 1686276 - Destroyer Droid Star Wars Meccano Parts * 1668041 - Meccano Robot Snake & Octopus * 1686260 - Millenium Falcon Star Wars Meccano Expansion Parts * 1686914 - Mega Millenium Falcon X Mutant Expansion Star Wars Meccano Expansion * 1668780 - Space 1999 Eagle Meccano Spaceship Parts Model * 1671229 - Space 1999 Space Station Meccano Expansion Parts Lost Plans
With this file you will be able to print EE Electrical Breadboard Cabinet Stackable Case - Parts - UPDATED Control Panel and Cabinet Wall Support with your 3D printer. Click on the button and save the file on your computer to work, edit or customize your design. You can also find more 3D designs for printers on EE Electrical Breadboard Cabinet Stackable Case - Parts - UPDATED Control Panel and Cabinet Wall Support.