Egg Bot - Ostrich Bot
thingiverse
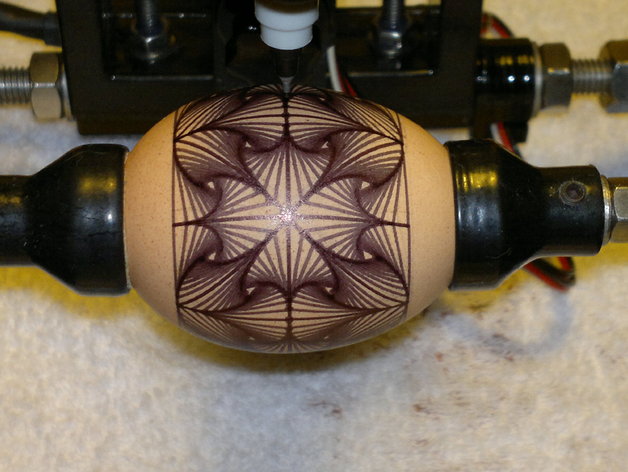
Introducing my version of EggBot, a 3D printable device with a 160mm diameter x 200mm length working range, controlled by EggBot's original electronics for motor and engraver functions. The design features EggBot Op Art dnewman (Thing: 7097), crediting Dan. Check out the videos here and here. To improve print quality, I split the external slider into three parts. Assembling the box involves screwing connectors at the back below the cursor, using 4-pin connectors available in electronics stores. Connectors for the engine are placed in the lid hole, while servo and engraver connectors are inserted into the box (3-pin and 2-poles, respectively). Engraver wires connect to the top screws on the pen arm, attaching to the arm's existing wires. The internal slider slides on a 6mm threaded rod, while the main structure requires 10mm x 430mm rods. Modify the engraver coupon for better fit on the left side by removing the existing hole and redoing it in the center. Replace the trimmer with a 100kOhm resistor, solder wires to a potentiometer (same value), and mount it on the lid covering electronics. A power LED, in series with a 620ohm resistor, is inserted into the hole above the potentiometer. Insert two plastic buttons into the cover holes for pressing the EggBoard microcard's reset and programming buttons. Adjust the spearhead knurled support to fit the arm by turning the original knurled support. Brass threaded bushings (3mm) are glued to the egg motor from the engine, while a right-handed 6mm thread engages the allen pivot. A 4mm bushing is placed in the support arm, and motor wires are fed into the hole below it. Note the left side structure's hidden wire passage for connecting wires and motor 2 wires. I hope these photos aid assembly. Enjoy!
With this file you will be able to print Egg Bot - Ostrich Bot with your 3D printer. Click on the button and save the file on your computer to work, edit or customize your design. You can also find more 3D designs for printers on Egg Bot - Ostrich Bot.