Egg Lathe
prusaprinters
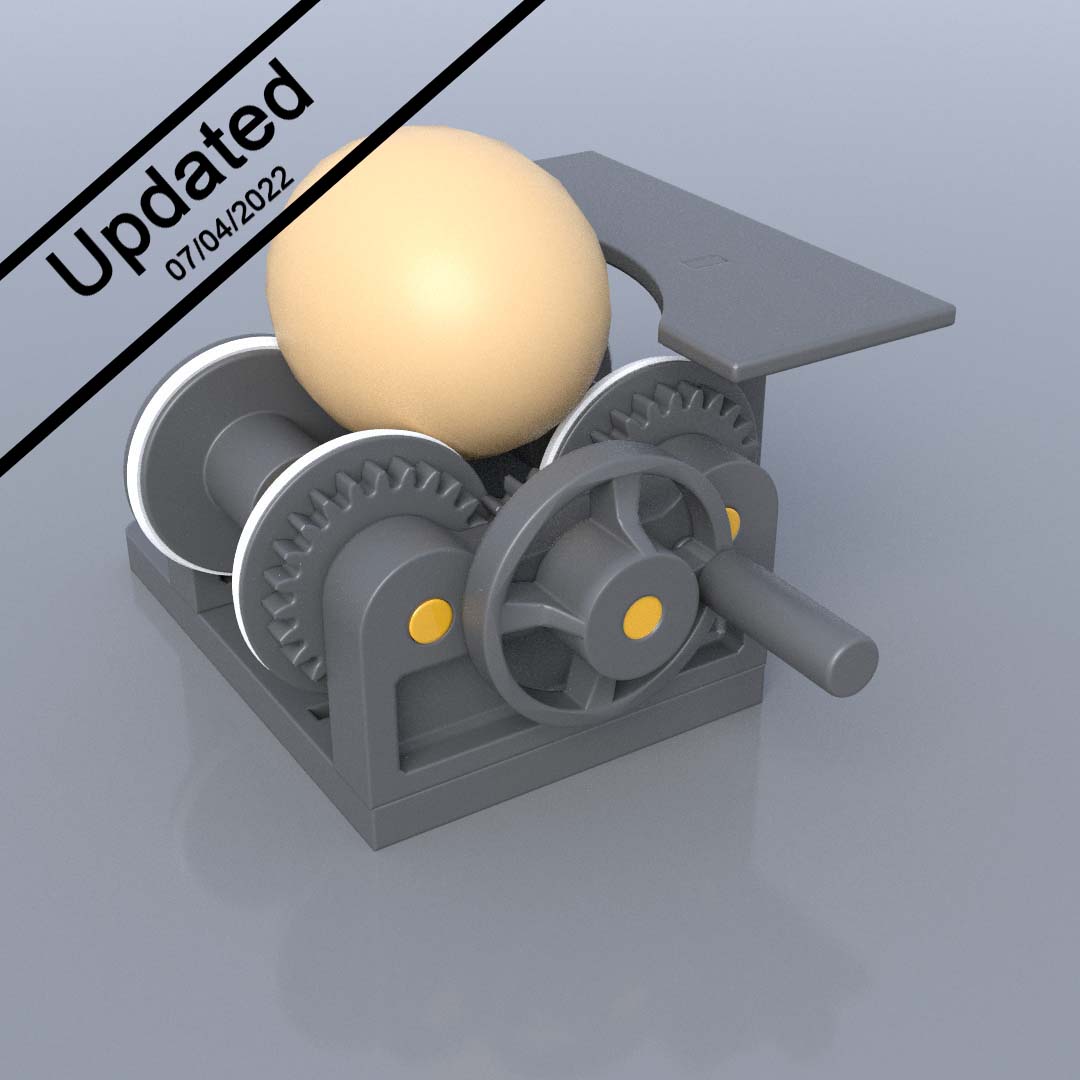
<p><strong>Egg Lathe</strong></p><p>For painting eggs. Not for turning them!</p><p>See also 'Egg Lathe UPDATE' for alternative parts that replace the gears for a smoother rotation at https://www.prusaprinters.org/prints/153374-egg-lathe-update</p><p>NOTE:</p><p>Now includes STL files to allow you to print the rods (see below under ‘You will need’).</p><p> </p><p>Material: PLA (If you use PTEG or ABS then you may need to scale everything to allow for different material shrinkages so the rollers, handle and gears are still a tight fit but the ‘bearings’ in the supports allow free rotation.</p><p>Layer height: 0.2 mm<br>Infill: 10%<br>Supports: None<br>Rim: None<br>Brim: 3 mm only on Winder and Winder Plug</p><p>The STL files are already oriented, as are the 3MF files.</p><p>You will need:</p><p>A 3D printer<br>PLA filament (about 88.5 g or28 m using the above settings)</p><p>**********************************************************<br>6.23 mm diameter brass or steel tube or rod:<br> 2 x 22 mm<br> 2 x 48 mm<br> 1 x 31 mm</p><p>The update now include STL files for printed rods, 70mm_rod.stl and 31mm_rod.stl. Print 2 x 70mm and 1 x 31 mm.</p><p>Aligned vertically on the plate they will take ages but it'll save you having to source tubing or rods of 6.23 mm diameter.<br><br>***********************************************************</p><p>4 x rubber bands about 32 mm (inner) diameter</p><p>Light hammer, hacksaw, fine file or sandpaper</p><p>For the metal tubes I used pistol crossbow quarrel shafts (the aluminium variety) which are 6.23 mm diameter – pull off the plastic fletching and cut them up accordingly but if you manage to get 6.23 mm diameter rod or other tubing you can use 2 x 70 mm lengths for the rollers.</p><p>The rubber bands came from a multi-pack of good quality but try any kind that fit neatly around the rollers.</p><p>EGG LATHE ASSEMBLY</p><p>Download the PDF file for full instructions plus illustrations.</p><p><strong>Follow the pictures closely to ensure all the parts are oriented correctly. Once tapped into place it will be difficult to disassemble them.</strong></p><p>Step 1:<br>With a light hammer, tap the 48 mm tubes into the large gears leaving 11 mm projecting out from the small bearing flange (on one side of the gear). Then tap the flat pulley onto the other end of the tube to sit flush against the gear.<br>Repeat for the other side.</p><p>Step 2:<br>Tap the short tube through the smooth end of a rear pulley leaving 12 mm exposed. Tap this assembly onto the long end of the front pulley assembly from Step 1.</p><p>You should end up with 10 mm of tube exposed at the gear end, the gear, 17 mm of bare tube then the drum part of the rear roller (which only serves to join tube halves together) and 12 mm of tube protruding from the flat side of the rear roller.</p><p>Step 3:<br>Stretch the rubber bands over the rollers so they sit in the grooves neatly and without twists.</p><p>Step 4:<br>Tap the 31 mm tube through the centre of the small gear wheel. The end of the tube should be flush with the flat side of the gear.</p><p>Step 5:<br>Insert the winder into the outer hole in the handle wheel. Tap the tiny retainer onto the back end of the winder to hold it in position. Note the orientation of the winder in relation to the handle wheel.</p><p> </p><p><strong>IMPORTANT:</strong><br>The front support has a small bearing bush around the centre hole.<br>The rear support has bearing bushes around the outer holes.<br>In both cases the smooth side of the supports (that were flat on the print bed) face to the REAR of the lathe.</p><p>Step 7:<br>Insert the tube (with the small gear) through the centre hole of the front support from the smooth back side.</p><p>Step 8:<br>Slide the tube with the small gear through the centre hole in the front support from the back of the lathe.<br>Tap the handle wheel (with winder attached) onto the protruding tube.</p><p>Step 9:<br><strong>IMPORTANT: </strong>On both supports the indented rectangle faces the front of the Egg Lathe<strong> </strong>(where the handle will be).</p><p>If you’re going to mount the lathe onto a timber baseplate it’s easier to do so before attaching anything to the base. Use 2 countersink screws in the provided holes in the base.</p><p>Slide both roller sets through the outer front support holes from the rear then slide on the rear support.</p><p>Align the front and rear supports with the slots in the base and tap firmly into place. The front support must be flush with the front end of the base.</p><p> </p><p>WRIST REST ASSEMBLY</p><p>Slot the two rest support pieces into the narrow, elongated holes in the base (left or right side) and press on the rest with the curved edge to the inside.</p><p>You could print 2 of the rest supports (ie, 4 pieces) and 2 of the wrist rest plates and add them to both sides for an ambidextrous Egg Lathe.</p><p> </p><p>TO USE</p><p>Obvious really, but set an egg on the rollers, wind the handle and hold a felt tip pen against the egg as you turn the handle. Voila!</p><p>Happy Easter.</p><p> </p><p>PS: There’s a centre hole in the rear support which corresponds to the handle’s axle hole in the front support so you can use a long tube or rod (85 mm) all the way through if you want added stability but it seems to work fine without it.</p><p> </p><p>PPS: The parts are all designed to be a very tight fit so no glue is required however if you need to take the thing apart you’ll need to punch the support lugs out from underneath the base. Clamp the rear of the base in a vice (with the lathe upside down) and punch out the rear support using a light hammer and flat-ended rod/pliers/etc. Then clamp the other end and repeat. Probably easier to reprint it all!</p><p> </p><p>Happy Easter,<br>Regards, Paul</p>
With this file you will be able to print Egg Lathe with your 3D printer. Click on the button and save the file on your computer to work, edit or customize your design. You can also find more 3D designs for printers on Egg Lathe.