Egyptian Heiroglyphics - Making a Cartouche
thingiverse
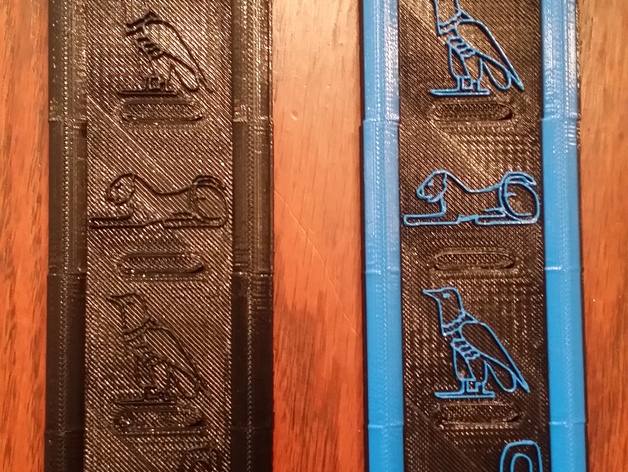
Learn about Egyptian writing system by making a Cartouche with students' names spelled out phonetically. Interlocking tiles allow character set to be printed individually or combined and printed as a single unit. Be sure to download the Egyptian Alphabet Translation Table PDF in downloads to get the Letter to Hieroglyphic translation. Print Settings Printer Brand: MakerBot Printer: MakerBot Replicator 2 Rafts: No Supports: No Resolution: Standard Infill: 10% How I Designed This The 3D printed parts were designed in Tinkercad. Hieroglyphs were downloaded from google images and converted to svg format using online converter and then imported into Tinkercad and placed on the interlocking tile pieces. If 2 colors are to be used, pause print at approximately 84% to 85% and switch filaments. Overview and Background Student’s will gain a knowledge of the importance of writing in ancient Egypt through translating their own names into hieroglyphics and embedding them in a Cartouche which was usually reserved for people of importance in Egyptian society. Ancient Egyptian appeared more than 5,000 years ago making it one of the earliest recorded written languages and was in use from about 3200 BC until the late 4th century AD and changed very little. Ancient Egyptian was a picture language with some pictures representing letters, others representing objects, and still others representing ideas. Through the ages though, the meanings of the hieroglyphs became lost. When archaeologists discovered hieroglyphic writing on the walls of tombs they could not read it. They knew the pictures had meaning. But the best they could do was to guess what those pictures meant. It wasn’t until the discovery of the Rosetta Stone that all this changed. The Rosetta Stone is a stone carved in three languages: Egyptian, Demotic and Ancient Greek. Inscribed on it was a short story. The same story was written in Greek, in Demotic script, and again in hieroglyphics. Scientists could read Greek. Using this a gentleman by the name of Jean-Francois Champollion performed the translation and they could now read hieroglyphics. His job was made a little easier because the ancient Egyptians surrounded royal names with an oval call a cartouche. There were many royal names surrounded by a cartouche. But there were two names in Greek - Ptolemy and Cleopatra. Champollion's job was to find those two names in the hieroglyphics which he did. A Cartouche is like a nametag and was used to identify important people in Egyptian society like the Pharaoh who Egyptians considered a living god-king. Objectives Students will become aware of an ancient writing system. Use a phonetic reference resource to spell their names using hieroglyphic characters. Students will practice translating their names from English into hieroglyphics and back again. Standards FINE ARTS: Visual Arts GRADES K - 4 NA-VA.K-4.4 Understanding the Visual Arts In Relation to History and Cultures NA-VA.K-4.6 Making Connections Between Visual Arts and Other Disciplines GRADES 5 - 8 NA-VA.5-8.4 Understanding the Visual Arts In Relation to History and Cultures NA-VA.5-8.6 Making Connections Between Visual Arts and Other Disciplines LANGUAGE ARTS: English GRADES K - 12 NL-ENG.K-12.8 Developing Research Skills NL-ENG.K-12.9 Multicultural Understanding NL-ENG.K-12.10 Applying Non-English Perspectives NL-ENG.K-12.12 Applying Language Skills LANGUAGE ARTS: Foreign Language GRADES K - 12 NL-FL.K-12.1Communication NL-FL.K-12.2 Cultures NL-FL.K-12.4 Comparisons SOCIAL SCIENCES: World History GRADES 5 - 12 NSS-WH.5-12.2 Early Civilizations and the Rise of Pastoral Peoples NSS-WH.5-12.3 Classical Traditions, Major Religions, and Giant Empires Lesson Plan and Activity Print copies of the Egyptian Hieroglyphic Alphabet table, One for each child and transform a few names into hieroglyphics to see how it works. Introduce the topic of hieroglyphics by asking children if they know what hieroglyphics are and where they came from. Discuss aspects of ancient Egyptian life that the children may know about such as pyramids and mummies. Then help children locate modern Egypt using an atlas or map. Distribute the copies of the hieroglyphic table. Have them look at their hieroglyphics table to find the English letter equivalents of their names. At this point you have 3 options on how you want to proceed depending on time and/or access to 3D printer. Create a rubbing using minimal amount of blocks Create single cartouche for each student using interlocking tiles In Makerware desktop software have students arrange tiles together and print as a single unit. Option 1: Can be put together and have rubbings made for young children. Option 2: Individual tiles can be downloaded and interlocked. Option 3: In Makerbot Desktop tiles can be joined and printed as a single Cartouche. Skills Learned Art History Foreign Language Visual Arts World History Anthropology Duration of Lesson If choosing option 1 or 2 lesson should take approximately 1.5 hours. If option 3 is chosen it takes approximately 15 minutes per tile to print. Preparation 2 to 3 sets of printed tiles and cartouche end caps top and bottoms. Handout indicating which letter/sound combination goes with which hieroglyph Rubric and Assessment Have students randomly trade Cartouches and using hieroglyphic alphabet table translate and have match back to original student. References http://www.pbs.org/empires/egypt/special/hieroglyphs/introduction.htmlhttp://greatscott.com/hiero/hiero_alpha.htmlhttp://www.educationworld.com/standards/national Hieroglyphs for Anyone: by Scot Bruaw
With this file you will be able to print Egyptian Heiroglyphics - Making a Cartouche with your 3D printer. Click on the button and save the file on your computer to work, edit or customize your design. You can also find more 3D designs for printers on Egyptian Heiroglyphics - Making a Cartouche.