Einsy enclosure for BPI Banana Pi M2 Zero Plus
prusaprinters
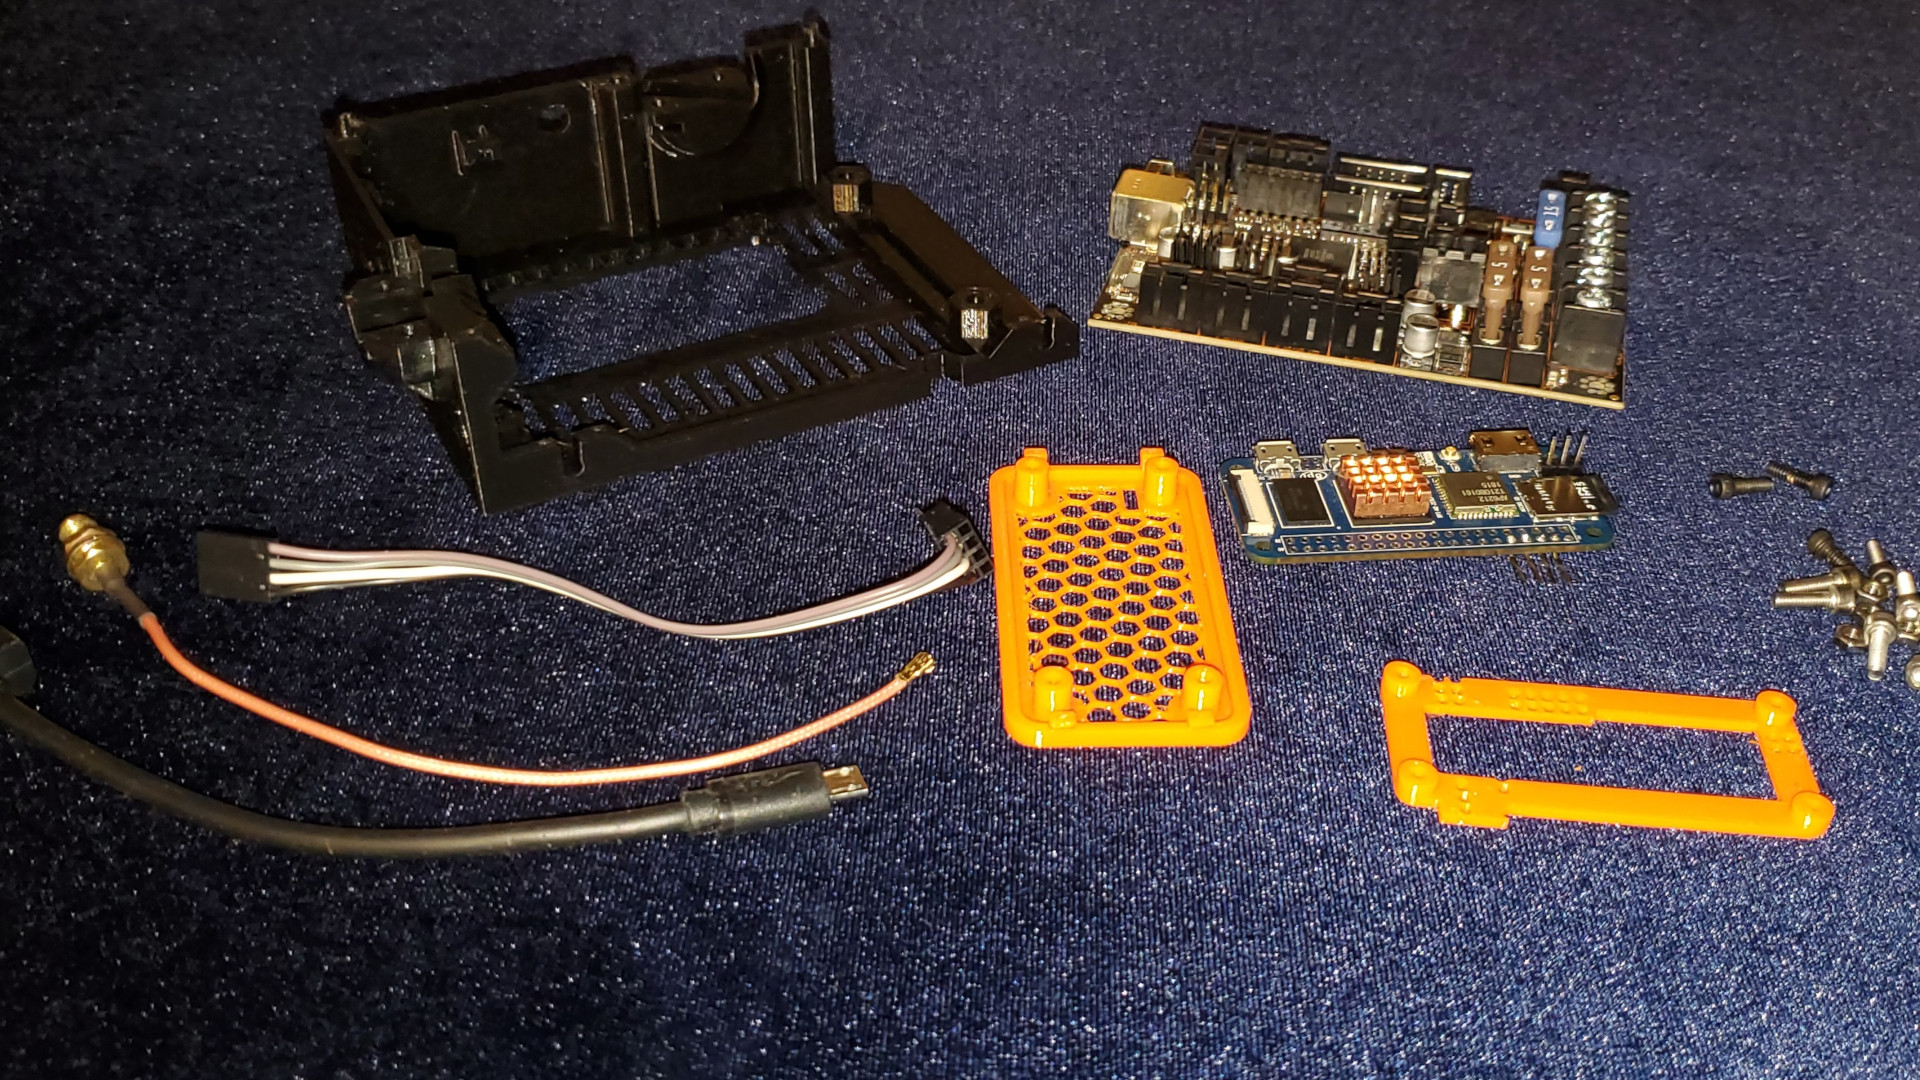
<p>My Raspberry Pi Zero W caused no end of problems with my MK3. With a little redesign, I switched to a BPI Banana Pi M2 Zero Plus and now everything works a lot better. If you wanted a WiFi-connected MK3 or MK3s (with a camera) but also struggled with the Zero W, maybe this will help.</p> <p>So, not only was Octoprint slow on a single core CPU (let alone trying to run a Rasberry Pi camera or webcam), but WiFi was always abysmal despite the MK3 being in the same room and within line of sight to my router. The onboard antenna just never seemed to work for me. The connectivity via WiFi and serial was poor, and I removed and re-inserted my Zero W so many times trying to troubleshoot, it caused the traces on the Einsy connector to lift up from the board. While I did have a Raspberry Pi camera module hooked up, the ribbon cable was also problematic. Maybe it's just me, but I found this a really poor solution.</p> <p>So... having to replace my Einsy board since the traces were lifting up, I decided to replace the Pi Zero and change connectivity so it wasn't causing physical strain on the Einsy board.</p> <p>The platform I selected to replace the Zero W was the Banana Pi M2 Zero Plus. This board has the same form factor as the Zero W and a number of advantages for an embedded Octoprint server:</p> <ul> <li>4 CPU cores (Octoprint runs fast, plenty of CPU to also run a webcam)</li> <li>A WiFi connector from the factory (while it's been done, I know my soldering skills and equipment aren't up to the task to successfully mod one on a Zero W and I wasn't 100% sure even if I could pull it off, the problem was the antenna and not the WiFi module itself)</li> <li>Multiple hardware serial ports (can connect a USB->Serial console cable while connected to my printer to make debugging easy)</li> </ul> <p>It has a couple of disadvantages:</p> <ul> <li>While it has a "camera connector" it is not compatible with Raspberry Pi cameras. </li> <li>It runs Armbian instead of Raspbian. This means minor differences in software config and most online guides can't be directly followed. </li> <li>The vendor images ran incredibly hot, i.e. you needed a heatsink. (which I worked into the design) Luckily, newer upstream images that came out while I was in the middle of this project fixed that issue.</li> </ul> <p>None of these downsides were particularly problematic for me. Because I had poor luck with the camera module and ribbon cable, I already had decided on a USB adaptor and webcam over the Raspberry Pi camera module.</p> <p>I decided to flip the Banana Pi over, so a heatsink could be added, and connect via a cable to male pins that inserted down inside the Einsy enclosure instead of up from outside so the physical force would press the connector into the board instead of away from the traces. This is detailed in the 3rd photo.</p> <p>To fit the Einsy connector cable, heatsink, WiFi connector, and USB on the go extension cable, I needed to extend the standoffs for the Einsy board by 2mm. A hole was also added for a uFL to SMA connector cable for the WiFi connector. I modified the Prusa part in OpenSCAD to accomplish this. I didn't extend the size of the enclosure.</p> <p>To mount the Banana Pi, I decided to make a modified Raspberry Pi adapter board (I couldn't find OpenSCAD source, so reverse-engineered an OpenSCAD from an .stl found) connect via screws to the cover with the Pi in a "stack" that would sit on the back of the Einsy. I made a custom cover that I thought looked cool and would allow plenty of airflow for the heatsink using PrusaSlicer and modifier meshes to expose the infill as per the Prusa blog article. I also included a slot for the dedicated serial console of the Banana Pi (to which I sodered IDC pins) so I could hook up a serial cable without removing the Pi if WiFi was ever problematic.</p> <p>The second photo shows all the pieces needed for this mod/ upgrade:</p> <ul> <li>Einsy Rambo board</li> <li>Banana Pi M2 Zero <ul> <li>4 IDC pins sodered on the underside for Power/ Ground and Tx/ Rx for serial 3</li> <li>3 IDC pins sodered on the top for Ground and Tx/ Rx for serial 0(console). </li> <li>Copper heatsink applied to SOC (CPU/ GPU). </li> </ul> </li> <li>3D printed parts</li> <li>Custom IDC connector cable</li> <li>uFL to SMA adapter</li> <li>USB on the go dongle</li> <li>4 M3x10 bolts.</li> <li>4 hex nuts.</li> <li>4 M3x8 bolts. (I happened to have these in black so used them as I thought it looked better than the standard Prusa stainless.)</li> </ul> <p>Long story short, after I assembled everything and re-attached my printer to the Einsy board, everything just works. My WiFi is now connected consistently at 80-100% strength at 65Mbit (full speed for a single 20Mhz 2.4Ghz channel), Octoprint never has a problem connecting to my printer, and I can run a Logitec C920 webcam for remote monitoring/ time lapses without any issue. I did hookup the serial cable once - but only to validate it still worked after assembly, I haven't needed it.</p> <p>Since part of this is a remix of the Prusa OpenSCAD source, everything is GNU v3 licensed to match.</p> <h3>Print instructions</h3><p>I printed in Prusa Orange PETG for the cover and bracket and Prusa Black PETG for the modified Einsy base.</p>
With this file you will be able to print Einsy enclosure for BPI Banana Pi M2 Zero Plus with your 3D printer. Click on the button and save the file on your computer to work, edit or customize your design. You can also find more 3D designs for printers on Einsy enclosure for BPI Banana Pi M2 Zero Plus.