El Cheapo Portaguitar
thingiverse
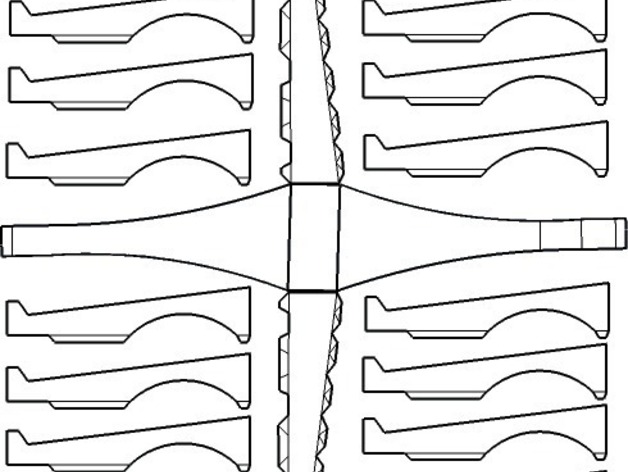
This design is based on a portable backpacker acoustic and a toy cardboard guitar for children. Its intent is to explore whether cardboard can be strong enough to withstand the stresses of a guitar string while flexible enough to produce an attractive musical tone. I would also like to see if it's possible to make a flatpack version in pine sheets, but I would need to make a wood steamer first. This is an entry into the Make/Makerbot contest :) Instructions Instructions for hand cutting: Print out the portaguit_*_single.png templates. They are scaled for US letter-sized paper (8 1/2" x 11"). This will produce an El Cheapo about eight inches long. Scale up if you want a larger guitar. Trace the templates onto some cardboard. Pizza boxes and/or moving boxes are just about perfect for this. You will need two sidepanels, one body panel, and approximately fifteen ribs. Pre-bend the tabs. Place the body panel flat on the ground. Glue the ribs onto the body panel. Their faces should be perpendicular to the face of the body panel. Glue them with their flat edge down and the end with the notch flush with the unfolded, flat, thin head of the body panel. The ribs are intended to fan slightly towards the butt of the guitar by a factor of the width of the adhesion tab and be packed together at the head of the guitar. Make sure to get a good amount of glue in between each of the ribs along the neck of the guitar. Clamp the ribs together at the head of the guitar. You may also want to pin or tack the rib tabs in place while the glue dries. Wait for the glue to dry. Unclamp and untack the ribs. They should now be firmly affixed and fairly solid. Glue the two side panels onto the body panel. Fold the half of the body panel that has not had any ribs or side panels adhered to it over the ribs and sidepanel and glue it in place. Wrap your El Cheapo with string or rubber bands to keep it all in place while the glue dries. Wait for the glue to dry. Determine how many strings your portaguitar will have. If it will have one, notch the butt and the rear knob of the head in the middle. If you want two, you'll need two notches equidistant from the center, etc. Notch the butt position deep enough that the standoff will fit snugly. Notch the head position so that the standoff will fit parallel to the neck of the guitar and poke out the top and bottom of the head. Use some cyanoacrylate (superglue) to glue the standoffs in place. Screw two nuts onto each eyebolt as far as they will go. Insert an eyebolt into each head standoff. Attach an eyenut onto the thread of each eyebolt. Make sure that it fits flat against the neck of the guitar. You may wish to dab a little superglue or threadlock onto the threads to keep them secure. Cut a sound hole or slots onto the face of your El Cheapo. Go out for Asian fast food and bring back some extra chopsticks. Cut one chopstick in half. The ones I generally run across have one thicker, square end and a thinner round end. Take the smaller end and cut it to fit across the neck near the head. Put a notch in it to match each tuning peg. Take the thicker end and notch it in kind. Glue the small end near the head. Glue the thicker end on the body face. Let the glue dry. Write a haiku. Spin around until you are dizzy. Get some guitar string. I would recommend nylon. I'm not sure how much tension this design will take, and I'm worried that steel string would cause a catastrophic implosion. You could probably even get away with fishing line, elastic, or other common stretchy fibers. Tie one end of the string to the eyenut. Fish the string through the corresponding standoff on the butt of the guitar. Then fit the string into the notches on the bridge and the nut. Finally, stretch the string good and tight and tie it through the eyebolt. Repeat steps 29-32 for each remaining string. Tune the portaguit by turning the lower nut on each eyebolt assemblage. This should quickly tension the string to its correct pitch. Then, to lock the eyebolt, screw the top nut down so that it contacts the lower nut. The two nuts butted up against each other like this should prevent slippage. To tune down, you would free up the upper nut first, and then adjust the lower nut. Instructions for laser cutting: Follow the instructions above, but use a laser. To customize: F-slots and fancy soundholes. Toothpicks for frets. Modify the body panel shape. Paint and varnish it. Glue in a piezo buzzer contact mic and quarter inch jack.
With this file you will be able to print El Cheapo Portaguitar with your 3D printer. Click on the button and save the file on your computer to work, edit or customize your design. You can also find more 3D designs for printers on El Cheapo Portaguitar.