Electric Controls for Lightsaber, Switch and Knob
thingiverse
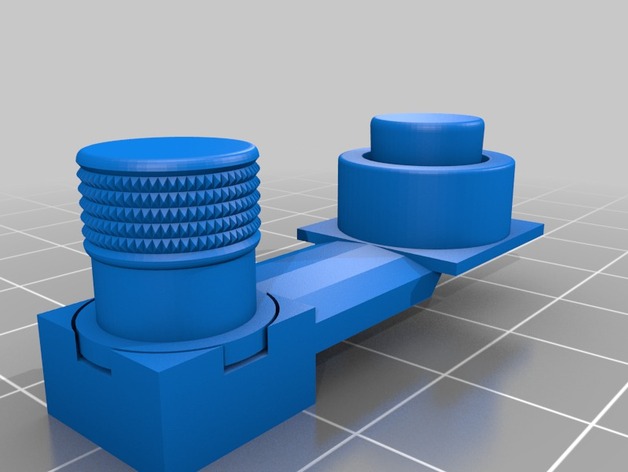
Human: Hi, I was helping Lara with a problem she had with her lightsaber cane's on/off switch being hard to reach under the pommel, not the buttons on the actual lightsaber. So, I created replacement buttons for the Ultimaker-style Obi-Wan lightsaber or my cane based on that design (or whatever other project you'd like to use them for). The housing has room for one button and one potentiometer. 6x6x5mm standard mini/micro momentary PCB pushbutton Common trimmer potentiometer - I think mine are Panasonic, but several others are similar. If you enjoy my projects, please support me by visiting one of my YouTube channels or blogs: http://L3-G0.com or http://LegoBB8.com. I don't mind if you click on the ads either. Print Settings Printer: FlashForge Rafts: No Supports: No Resolution: .2mm (Medium) Infill: 20% Doesn't matter Notes: For the most part, I intended these to print without supports; however, the housing is so wiggly that it needed some once I combined the two parts - So, I added supports to the model. If that doesn't work for you, try the no-support version with your slicer's supports. The knob for the potentiometer was too tight when I changed filaments, so I've included a slightly looser version. Hopefully other adjustments won't be required. Post-Printing Assembly: I intended to need a drop or two of glue, but it's almost press-fit. Tip: Consider soldering the leads first so you don't melt the thing. Superglue: If you decide you need glue, or when mounting to the lightsaber, obviously watch out for the moving parts. First, press the button into the round housing with the square in it. The button back should be about flat with the housing. Mine are quite tight and I don't need anything else. I pressed with a screwdriver across the back or pliers in the corners. Some people may need to use a file. If you choose to use a drop of glue, make sure the button works first! The bottom square is actually a rectangle designed so that there is more room for the pins on the edges without the side holes. If you position the side indents left and right, then press the button in with the pins on the top and bottom. Drop the button cap into the cap of the housing, and then press the bottom assembly from the previous step into it. Again, the bottom should be flush with the housing. Check that the button "clicks" when you push it. If not, the micro button is probably not in far enough, either press it or its holder into the housing further. For the potentiometer, press the cap onto the top of the pot. The pot isn't really designed for this, so it may be a bit problematic. My plan is to use a drop of glue, though I seem to get away without it. Then press the cap into the housing, making sure the potentiometer leads make it through the gap. When pressed flush with the top mine fits very neatly, though I expect to need glue. After you're happy everything is working, the assembly is designed to be affixed to the interior of the lightsaber by gluing the middle pad &/or the big button housing. I would avoid trying to glue the corners of the potentiometer housing as it is probably not needed and would likely seize the dial. Good luck and have fun! Assembly Order: A) Press the button into the bottom holder with the openings 90 degrees to the pins - it will be a hard fit. B) Put the button cap in the big housing C) Press the part from step A into the housing. Bottoms should be about flush, and the button should click when pressed and not be too loose. D) Put the potentiometer into its knob. You may want to use a drop of glue. This is tricky; I broke my X out of my knob and had to reprint. E) Press the potentiometer + knob from D) into the housing. Make sure it spins! Parts Used: Trimmer and button used. 6x6x5mm standard mini/micro momentary PCB pushbutton Common trimmer potentiometer - I think mine are Panasonic, but several others are similar.
With this file you will be able to print Electric Controls for Lightsaber, Switch and Knob with your 3D printer. Click on the button and save the file on your computer to work, edit or customize your design. You can also find more 3D designs for printers on Electric Controls for Lightsaber, Switch and Knob.