Electric focuser frame for Sky-Watcher telescopes (version 3)
thingiverse
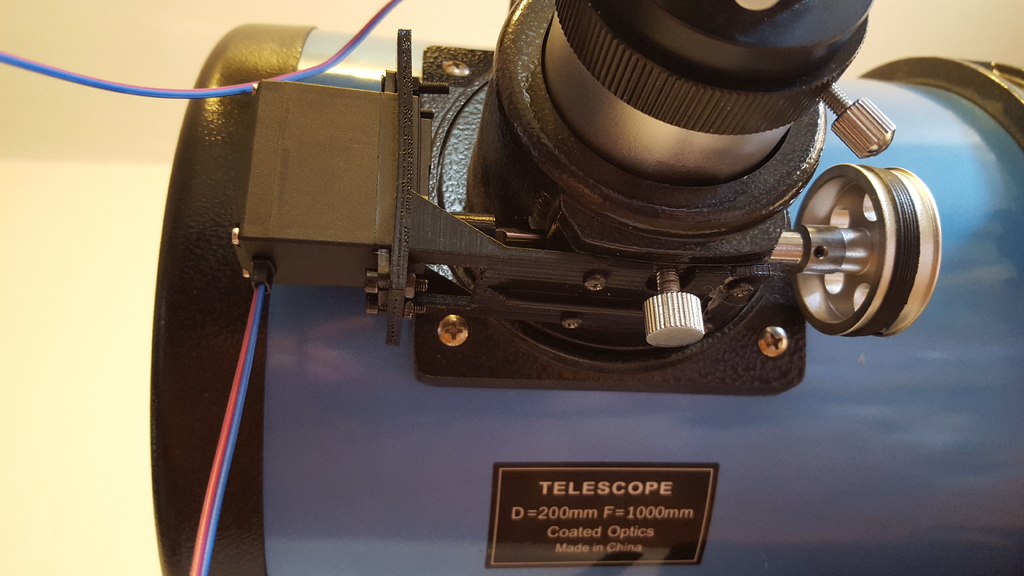
This bracket is designed to hold an MG996R or MG995 motor alongside the focuser wheel axis of a Sky-Watcher 200P telescope - with one focuser wheel removed. Ensure your scope is ten years old and check the photo to confirm you have the same type of focuser. It comes with a focuser-to-motor pin adapter and a wheel. The previous pin adapter was not up to the task: the teeth on the motor axis eventually stripped the inside. So I made a new one, which has to be screwed onto the small plastic wheel provided with the motor. The wheel then fits into the motor axis. There are four holes for the screws, but two should suffice. I also redesigned the control wheel and added holes for the screws. I redesigned the pin adapter once more because now it's the wheel axis that damaged the inside. This time I added a gap to put a nut and a hole for a screw, so the adapter can be tightly fitted to the wheel axis. Make sure the axis is deep enough inside the adapter to allow the screw to bite properly. You'll need a very short M3 screw, about six millimeters long. I also added a holder for the controller; it can be screwed onto the dovetail. If you're handy, you can easily build an electronic hand controller with batteries to control the motor (you still need to Dremel a pin as explained below), but the option I chose was to build a battery-less electric focuser using two modified electric motors. It's one fewer set of batteries to worry about, and also you can still focus manually if you wish. You can search for "battery-less electric motor for telescope" on Google to find how to hack the motors, and there are a couple of videos on YouTube, but in brief: 1- Get two MG996R or MG995 motors (£7 on eBay), strip the existing wires and electronics and solder wires directly onto the motor poles. Each wire should join the same pole on each motor. 2- These models of motor have a little pin on one of the cogs, which prevents it from doing a full rotation, so you'll have to Dremel that pin. It's a bit of precision work but not beyond the skills of someone with very little Dremel experience and average dexterity like myself. Wear safety goggles and be ready for some sparks! The cog material seems to be brass, which is much softer than the stainless-steel pin, so you'll have to be very careful. I did shave a bit of the cog to no consequence. Also, make sure you take a photo of the cog positions before you take them apart! That said, I think there are similar models without a pin, which would simplify the job. If you know about this, please let me know! One motor fits on the bracket and replaces one of the focuser's wheels. First, screw the bracket into position. Then screw the pin adapter to the small wheel provided with the motor. Then push the pin adapter onto the axis and tighten the six millimeter screw mentioned above. Make sure it bites onto the flat part of the axis. Then push the motor axis into the pin adapter. Screw the motor to the bracket, and you're done. This work may require some trials and errors to get the right position. Make sure the six millimeter screw bites properly onto the axis. Also, when you push the focuser's wheel axis, it tends to pop out on the other side, so make sure you hold it. The other motor is your hand controller. Attach the wheel for easier handling; it is oversized to give more torque - the motor can be hard to spin if you have weak hands. The best way to attach the motor to the wheel is to screw one of the adapters provided with the motor onto the back of the wheel (pre-drill the screw holes). Then push the adapter into the motor axis and fit an M3 screw through the wheel axis to hold it in place.
With this file you will be able to print Electric focuser frame for Sky-Watcher telescopes (version 3) with your 3D printer. Click on the button and save the file on your computer to work, edit or customize your design. You can also find more 3D designs for printers on Electric focuser frame for Sky-Watcher telescopes (version 3).