Electric locomotive for Ikea Lillabo/Brio train (USB rechargeable) — v2.0
thingiverse
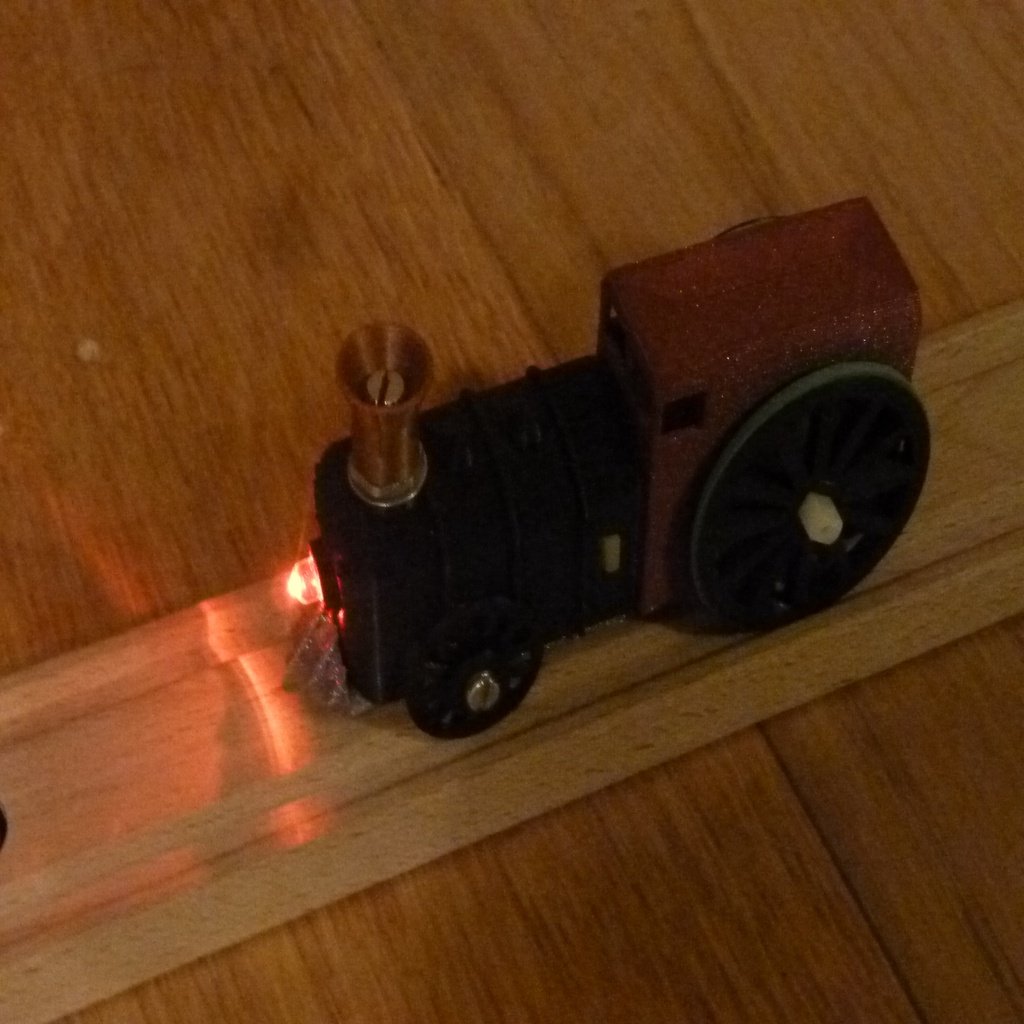
[Edit: I wrote an Instructable about how to build this.](https://www.instructables.com/id/Electric-Locomotive-for-Wooden-Train-Tracks-USB-Re/) This is the second iteration of a locomotive inspired by MilanGajic's work. I wanted it to be as compact as possible (to fit in the Lillabo tunnel) while looking like a (kid's idea of a) locomotive (and in particular having a nice cow plow at the front end!). The switch is the funnel. Turn it right once to turn the light on, twice to turn the light + motor on. You should print the `base`, `engine`, `cabin`, `chimney` part once, and the `front_wheel`, `spacer` and `rear_wheel_groove` part twice. (The `rear_wheel` part is an alternative that has small teeth instead of the groove for the rubber band). With two rubber bands as tires, the rear wheel has enough traction to easily pull several Lillabo cars, or even climb the bridge. Use `loco-rear_wheel_groove.stl` to put a tire; use `loco-rear_wheel.stl` for the older version, which has less traction. The front wheels are “wobbly” on their axle: this is on purpose, to help the locomotive stay on the track during the curves. Assembling this part is done by screwing the spacer part on the M3 bolts, then assembling the wheel on the spacer, and finally attaching this to the base. Extra parts needed: - [small rotary switch](https://www.aliexpress.com/item/5pcs-lot-Band-Switch-Rotary-Switch-Gear-Change-Switch-1-Pole-5-Position-2-Pole-3/32976667211.html); I used a 2 pole, 3 positions switch (but should have ordered the 2 poles, 4 positions version instead: by soldering just one extra resistor this would have allowed a slow and a fast speed on the motor!). - one 5mm LED and a matching resistor (I used red and 200 Ω). - [T-shape DC motor](https://www.aliexpress.com/item/TT-Motor-Smart-Car-Robot-Gear-Motor-for-Arduino-Free-Shipping-Wholesale-for-Arduino-Motor-Smart/32642267017.html) - [small lithium-polymer battery](https://www.aliexpress.com/item/best-battery-brand-3-7V-lithium-polymer-061730-601730-MP3-wireless-mouse-Bluetooth-stereo-280mAH/32662741428.html) and [micro-USB charging module](https://www.aliexpress.com/item/5-pcs-Micro-USB-5V-1A-18650-TP4056-Lithium-Battery-Charger-Module-Charging-Board-With-Protection/32402397769.html) - [12mm ring magnet](https://www.aliexpress.com/item/10pcs-12-x-3mm-Hole-4-mm-Super-Strong-Ring-Loop-Countersunk-Magnet-Rare-Earth-Neo/1000007719690.html) and round-head 4mm bolt & nut - two M3 bolts for the front wheels (screw them through the spacer part first: this prevent the wheel from screwing or unscrewing the bolt) and a M4 bolt for the ring magnet. - solder and heat-shrink wrap for insulation. The LED is wired in series with the resistor (see photo) and this is wired in parallel with the motor. Photos of the rotary switch are included to show some of the wiring. The positive pole of the motor should be the upper one (this applies independently of the position of the motor: if you rotate it by 180° around the locomotive axis, the “upper/lower” poles are switched, but the rotation of the motor is also reversed). The wheels and spacer parts should be printed twice.
With this file you will be able to print Electric locomotive for Ikea Lillabo/Brio train (USB rechargeable) — v2.0 with your 3D printer. Click on the button and save the file on your computer to work, edit or customize your design. You can also find more 3D designs for printers on Electric locomotive for Ikea Lillabo/Brio train (USB rechargeable) — v2.0.