Electric Spinning Wheel
thingiverse
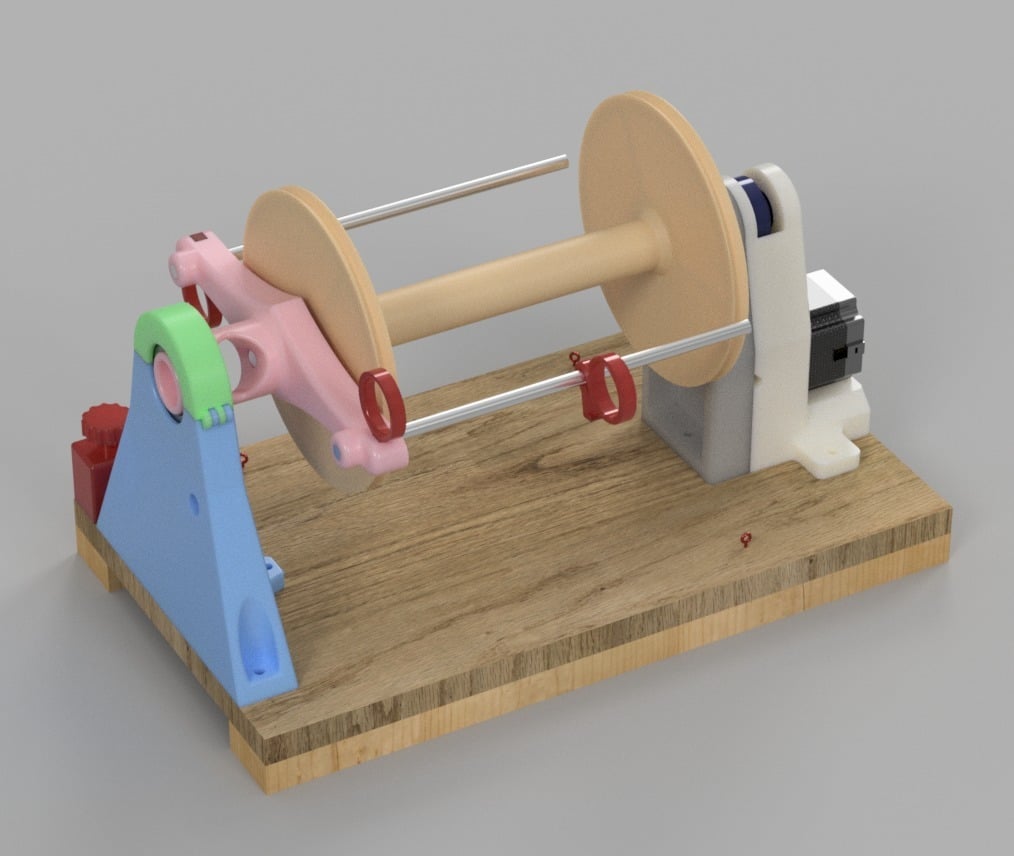
### Electric Spinning Wheel This is a spinning wheel with a big orifice of 25mm useful for making art yarns. *I have printed everything with a e3d v6 volcano 0.8mm nozzle in PETG, layer heights from 0.2mm to 0.4mm without any support.* **Bobbin:** 1x Bobbin_A 1x Bobbin_B 2x Bobbin_Shim 2x 6903 Bearing - Print 1x Bobbin_A, 1x Bobbin_B and 2x Bobbin_Shim. - Drill open the hole on the bottom of Bobbin_B (the closed hole makes it print without support). - Press both together. - Put in one bearing at the top and one at the bottom. - Insert a shim into each bearing. Everything should be press fit, but depending on the printer a bit of sanding or gluing might be required. **Flyer:** 1x Flyer_Body 2x Flyer_Clip 2x Flyer_Ring 1x 6007 Bearing 2x Aluminium Rod 8mmx250mm 1x Steel Rod 10mmx280mm (Alu should work too) - Print 1x Flyer_Body, 2x Flyer_Clip and 2x Flyer_Ring - Sand the surfaces where the wool will pass (maybe even laquer) - Sand, file or grind the end of the steel rod so it fits in Drive_Coupler - Put the 3 rods into the Flyer_Body and add Flyer_Clips and Flyer_Rings **Tensioner:** 1x Tensioner_Block 1x Tensioner_Wheel 1x Synthetic Cord 3x Ring Screw Hook 1x Dual Hook Spring 4x M3x30 (up to M3x40) Screw 4x M3 Square Nut 4x M3 Washer - Print 1x Tensioner_Block and 1x Tensioner_Wheel - The spring should be soft, you can combine multiple springs in series to make it softer. - Mount to the Base_Plate according to the picture, the two hooks at the Bobbin should be placed aligning with the bobbin because the Cord will hold it in this position. - From there the cord can be routed anywhere, the Tensioner_Block can also be anywhere. **Front:** 1x Front_Top 1x Front_Bottom 1x Front_Hook 4x Front_Joint 1x Front_Cleat 1x Front_Knob 2x 2mm Nail or thick wire 1x KY-040 Rotary Encoder 3x M5x35 Screws 3x M5 Locknuts (other nuts will work too) 6x M5 Washers (bottom washers can be bigger if possible) - Print 1x Front_Top, 1x Front_Bottom, 1x Front_Hook, 4x Front_Joint, 1x Front_Cleat and 1x Front_Knob - Put the Front_Bottom at the front center of the Base_Plate and drill 5mm holes for the screws, 8mm-12mm for the cable of the KY-040 - Shorten the axis of the KY-040 to about 5mm - Put 5 wires on the KY-040 put them through the hole and glue the KY-040 to the Front_Bottom, you can use color coded dupont wires, I put a SM2.54-5P connector at the end to later connect to the Arduino - Put the Front_Knob on the KY-040 - Screw the Front_Bottom to the Base_Plate - Glue 2 Front_Joint into Front_Top and the other 2 into Front_Bottom - Connect Front_Bottom and Front_Top by interleaving the Front_Joints and fix with a nail - Fix the Front_Hook to the Front_Top with a nail too - Put Front_Cleat into Front_Bottom, this is for parking the wool while pausing spinning **Footswitch:** 1x Footswitch_Pin 1x Footswitch_Top 1x Footswitch_Bottom 1x Guitar Effect Button 4x M4x20 or M4x25 Screws 4x M4 Square Nut 1x ~2m Cable with at least 2 wires 1x Male and Female connector with at least 2 connections. Headphone or Guitar plugs will work best - Print 1x Footswitch_Pin, 1x Footswitch_Top and 1x Footswitch_Bottom - The Footswitch_Pin might need to be sanded a bit to slide smoothly into the Footswitch_Top - Pressfit the Footswitch_Pin onto the Guitar Effect Button - Solder the cable and screw everything together - Alternatively any generic binary foot switch will work too but not continous ones from sewing machines **Base:** 1x wooden Base_Plate 250mm x 440mm Some wood pieces as border or rubber feet **Drive:** 1x Drive_Back 1x Drive_BackCap 1x Drive_Coupler 1x Drive_Front 2x 6000 Bearings 1x 6903 Bearing 1x Steel Rod 10mmx60mm (Alu should work too) 1x GT2 Pulley, 60 Teeth, 10mm ID 1x GT2 Pulley, 40 Teeth, 8mm ID 1x GT2 Belt, 280mm x 6mm closed 1x 57BLF01 BLDC Motor 1x JYQD BLDC Driver (the version without hall sensing should work too) 4x M5x45 Screws 3x M5x35 Screws 7x M5 Locknuts (other nuts will work too) 10x M5 Washers (bottom washers can be bigger if possible) - Print 1x Drive_Back, 1x Drive_BackCap, 1x Drive_Coupler and 1x Drive_Front - Shorten the motor cables and solder to the driver board - Mount the motor to Drive_Back the driver fits in the cavity below - Put in 4x M5x45 through the motor and Drive_Back but don't use the nuts yet - Put 2x 6000 Bearings in the top of Drive_Back - Put the 40 Teeth Pulley on the motor shaft, screw side facing to the front - Put the Belt on the 60 Teeth Pulley and put it in trough the top, this pulley needs to face the other way around - Push the Steel Rod through the 2 Bearings and Pulley - Align the pulleys so they move tight but without grinding and tighten the grub screws, if you use steel rod the top grub screw might not bite into it but you can file down a flat portion on the rod about 1mm deep at the area where the screw will be - Pressfit the coupler on the Steel Rod add the 6903 Bearing - Mount Drive_Front to Drive_Back, fasten with 4 Washers and 4 Locknuts - Finally the Drive can be mounted to the Base_Plate, this is not done by measurement but by fit, since some of the manual steps will have accumulated inaccuracy. - Insert the Flyer into the Front and put the Drive onto its end. Align everything so it fits without slack, then mark the holes to mount the Drive, also shorten the Base_Plate to be flush with the Drive - Fasten it with the remaining nuts and washers. In the end all the wires need to be connected to an Arduino compatible microcontroller. I used SM2.54 Connectors to make it easier replacable and flashable. You can use any power supply from 12V 3A up to 48V but at 48V the wheel will run much faster. Controlling the spinning wheel is done with the rotary encoder, clicking the encoder or the foot switch will pause it, clicking it again will resume at the same speed and direction. This is rather long, there might be mistakes in here. Feel free to ask questions. **Firmware:** https://github.com/ChristophPech/Spinner **Parts Sources:** Guitar Effect Button: https://www.aliexpress.com/item/1pc-SPST-Momentary-Soft-Touch-Push-Button-Stomp-Foot-Pedal-Electric-Guitar-Switch-Hot-Sale/32697477435.html GT2 Pulley 60 Teeth: https://www.aliexpress.com/item/High-quality-1pcs-GT2-60teeth-Timing-Pulley-GT2-60-teeth-bore-5mm-6-35mm-8mm-10mm/32719419636.html GT2 Pulley 40 Teeth: https://www.aliexpress.com/item/Free-shipping-1pcs-lot-Alumium-GT2-40teeth-Timing-Pulley-Bore-6mm-for-6mm-Width-GT2-Belt/32771396968.html GT2 Belt: https://www.aliexpress.com/item/3D-printer-belt-closed-loop-rubber-GT2-timing-belt-200-2GT-6-length-110-112-200mm/32477498985.html 57BLF01 BLDC Motor: https://www.aliexpress.com/item/57BLF01-Brushless-DC-Motor-63W-24V-3000RPM-Nema-23-0-6N-m-Peak-CNC-Router-LONGS/32638118697.html JYQD BLDC Driver: https://www.aliexpress.com/item/Motor-Controller-DC-Car-Driver-Board-12V-36V-500W-Brushless-Motor-Controller-Hall-Motor-Balanced-Car/32734523707.html 6000 Bearings: https://www.aliexpress.com/item/6000ZZ-Bearing-ABEC-5-10PCS-10x26x8-mm-Deep- Groove-6000-ZZ-Ball-Bearings-6000Z-80100-Z/554970982.html 6903 Bearings: https://www.aliexpress.com/item/10pcs-Bearing-6903-6903RS-61903-2RS1-6903RZ-17x30x7-ABEC-3-MOCHU-Thin-Section-Shielded-Deep-Groove/32581561929.html 6007 Bearings: https://www.aliexpress.com/item/5pcs-bearing-6007-6007Z-6007ZZ-6007-2Z-35x62x14-Shielded-Deep-groove-ball-bearings-Single-row-P6/32625161658.html 6903 Bearings: https://www.aliexpress.com/item/10pcs-Bearing-6903-6903RS-61903-2RS1-6903RZ-17x30x7-ABEC-3-MOCHU-Thin-Section-Shielded-Deep-Groove/32581561929.html KY-040 Rotary Encoder: https://www.aliexpress.com/item/5pcs-lot-KY-040-Rotary-Encoder-sensor-Module-for-arduino-Free-Shipping-Dropshipping/32293140596.html Arduino Nano: https://www.aliexpress.com/item/Nano-V3-ATmega328-CH340G-Micro-USB-Pin-headers-NOT-soldered-Compatible-for-Arduino-Nano-V3-0/32664577152.html SM2.54 Connectors: https://www.aliexpress.com/item/SM2-54-Kits-20-sets-Kit-in-box-2p-3p-4p-5p-2-54mm-Pitch-Female/32699760809.html **Action:** https://www.youtube.com/watch?v=xmsiC8HChfQ
With this file you will be able to print Electric Spinning Wheel with your 3D printer. Click on the button and save the file on your computer to work, edit or customize your design. You can also find more 3D designs for printers on Electric Spinning Wheel.