Electric window opener,
thingiverse
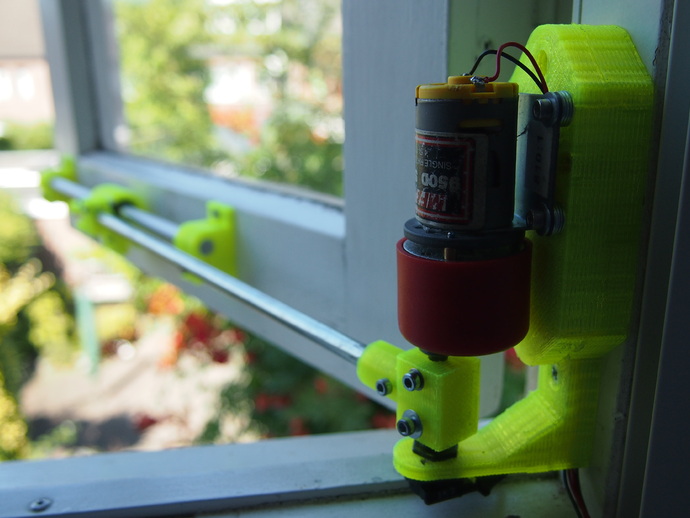
UPDATE: video: http://youtu.be/kuJ2semcIVk A couple of years ago I started to study Electrical Engineering. Since then I always wanted an automatic window opening robot. The reason for this is that I live in the Netherlands where it often rains. Normally it is not a real problem to open or close the window that is a few meters away. However, it often starts raining at night when you are nice and cozy in your bed. A solution for this first world problem is to shut the window when rain falls onto a sensor or when a button is pressed. A few years ago I tried making it from wood and metal, but this failed due to improper mechanical construction and the lack of mechanical engineering skills at that time to make a shaft coupler strong enough to push a window open without slipping. Being annoyed with the mechanical problems I set the project away for some time... I recently finished a mendel which can print parts reasonable good and I needed an idea for which I could use a 3D printer. First lets go over the requirements: -The system should fit within the limits of the frame depth (about 50mm in this case). -The moving arm is not allowed to move out of the frame at the room side. This is nescessary to let the window mosquito screen in place. So basically this rules out the use of a double armed system. -Electronics should fit in the enclosure that also hold the motor and angular position potmeter. -The system should be able to detach completely from the window with a few screws to allow frame cleaning and painting. -The mechanical construction should preferably contain parts that are used in most reprap projects so they are easy to source. The window opener consists of a bar attached to the window, a bearing holder connected to an arm that makes the rotational motion pushing the window out or pulling it in. The bar is held to the window with some bar clamps(similar to those in 3d printers but a bit more lower profile). The hardest part is the 3-way shaft coupler, which is pushfit on the shaft and held in place with some bolts through the shaft(this proved to be necessary because the torque is quite high). The enclosure is quite simple and holds the motor and the potentiometer in place. The potentiometer is used to know the absolute position of the arm. The entire enclosure can be bolted to the window frame using self tapping wood screws. Cable connections are fed through the channels at the back of the enclosure and are held in place by the frame. Electronics consists of a PIC18f14k50 microcontroller in combination with the L298N motor driver, and is driven at 5V through a 7805 regulator. The controller is at this moment a simple proportional controller but has still room for improvement. At this moment the window can be controlled by a pushbutton that is a away from the window. The idea is to replace it eventually with a rain sensor but is not yet implemented. Eventually the system could be used to integrate in a home automation system. I will upload a video of the working system soon. TL;DR: Made awesome window opening robot. Instructions INSTRUCTIONS: Print all the components at 75% infill, shaft coupler at 90-100%. BOM: MFA 950D (http://www.conrad.nl/ce/nl/product/222367/) 2 bar clamps 1 bearing holder 10mm bar 30cm long (for bearing) 8mm bar 30cm long (for arm) 1 lm10uu bearing. Some M4 and M3 nuts (details will follow)
With this file you will be able to print Electric window opener, with your 3D printer. Click on the button and save the file on your computer to work, edit or customize your design. You can also find more 3D designs for printers on Electric window opener,.