Electro-pixie
thingiverse
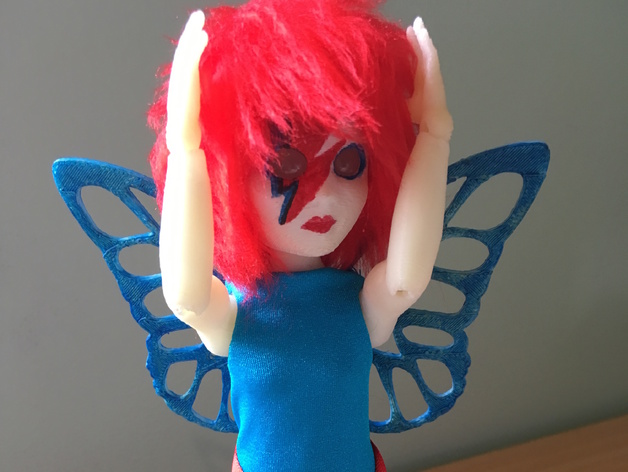
Electro-pixe An interactive electronic articulated doll This project aims to teach 3D sculpting, coding and electronics skills through a hands-on art project to create a custom electronic doll How I Designed This Make Human is an open source tool written in Python, which is designed for generating human models e.g. for games and animations, and the models created using Make Human are CC0 licensed (i.e. public domain). So, I figured it would be a good way to generate a base model from which I could create my doll parts. You start with a "generic" model and then you can tweak various aspects of the appearance, for example the size, spacing and angle of facial features, limbs, height, body shape etc. Models can be exported to an obj file ready to import into 3D sculpting software. Creating the base model with Make Human Ball Jointed dolls are strung together using elastic, with balls at the ends of the parts providing the degrees of freedom for each of the joints. So I needed to slice up my human model into pieces corresponding to the parts of the doll: head (2 parts), body (could also be split into parts but I decided to keep it as one), feet, shins, thighs, hands, lower arms and upper arms. Then I'd need to add the balls for the joints, hollow the parts out where the strings pass through, and prepare them to be suitable for 3D printing. I'm on a Mac, so I was looking out for an affordable and accessible (to beginners to 3D sculpting) 3D CAD program that would run on Mac OSX. I'd seen some tutorials for Autodesk's free Meshmixer software. I liked how intuitive it looked to slice up a model and merge multiple models into new shapes. The first thing I did after importing my human model into Meshmixer, was to use the slice tool to cut the model into parts and save them in separate files. Using the brushes to sculpt the surface of the 3D model is conceptually similar to sculpting with clay (which is how I was making dolls before learning about 3D printing), so it was pretty easy to get my head around how to make the tools do what I wanted. The new shapes for the joints and sockets can be created as separate shapes and then joined with or used to subtract from the existing parts (using the difference tool). I started with the head. It needed to have the unnecessary (for dolls) parts created by Make Human - eye balls, eyelashes, eyebrows, tongue - removed, and the crown sliced off to provide access for changing the eyes. Both the top and bottom of the head needed to be made solid and then hollowed out, and the eye sockets made bigger to accommodate doll eyes. A socket to go on top of the neck also needed to be added at the base (with a hole to allow the strings from the body to pass through where they are tied off inside the head). I also made some changes to the facial features (I sculpted 2 different faces for two different doll characters). Finally I added some mounting points where I'd be able to glue small magnets onto both head parts to hold the parts together. I also had to turn each part into a solid part suitable for printing. Sculpting the head with Meshmixer One thing I learnt to do quite early in the sculpting process was to save often, and keep multiple revisions of my file because Meshmixer crashed a lot. Maybe this was because I was working with models with a lot of polygons. It usually happened when I was trying to merge models. It also managed to corrupt files a few times, so I'd save the file, and when I came back to open it later, I'd get warnings about the file being corrupt. When that happened, I exported the file to obj and then reimported from the obj file, and the warnings would disappear. Eventually I got better at using the reduce tool, and making sure my parts were always solid before performing merge operations, so the crashes became a lot less frequent. Trying out different faces Creating the parts for the body involved starting with each sliced up body part and adding ball joints and sockets. Balls were added as spheres and merged into the existing body part. Then I created long cylinders and moved them so they would run along the inside of the parts and then subtracted them (using the boolean difference tool) to hollow these parts out to make room for the elastic that is used to string a ball jointed doll together. Hands and feet are terminal parts, so they needed joints with holes through them. These started as balls but got smoothed down to a more squashed shape to fit better into the sockets on the ends of the arms and legs. Adding a ball to the hand On the body joints, I added "dog-bone" shaped holes. For example on this shoulder joint, the arm needs to be able to be raised, so there is a hole for the elastic to sit in the resting position (the elastic is coming out of the body in through the side of the arm joint) as well as the raised position (the elastic comes in through the top) and a channel between those holes for the elastic to pass through while the arm is moving anywhere between those two positions. Sockets were created by subtracting shapes. For the torso, I needed to add sockets for shoulders and hips, and extend the neck, as well as hollow the inside out. I added a sphere for each socket and then used the edit tool to transform it to resize it to exactly the right dimensions and position to match the joints I'd created on the corresponding limbs. Then I used boolean difference to subtract the spheres from the torso and used sculpting brushes to smooth out all around the edges of the new sockets. I also used smoothing brushes to blend the balls onto the parts, and to reshape parts slightly to make them more doll-like (e.g. to remove detail, join toes on feet). The symmetry option for the brushes came in handy here because I could smooth two sides of symmetrical parts like the torso simultaneously. I hollowed parts of the torso out by creating additional shapes e.g. lozenges and then using the difference tool to subtract them. I also joined a a donut shape to the very top of the neck to give it a smooth rounded top to fit into the socket at the base of the head, then used the 'Make Solid' tool to create a single solid shape. Holes for shoulder joint Torso I found it tricky to get the balls, sockets and holes at the right angle so that the doll joints would move in a natural direction and also so that the limbs would sit right when the doll was at rest (standing or sitting). Mostly my joints were made through trial and error: I'd guess the rough sizes and angles, and then I'd print the pieces to try the joints out and then adjust the model(s) based on my observations of how well the printed pieces worked together. Sometimes I got the joints pretty much right first time (I lucked out with the shoulder joints), but others like the knees, took several attempts. I only created one one hand, lower arm, upper arm, upper leg, lower leg and foot model, because I used mirroring to print the parts for the other side of the body. I printed the parts on an UP! mini printer, using 2mm layer height and solid infill for small parts for strength (larger parts like the thighs were printed with loose infill). Testing the knee joint The positioning of the parts on the print bed when printing makes a big difference to the end result. This is because of the effect that the "grain" of the prints (i.e. the direction the filament runs) has on the appearance of features on the parts, and the result of gravity where filament droops on overhangs. I tried printing these with support but for delicate features and small parts like the fingers on the hands, support leaves unsightly marks and was difficult to remove. Printing hands Here's an example of printing hands at different alignments - printing palm up flat on the bed resulted in drooping on the back of the fingers, and marks on the back of the hand upon removal from the raft (hand at front right of image). Printing on the side was an improvement, but the side of the hand became flat, and there was some drooping along the sides of the fingers that left marks when trimmed off (hand at front left of image). Printing with the hand sticking up in the air at a slight angle ended up being the best for this part, although it had the side effect of making the fingers slightly stubbier (because of the low resolution of the printer). Where possible I tried to make the surface that touched the raft something that would be hidden in the joints. All of the parts have been oriented for printing on an Up! mini with a minimal amount of support (which the Up! mini generates). I remixed by original Ball Jointed Pixie Doll model to make an electronic version, adding cutouts for LED eyes, wires and magnets through the feet and a 6mm pushbutton in the back. When it came to adding the electronics inside the dolls, the original models were a little too small for fitting the parts. so finally I scaled everything up by a factor of 1.2. There is space for a small micro-controller (e.g. Digispark or ESP-07) under the head cap. I also added a base (or stand) for the doll. The base houses a 9V battery and an optional switch and power indicator light (see circuit diagram). Use 8mm wide metal strips to make the terminals for the feet and run the power wires to GND and VIN up through the legs. Use a diode on the power line to provide reverse polarity protection for the micro-controller. The doll attaches to the base via magnets in the feet. The magnets in the feet are 4mm x 8mm. I'm using 8mm neopixels for the eyes. There are two alternatives for the torso - with or without magnet mounts for attaching wings or other accessories. There are two alternatives for the feet - one with + / - symbols and one without. Project: Electro-Pixie Project Name Electro-pixie: a custom 3D printed electronic articulated doll Overview & Background: This project aims to teach 3D sculpting, coding and electronics skills through a hands-on art project to create a custom electronic doll. The basic doll parts provided can be used as a template that students can remix or use as a basis for their own custom doll design. Students can customise the parts by 3D sculpting, then 3D print, assemble, create a costume for, and paint or decorate their custom doll (or action figure), and then add electronics including a programmable micro-controller to add interactive light and sound to their projects (e.g. LED eyes, buzzer to create sounds, button to trigger different light or sound) Objectives: Students will learn basic 3D sculpting techniques and how to prepare their models for 3D printing using Autodesk Meshmixer. Students will learn how to build simple electronics circuits and introductory micro-controller programming with Arduino IDE. Students will combine these new skills with their existing knowledge of art / design techniques to produce an interactive electronic artistic work. Audiences: The slides are aimed at high school level, but the project could be adapted to a younger audience by skipping the 3D sculpting component and using the provided parts as is, and focusing on the artistic & electronics aspects. The coding & electronics component could also be simplified by removing the button and sound elements, and focusing only on LEDs (with or without a microcontroller to control them). Subjects: Art, Design, Technology (Coding & Electronics) Skills Learned (Standards): This project aims to teach 3D sculpting techniques, Arduino coding & introductory electronics skills. Lesson/Activity: This course is split up into three sessions: Session 1: 3D Sculpting Session 1 Slides The first session covers basics of 3D sculpting using Autodesk Meshmixer to create articulated doll (or action figure) parts. Refer to the Session1Slides.pdf slides for suggested session content. The instructor first demonstrates each technique, and then the students should be given time to experiment with MeshMixer to apply the technique to create their own custom parts- with the instructor on hand to assist. This session covers: Generating 3D human models using MakeHuman (or similar Character mesh generator software) Slicing up the 3D model into doll parts and adding articulated joints using Meshmixer’s slice and merge tools Using Meshmixer’s 3D sculpting tools to customize 3D parts The STLs provided are all the parts required for a complete doll. Students can generate new models using the techniques described in the slides, or import the provided STLs into MeshMixer and apply 3D sculpting techniques to modify them. For example, they may wish to modify the head sculpt to change the features, or create new parts for their figure e.g. wings, tools, hats, etc. This session also provides an opportunity to teach students about Creative Commons licensing - encourage them to remix other designs from Thingiverse (I have included the butterfly wings accessory remixed from Lightshow74's wall ornament as an example of this - all of the other models are my own). Session 2: 3D printing Session 2 Slides This session focuses on preparing and printing the parts for 3D printing: Tips for preparing 3D models for successful prints Limitations of additive printing, importance of support, effects of part orientation How to print parts using the 3D printers How to clean up prints after printing Refer to the Session2Slides.pdf file. Tip: Focus on printing the custom parts first e.g. head sculpts in case they need to be tweaked and re-printed - the bulk of the body parts can be used as-is and can be printed between sessions. Session 3: Assembly and Adding electronics Session 3 Slides This session focuses on assembling and decorating the figure as well as adding electronics and a micro-controller: How to paint 3D printed model parts An introduction to electronics by designing and prototyping electronic circuits An introduction to soldering Microcontroller programming Decoration, adding hair, costumes and eyes To assemble the doll I'm using hat elastic with fishing line tied on the ends to go through the hands and feet, I string the arms first, then the legs and finally the head. See the session 3 slides PDF under Thing Files for more assembly instructions and the assembly video linked under assets, below. Use a very thin gauge wire for the electronics. Add the wires from the feet up through the legs while stringing the legs, and add the digispark inside the head as the final step. The button and piezo buzzer go inside the torso with the wires coming up through the neck. The slides recommend example programs (built into Arduino IDE) to use for coding the doll. Tip: For a younger audience, either pre-program the micro-controller, or skip it altogether and go with static single-colour LEDs connected directly to a battery - e.g. refer to the circuit for the battery box for an example circuit for an LED powered directly from a battery. Duration: Depending on student ability and background knowledge, each of the three sessions require at least 4 hours for high school students (not including time spent printing the bulk of the parts - which should be done between the second and third sessions and could be performed by a third party e.g. 3D printing service). The final session requires about 4 hours to go through the assembly process as well as covering the basics of each circuit and code but students will also need additional time after the sessions to actually complete their projects (e.g. painting, creating a costume, wig-making, customising their code etc). Preparation: Session 1: Sculpting Software required: Meshmixer http://www.123dapp.com/meshmixer Make Human http://www.makehuman.org/ Session 2: 3D prep & printing Software: As for session 1 Equipment: 3D printer & filament (or printing service). Session 3 Software required: Arduino IDE https://www.arduino.cc/en/Main/Software FTDI VCP drivers http://www.ftdichip.com/Drivers/VCP.htm Equipment required: Scissors, needles and thread, pliers, wire cutters, wire strippers, soldering iron & solder, hot glue Materials required: Parts from previous session should have been 3D printed. A selection of craft materials should be provided for decoration e.g. faux fur for making wigs, fabric for costumes, acrylic paints, water colour pencils, for decorating. See Bill of Materials PDF for list of recommended electronics parts References: Instructor should have basic familiarity with Meshmixer (see Meshmixer 101 tutorials on YouTube ), in order to assist students with the 3D sculpting session. Prior experience with electronics would be useful but not required (example circuits are provided in the slides) Prior experience with coding with Arduino IDE would also be advantageous but not required. See arduino.cc for Arduino resources. Rubric & Assessment: I would recommend providing a design brief to students at the start of the project. At completion of the sessions, students will have assembled and decorated a custom doll, with interactive electronics in response to the brief. Students could produce a written report to accompany their work describing their process and reflecting on what they have learnt throughout the project. Handouts & Assets: Comprehensive slides for all three sessions have been uploaded to Thing Files as PDFs. Bill of materials recommended for electronics session has also been uploaded as PDF. Session 1 Slides Session 2 Slides Session 3 Slides Bill of materials Stringing the doll Note: This video was made with a previous version of the model - there are now struts inside the body to tie the elastic and fishing line around e.g. the head is attached with fishing line around the strut inside the torso and can be tied off around the strut inside the head so you don't need the bead.
With this file you will be able to print Electro-pixie with your 3D printer. Click on the button and save the file on your computer to work, edit or customize your design. You can also find more 3D designs for printers on Electro-pixie.