Electronic Bed Leveller
thingiverse
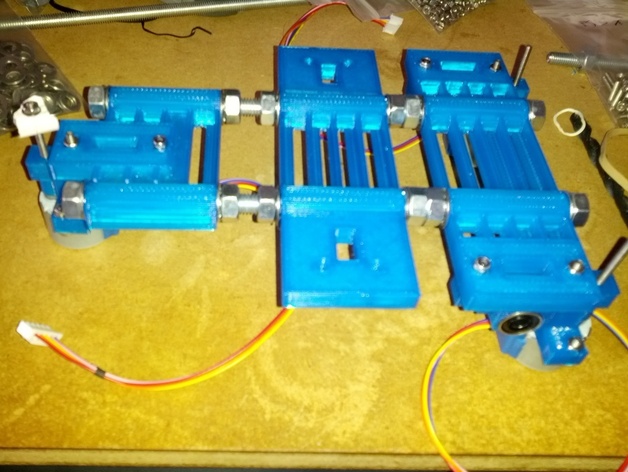
This is my first attempt at an electronic bed leveller. The main Y carriage is from http://www.thingiverse.com/thing:43270 I am using this to test with as i don't have a spare Y carriage. Using 3 stepper motors attached to the standard reprappro mendel carriage along with a probe attached to the x carrage should allow automatic levelling of the print bed. Instructions Currently I am looking at how to attach a nut to the standard MDF print bed, without having to drill/glue it (so you can revert to the original if wanted). Best idea I have come up with for this is a M3 mudguard washer with an outer diameter of about 15mm, place a bend in the washer so that it folds up over the edge of the MDF and then supper glue an M3 nut to the washer. (washer shown as purple in pic) The openscad pic shows the MDF print bed (yellow), the M3 bolt (red) and the M3 nut (green). the other pics show the Y carriage with the stepper motors mounted and connected to the height adjustment screws. I have designed this so that it can just be added or removed from a standard Y carrage without any changes to the existing design (other than removing a couple of screws and replacing with longer ones). The Y carriage in the picture is one i am using for testing (http://www.thingiverse.com/thing:43270) but this should work with the original MDF base plate as well (I will be mounting on my original plate once i have it working). The controller for this is going to be a Raspberry Pi. The probe for the X carriage is currently a screw driver with a bit of wire wrapped around it! This is going to be sorted after the bed has been completed!! The stepper motors that i am using at the moment are a standard 5V 28BYJ-48 which you can get on-line with a ULN2003 driver pre-wired for a couple of £ each. I still need to make sure that these are going to be strong enough to lift the whole bed (Heating PCB/ALU/Glass) Each stepper motor is approx 20g, so allowing for 3 steppers + the plastic in the motor mounts + the extra few screws, i think it will add a total of 70-80g to the carriage. I have uploaded a series of photos showing the assembly of the stepper motor and mount, the coupler has a hex hole at one end to take a hex head bolt (this needs to be long enough to reach the existing hotbed) the other side of the coupler is designed to fit over the stepper motor (it has 2 flat faces to stop the coupler from spinning). I use M3x12 to secure the stepper to its bracket and M3 x 30 to secure the bracket to the existing LM8UU holder (you may need a shorter screw here, as my Y carriage is quite thick). You will also need a washer between the coupler and the LM8UU holder, otherwise any snags on the coupler catch the existing plastic and the motor will not turn. The coupler should slide easily over the stepper shaft, if not then run a 3mm drill bit along the inside curved edge to get rid of any burrs. The hex head should be a snug fit. It is going to be a couple of days more before i can test the hotbed washer/mount as i need to get the mudguard washers still.
With this file you will be able to print Electronic Bed Leveller with your 3D printer. Click on the button and save the file on your computer to work, edit or customize your design. You can also find more 3D designs for printers on Electronic Bed Leveller.