Electronics Enclosure for Arduino Mega or Rambo Mini and LCD Graphic or LCD 2004 Controller
thingiverse
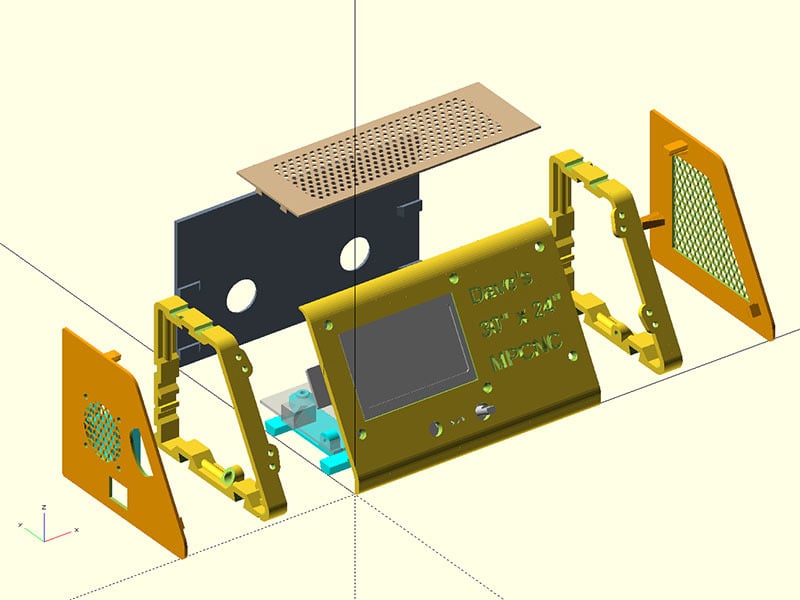
**9/7/2018** Someone pointed out that the Rambo Mini is slightly off. Since I don't have a Rambo Mini to check this, someone else will need to provide me with the correct dimensions to make these changes. **5/7/2018** I updated the openscad file to include a 1.5mm base under the electronics board. It seemed like a better idea to give more protection to the electronics underneath rather than saving a little plastic. The module I added to the openscad code is Bottom_Flat() for those interested in that. **9/9/2018** Someone mentioned that the graphics faceplate was difficult to access. I made the SD card opening with an oval cutout, which should make it easier now. **9/10/2018** This project started out as a way to take the electronics from underneath my Folgertech Delta printer and mount them on the outside like I did with just the display. When someone asked about a case for the Rambo Mini with Graphics LCD, I decided to make this project more adaptable. **9/11/2018** This can be used with either the Arduino mega or the Rambo Mini and the Graphics LCD controller. Here is the controller this was sized for: https://shop.vicious1.com/products/full-graphic-smart-controller-big . You could also use this with other electronics that use this display if you make a base plate to mount it on. **9/12/2018** Most of the parts use dovetail joints instead of screws. In the openscad files, you can adjust the clearance of the dovetail joints to .15, .2, .25, .3 or .4. That is the total clearance of the joints, so for .2mm it is .1mm on each of the joint. **9/13/2018** There are example settings for this setup in the openscad file. There is also a test print for the face plates for checking the hole pattern if you are not sure whether your controller is this size. I have checked the 2004 LCD with one I have & it fits & someone else has checked the Graphics LCD. **9/14/2018** The holes for that I sized to use the electrical endcaps in this thingiverse design: https://www.thingiverse.com/thing:978384 . I took this Full Graphic Smart Controller case & overlaid it on my design to get the SD card cutout. **9/15/2018** If you are happy with the test print, the parts you want to print for a stand alone case are: **DD_2_TopCoverPlate_Rev138.stl** **DD_2_BackPlate_Rev138.stl** **LCD2004FacePlate_Rev138.stl** or **GraphicsFacePlate_Rev138.stl** LCD 2004 End Caps **DD_2_LCD2004_LeftRightEndCaps_Rev138.stl** or Graphics LCD End Caps **DD_2_GraphicsLCD_LeftRightEndCaps_Rev138.stl** The electronics base plates are only 2mm thick, but adjustable to 4.5mm with openscad file. For the Arduino electronics print: **DD_2_ArduinoMount_Rev138.stl** For the Rambo Mini electronics print: **DD_2_RamboMiniMount_Rev138.stl** If you are going to mount this case to the side of delta printer like the Folgertech or to a piece of wood, you will have to print the different brackets & back plate: **DS_LeftRightBrackets_Rev138.stl** The back plate might be difficult to use in this configuration, but included it. **DS_BackPlate_Rev138.stl**
With this file you will be able to print Electronics Enclosure for Arduino Mega or Rambo Mini and LCD Graphic or LCD 2004 Controller with your 3D printer. Click on the button and save the file on your computer to work, edit or customize your design. You can also find more 3D designs for printers on Electronics Enclosure for Arduino Mega or Rambo Mini and LCD Graphic or LCD 2004 Controller.