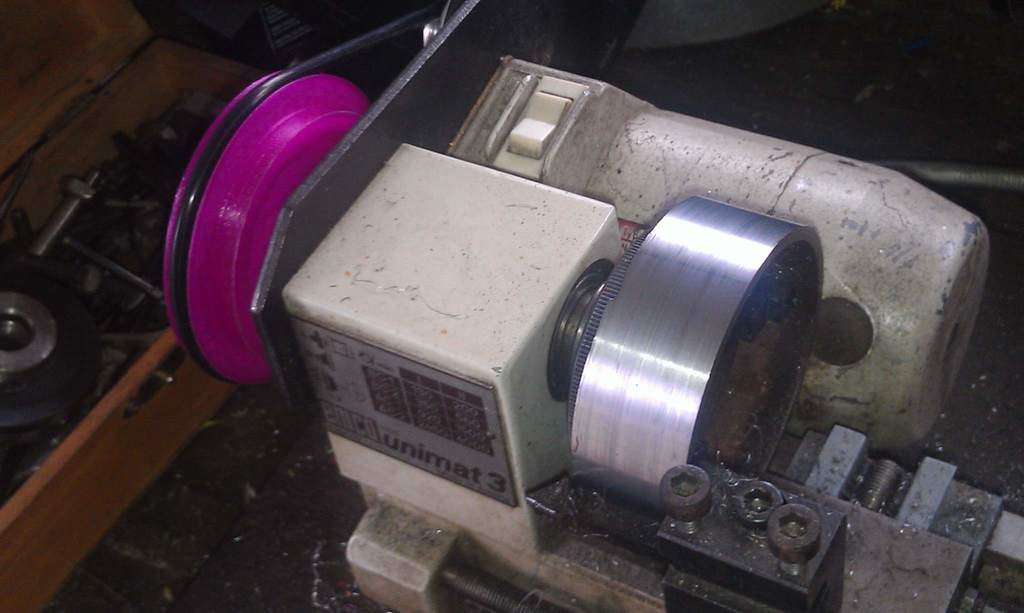
Emco Unimat 3 low and high speed pulley set
prusaprinters
<p>The wonderful EMCO Unimat 3 lathe, for all its extensive set of attachments never had anything resembling a back gear nor did it have the analog of the slow speed pulley bracket available for the earlier Unimat SL. This pulley set is an easy print and gives you larger headstock pulleys than the original for lower speed and higher torque, whilst the smaller-than-original-sized pulleys give higher speeds at the expense of torque. They came about when I was contemplating making a printed replacement for one of my U3's that arrived off eBay with a chipped pulley.</p> <p>The pulley set covers both the M14-threaded headstock spindle and the M12-threaded milling column and are quickly installed by simply unscrewing the original black pulley and screwing on the required size.</p> <p>Shown in the photos is the M14-threaded 125% larger radius pulley (purple) being used with a carbide insert to easily machine the outside of a large piece of fairly hard steel pipe.</p> <p>The idler pulley is employed here to give the lowest stepdown speed available. The belt is the standard BS336 O-ring which stretches over the larger pulley, albeit very tightly.</p> <p>Conversely, some rotating toolbits such as tiny mills, dental burrs, cutoff wheels etc. could benefit by being spun faster. The smaller pulley sizes are at 50%, 75% and 67% radius of the original black pulley, and are used with the small belt (BS331 O-ring). Another photo shows an M14-threaded 67%-radius red pulley being used with a small slitting saw and guide (a piece of curtain rail extrusion) to cut the short side off a piece of rectangular aluminium section.</p> <p>Also shown is the M12-threaded 67%-radius sized pulley on the milling column with a small grinding wheel being used to cut scalloped indents in a 45mm rotary craft cutter blade.</p> <p>(the lathe is roughly covered with aluminium cooking foil here).</p> <p>SAFETY NOTES</p> <ol> <li><p>With the large headstock pulleys the belt guard will no longer close so just keep your FINGERS CLEAR.</p> </li> <li><p>When using the smaller-than-original pulleys, be mindful that the toolbit or chucked job is SPINNING FASTER than it would normally be with the standard pulley.</p> </li> </ol> <p>Thus things like the tightening tommy bars etc. will fly out of the chuck with more force. Be careful and ALWAYS WEAR EYE PROTECTION.</p> <p>Note that for the smaller pulleys, to help remind me of the faster spindle speeds I printed these in bright colours (red and orange) whilst the large pulleys are other colours.</p> <p>PRINTING NOTES</p> <p>I firstly recommend printing the two test bosses before starting with the pulleys so you know that the thread printed ok.</p> <p>There is an M14 boss for the headstock and an M12 boss for the milling column.</p> <p>When fitting the pulleys for the first time make sure you take care to thread them on squarely and evenly right up to the shaft flange, gripping the pulley with a piece of cloth and being careful not to cross-thread. I also fitted them immediately off the printer whilst they were still warm.</p> <p>Print the pulleys with the smaller rim upwards. I used PLA with 25% infill, no raft, and with touching buildplate support as the outer face is recessed like the originals. For light-duty and occasional use PLA works just fine however ABS or PETG would perhaps be even better.</p> <p>I've included the STL's for a range of pulleys here (including 100% in case you need to replace broken originals) but if you want to generate your own custom-sized pulley, feel free to modify the OpenSCAD script.</p> <p>You should only need to alter two things:</p> <ol> <li><p>the SCALE variable, where 1.0 will generate a pulley at the Unimat3's original size, 1.25 for 125% larger radius, 0.67 for 67% of the original radius etc.</p> </li> <li><p>the call to M12Thread() or M14Thread().</p> </li> </ol> <p>In addition there are 150% and 175% increased radius pulleys, but I've not printed them. For these you will need something like a BS340 O-ring or thereabouts.</p> <p>The script uses the excellent and easy-to-use thread library 'OpenSCAD threads module' by Dan Kirshner: <a href="https://www.thingiverse.com/thing:1938150">https://www.thingiverse.com/thing:1938150</a> <a href="http://dkprojects.net/openscad-threads/">http://dkprojects.net/openscad-threads/</a></p> <p>Just put the library in C:\Program Files\OpenSCAD\libraries\Thingiverse and it ought to be good to go.</p> <h3>NEW ADDITION - Unimat 3 pulley with Unimat SL thread pattern adapter</h3> <p>I was asked in the comments if the pulley could accommodate the Unimat SL thread patterns. I've modified the script (actually it is a new upload) so you can produce the pulleys with a 16.9mm dia lip and series of mounting holes. I don't have an SL thread pattern to test it with so I'm going on the measurements provided.</p> <p>I've generated two STLs of the original size pulley for this, one with the cross holes as plain 4.5mm diameter, and the other with those holes threaded M5 so that the pattern can be secured with cap screws. You'll find both in the Files section and some pictures of them above.</p> <p>If someone can print either of those and let me know if they allow Unimat SL thread patterns on the Unimat 3, I'd be grateful. Thanks.</p> Category: Machine Tools
With this file you will be able to print Emco Unimat 3 low and high speed pulley set with your 3D printer. Click on the button and save the file on your computer to work, edit or customize your design. You can also find more 3D designs for printers on Emco Unimat 3 low and high speed pulley set.
