Emergency Stop button for Printrbot Play
thingiverse
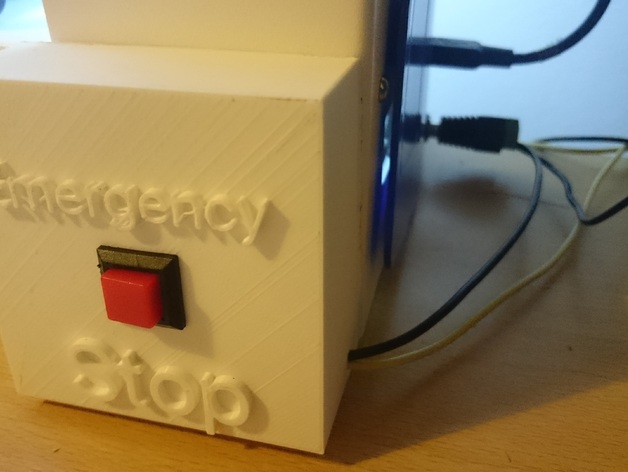
This is an emergency stop button for my PrintrBot play. It screws into the four screws holes on the bottom right hand part of the printer, using the existing screws. Using a "Push to break" switch on Amazon, and some cables you can run the negative wire through the switch and back to the Printrbot, which gives you a nice "Emergency Stop" button. When the button is pressed, the Printrbot loses power and cannot continue. Warning: You can break your printer, PSU and other things if you screw up the wiring. Be sure you know what you're doing before you attempt this. All information here is "as is" and simply documents what I've done. I cannot and will not be held liable for any breakages of any sort because you tried to follow what I've done. This is useful if you notice something disastrous happening, such as the hot end slamming into the print bed and you need to stop the printer immediately, and not when Octoprint (or whatever you're using) stops sending instructions to the printer and it's buffer clears. This will stop the printer dead, whatever it's doing. Not in a minute or a few seconds, it will stop immediately. It'll have no choice; it has no power. I've been running the Play off a ATX PSU, this means my handy inline 12v switch is no good anymore, plus I can now power my Octoprint Raspberry Pi and some sexy LED lights all from the PSU. However, killing the power to the Raspberry Pi suddenly is probably a bad idea for the longevity of it. So this was an easy way of killing power to the Play without turning off anything else. Note: This WILL NOT work with the Heated Bed upgrade, as this needs to connect to the PCI-E connector coming from the PSU, and the switch cannot break the several connections coming from the PCI-E connector. You cannot power the play from the regular 12v supply as I've done here and power the heated bed; it simply won't work and will probably damage the wiring and cause fire. I've wired in a ATX power supply, using a Molex extension cable (I don't mind cutting up a cheap extension cable, but I want to leave the PSU itself as is) and some standard plugs. All parts brought from Amazon. Links are all below. I'm still using the connector through the side to power the Play, and not powering from the PCI-E connector. I couldn't get the Play to power from the Molex connector and heat the bed at the same time. BE AWARE - This fits MY printrbot play. The four screws are NOT uniform in their location, they differ slightly on each corner. This made measuring them a pain in the ass and I have a feeling the screw holes are made in a "close enough to what we want" fashion by Printrbot. You may have to modify the model a little to make it fit YOUR Play. I have no idea how uniform each batch of Plays are, or even if they are different within each batch. The STL file includes both the lid and the base. Use Cura's "Split Objects" feature, and delete one of the models so you only print one at a time, otherwise it won't fit. Print the lid (part with text on) the correct way around, using supports, for the best finish. The base needs no supports. I printed both parts with brims to prevent warping. You'll need to sand down the inside of the lid to make it fit - It's a tight fit. If you're using thicker cables than I am, you may need to file down the little slot in the lid as well. Links for the bits I've used on Amazon (These are affiliate links, buying through these will get me a small amount of commission which I'll probably use to buy more filament with!): PSU: Corsair CP-9020096-UK VS Series VS450 ATX/EPS 80 PLUS 450W Power Supply Unit, UK Small Extension lead for PSU's Molex connectors: StarTech.com LP4 to 2x LP4 Power Y Splitter Cable M/F Push to break switch: Red Square On(Off) Momentary Push to Break Switch SPST Power connector to go into the side of the Play: BW 10 Pcs 5.5mm x 2.1mm DC Power Cable Male Connector Plug for CCTV Camera Print Settings Rafts: Doesn't Matter Supports: Yes Post-Printing Sand down the inner part of the lid, where it will meet the base. The fit is very tight, and you'll need to sand it down a little before it fits.
With this file you will be able to print Emergency Stop button for Printrbot Play with your 3D printer. Click on the button and save the file on your computer to work, edit or customize your design. You can also find more 3D designs for printers on Emergency Stop button for Printrbot Play.