Enclosure Fume Filter For 3D printers and others
thingiverse
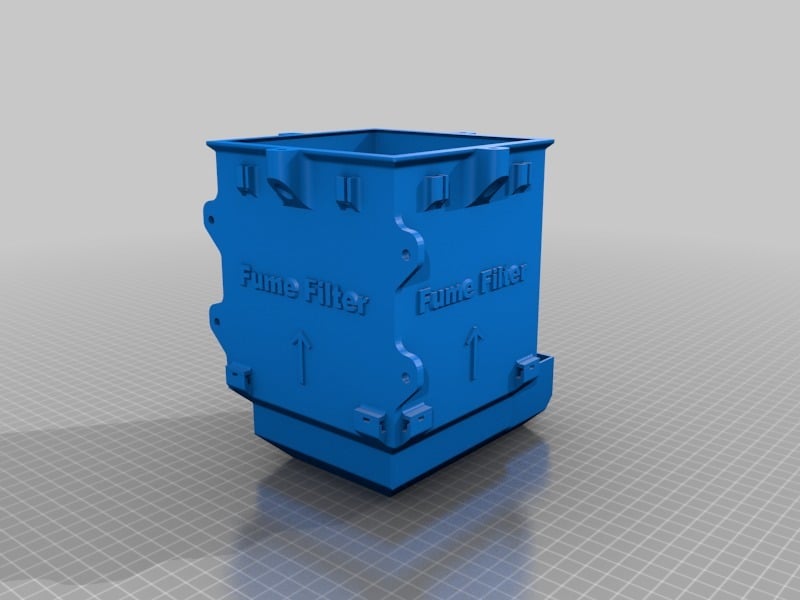
This is a fume filter to use with 3D printers and other machines that stay inside a enclosure. This can be installed inside enclosure, you need do a 110mm to 120mm hole to exhaust OR you can use the vertical mount version to loop air inside enclosure without exhaust. Prior study can be found here: https://shop.prusa3d.com/forum/user-mods-octoprint-enclosures-nozzles--f65/my-handmade-enclosure-for-prusa-t23384.html (Read whole thing) ## As 08/05/2019 i recommend you use only the Blower Variant. # **IMPORTANT NOTES:** * Fan height are 25mm and not 35mm! Don't use other fan than noctuas, if you wan't use commun fan i will post a remake for such, eg: DELTA. * You must have very good enclosure isolation, air must not escape outside other than filter There are many filters out there, but they all share same mistake, they don't have enough filtration area, that will filter only a small percentage of the particles but all the others will escape and contaminate the room. Even if you clone tons of separate filters it will only purge air from inside but will output bad air. I have made other filters in the past and i also start small, they seen ok because air at exit seens pure (no smell) but that was another mistake, the lack of smell on output doesn't mean clean air, once i buy a device to test the air i was shocked, my small filter (120x120x35mm) did almost nothing, since output values are very likely inside. So i start to build bigger filters and test, the next itineration cut the particles a lot more, from a value of 800-900 it goes down to 120 at output with a blast, that was a big improvement, still i was not happy. That's why i come with this last version, the biggest i can given my area, more HEPA and more GAC. The output values are great and air become truely clean and ok to breath. # **Noctua Variant** ## **SPECS:** * Can be installed inside or outside enclosure * **Fan:** 120x120x25, Dual recommend or single, Noctua * **Filter:** 115x115mm * **Total Dimension:** 120x120x170mm * **Screw to Screw mount point:** 133.60mm * **Aproximate Weight after fill:** 1.7KG ## **HARDWARE:** 1. 2 x Noctua NF-F12 industrialPPC-3000 PWM (I use 24V version) 2. 4 x M4 self trap screws 3. 4 x M3 screws 4. 4 x M3 Hex Nut 5. 4 x Fan included screws 6. Pre-Filter (https://www.aliexpress.com/item/Cotton-Filter-In-Outlet-Filter-HEPA-Vacuum-Cleaner-for-Philips-Electrolux-Motor/32823534510.html) 7. HEPA Filter (https://www.aliexpress.com/item/3in1-Compound-Filter-Hepa-Filter-for-Nobico-NBO-J003-J006-J008-J009-A-J011-PM2-5/32955417479.html) 8. GRANULAR ACTIVATED CARBON (GAC) (https://www.ebay.co.uk/itm/GRANULAR-ACTIVATED-CARBON-Marine-Aquarium-Fish-Filter-Koi-Pond-all-water-types/261530743716) 9. Carbon filter (Required to trap the GAC) (https://www.aliexpress.com/item/3in1-Compound-Filter-Hepa-Filter-for-Nobico-NBO-J003-J006-J008-J009-A-J011-PM2-5/32955417479.html) 10. (Optional) Fan grill/protector + 4 x M3 Spacers ## **NOTES:** * You can opt to use only one fan, if so set the fan at prefilter as push and not at exit! * I used 3 HEPA filters and you can use any DIY filter since they fit and trap GAC inside. You can use any combination you fell right. * I choose Noctua fan due performance/noise factor, and two of them to improve air flow since thick filter and can go lower RPM for improved noise. There are single fans much more strong than these two noctuas together but they will be very loud. * If you put a thick fan grill you need spacers for the fan holder, you can design and print them if not in stock # **San Ace B97 9BMB Blower Variant** https://www.sanyodenki.com/archive/document/product/cooling/catalog_E_pdf/San_Ace_97BMB33_E.pdf I've bought 9BMB24P2K01: https://www.ebay.co.uk/itm/Fan-Blower-San-Ace-B97-Series-Centrifugal-24-V-DC-97-1-mm-33-mm-1-61-m-m/392084939650 https://youtu.be/9WbOhrqViRQ ## **SPECS:** * Must be installed inside enclosure * **Fan:** San Ace B97 9BMB 97x33 Blower, any from datasheet * **Filter:** 115x115mm * **Total Dimension:** 172.90x146.60x170mm * **Screw to Screw mount point:** 133.60mm * **Aproximate Weight after fill:** 1.8KG ## **HARDWARE:** 1. 1 x San Ace B97 9BMB Blower 2. 4 x M4 self trap screws 3. 2 x M4x10 button screws 4. 2 x M4 Square Nut 5. See noctua variant hardware for filters # **Test Method** I used octoprint my with plugins for SDS011 and a external air monitor https://github.com/sn4k3/SDS011-Frontend https://github.com/sn4k3/Octoprint-SDS011 1. Print a long ABS object 2. Wait some time to saturate the air to the max values (Some ABS create a smoke cloud inside and reach sensor max value and trigger alarm sensor) 3. Turn ON the fan at max. speed and check the output values from exterior 4. If PM values are high mean bad filtration, low values or equal values on current room air mean good and proper filtration ## **Results:** If you saturate air for a long period of time and then switch on fans, the air will purge very fast as can seen on graph. I can now open door mid print and put my head inside without fell bad. You can also reduce fan speed and leave on all the time, like mid speed, i have a PWM controller for the fan so i can adjust speed and fan state from outside. The octoprint plugin will allow you to see the best speed/particles ratio, if you leave it max the air on enclosure will be clean all the time, but it will also remove some hot from inside, so you can achieve same results with lower speed but keep more temperature inside and improve the noise. # Control Fan Speed **You will always need a switch before the module to turn OFF and ON fans, most of the controllers will not provide a 0% PWM Cycle. Switch the VCC line and not the GND.** ## For DC fans (3 pin without PWM) https://www.aliexpress.com/item/Mini-5A-90W-PWM-12V-DC-Motor-Speed-Controller-Module-DC-DC-4-5V-35V-Adjustable/32843923964.html ## For PWM fans (4 pins) You need to build your own controller like i did, i can't find any proper 555 circuit to drive the PWM signal to fan. Maybe you can use this: https://www.aliexpress.com/item/32978091947.html Otherwise you can use PWM fans as DC switching (Method above) Or buy my fan controller module that respect the norm and is top notch: https://www.ebay.co.uk/itm/183894047866 # Changelog **08/05/2019:** Added blower solution **13/03/2019:** Added R2 version of Noctua, it allow vertical mount inside enclosure to loop air inside. Can also be mounted to exhaust.
With this file you will be able to print Enclosure Fume Filter For 3D printers and others with your 3D printer. Click on the button and save the file on your computer to work, edit or customize your design. You can also find more 3D designs for printers on Enclosure Fume Filter For 3D printers and others.