Ender 3/3_Pro Cable Chain. Useful Upgrades
thingiverse
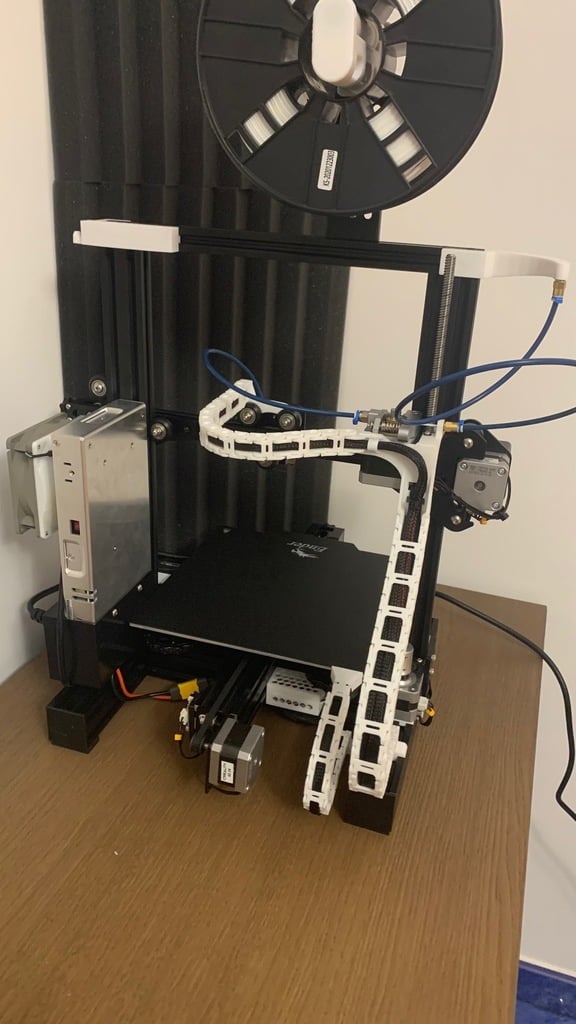
This is a collection of my "heavly remixed" upgrades for ender 3 pro. I really liked the idea behind the cable chain maded by NG_Designs ; https://www.thingiverse.com/thing:3769941 but i decided to redesign it because it's really hard and long to print. NOTE: for safety reasons i suggest u to set up the MAX Z HEIGHT of your printer 0.5-1CM LESS to avoid damaging the Bowden Tube (watch photos), even if its designed to not damaging it, i suggest u to lose 1 cm of height to avoid troubles (im using the full Z-height but on my own risc). U will also need to set up the correct lenght of your tube. (wach it on youtube) dont worry about X axis Lenght, its ok, just leave cables little bit lose to prevent the cables from being jerked during printing. IMPORTANT: this chain is NOT COMPATIBLE with the original and with all other designs u will find, because its mostly designed from zero or just heavly mixed, mesures and tollerances are different. BECAUSE OF IT u will need to use only my parts, or remix them to adapt. This chain is easy and fast to print, minimal support/infill and tweaking required. its big enough that u can even try to print it with bigger nozzles like 0.8 (i printed it with 0.4 nozzle and 0.32 height). let me know in comments if u try to use 0.8 nozzle. NOTE 1: before u will start to print all parts, try to print 4 pieces per part (Chain Parts), it will give u a nice understanding of what will be the final result. NOTE 2 : Big Chain (Small Chain also but less) parts are pretty precise, it could happen that after the print chain pieces will be hard to snap togheter and move, DONT worry, its normal, dont redesign them cause its a sweet spot of tollerance (i designed and printed 14 different examples ). Once u decide to use my design; Parts u need (chain): MIN 17 - MAX 19 from extruder to the hot end (Small Chain) MIN 12 from base mount to the bed (Small Chain) MIN 21 from base mount to the extruder (Big Chain) 1. u will need to print All Chain Parts u need and then connect all togheter. 2. once u have the chain u will need to "Post Process it" 3 close both chains (small and big) in circle 4 and start move each chain and rotate in way that all parts will rotate and scrub each other 5 this way after 10 minutes(maybe more) it will become perfect and each piece will rotate under its own weight. 6! maybe u will need to scrub them one at a time for better result, wear gloves to prevent hurting yourself. PS: maybe i will post a video in future, let me know in comments if u need help. This chain is pretty stable and HARD TO SNAPP OFF especialy where its connecting to various mounting parts. mount it the SAME ORDER as in the NG_Designs video https://www.youtube.com/watch?v=1bXfoMN2F5s&t=3s E. Mount snapps in easly, unscrew the rod (be patient and try to not lose screws or disalign the brass nut), mount the part first on the rod side and then snap it on, use 2 washers (its better) and rescrew all again. see photos. IF u know how,and u are able, i suggest u to cable-manage entirelly your ender 3 before put on the chain, but if u are not experienced in it, just avoid to move cables too much. IN the E-Mount there is a hole (watch photos) that u could use to pass E-Motor, X-stop and X-Motor cables, dont forget to zip them togher as on photo. IF u worry, or u feel that cabbles resulting too short u can avoid using the hole and pass them in traditional way (at some point let them exit from the chain), this way u will prevent to damage cables. ALSO E-Mount has a small Filament guide, u should use it like me (with bowden tube) or just with a little piece of it, it may not be so greate without it. Enyway, this hole is alligned good, u are always able to remix it if u need. Base Mount is a file with 2 parts, they are indipendent one from another, u will need to temporally remove the v-rail cover to mount them. Bed Mount is perfectly compatible with the original piece, and it goes in stead of the original cover that is zipped. my part also need to be zipped, buto U NEED TO ALIGN better your cabble before mount it on. its important cause of the allignement with Base Mount Part. Let me know in comments if u have some troubles or if u have suggestions. For now i will not redesign or change this thing (wasted to much time already), but maybe in future yes. The mobo cable guide is a bonus, u could use it to prevent cables being damaged from sharp edges of cutted metal, it just snapps in without troubles and stay in place without dropping out. PS: description is not good as i would like it to be, probably in future i will post a txt file with all instructions. PSS: models looks like trash, in fact im a noob in 3d design, using meshmixer only, anyway they are printing pretty well.
With this file you will be able to print Ender 3/3_Pro Cable Chain. Useful Upgrades with your 3D printer. Click on the button and save the file on your computer to work, edit or customize your design. You can also find more 3D designs for printers on Ender 3/3_Pro Cable Chain. Useful Upgrades .