Ender 3 60mm Hot End Fan Mount
thingiverse
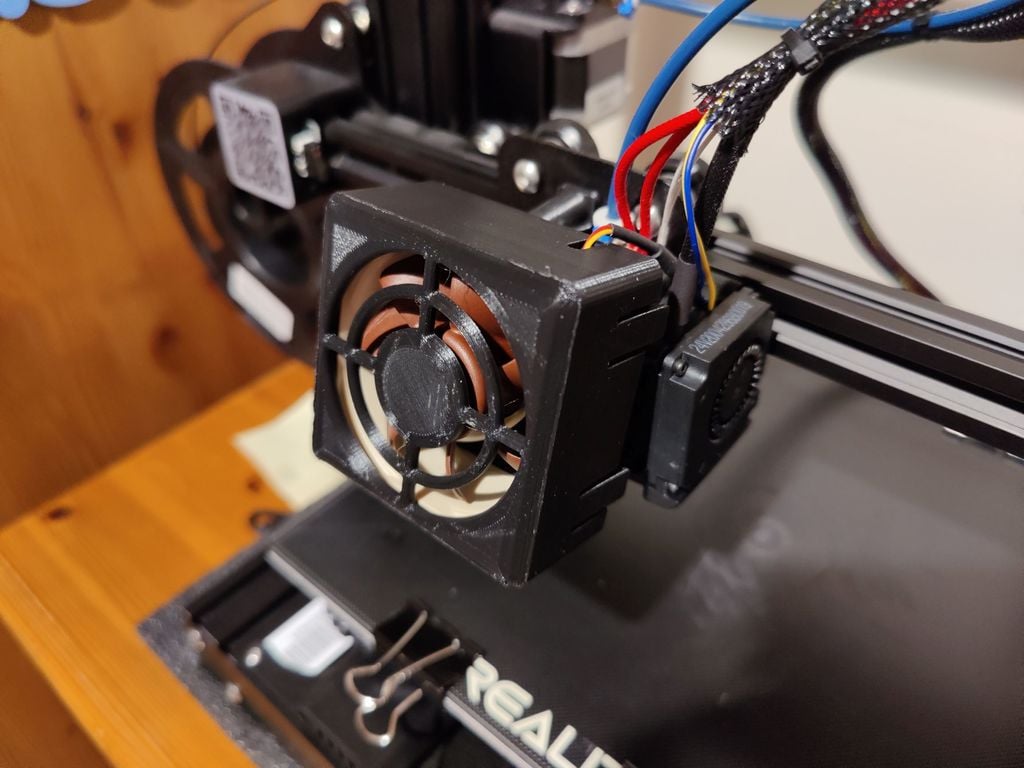
## WHY I DID IT ## The standard noisy 40mm hot end fan on my Ender 3 started to wear, go into resonance and get really noisy so rather than just replace it I decided to upgrade it for a significantly quieter one. After some research on flow rates I decided on a Noctua NF-A6x25 FLX 60mm fan which then needed some way to mount it. I didn’t want to change the part cooling fan so the stock fan is retained in this design. ## WHY I CHOSE THE NF-A6x25 FLX ## A web search shows that the stock 24V 40mm x 10mm fan has an airflow of 7 CFM and is noisy (as we know) at ~70dBa. The Noctua 40mm x 10mm fan is much quieter at 18dBa (or less with Low Noise Adapters) when it has a maximum airflow of 8.2 m³/h. A web conversion gives this as 4.8 CFM - 30% less airflow than stock! A Noctua 40mm x 20mm claws some of this deficit back at 5.3 CFM but still reduces airflow from the stock fan by a quarter. Others have used these without problem so they obviously work but because everything on the E3 is built to a budget I wanted to be sure not to risk anything (thermal runaway, burn out or the like) or shorten the life and to give me the headroom to run hotter with an all metal hot end down the line. To get the same airflow from a 'silent' fan as the stock fan you must go for a larger size and the next size up is the 60mm. The Noctua NF-A6x25 with the Ultra Low Noise Adapter has a noise level of just 8.2dBa (about the same as light breathing!) and still provides a bit more airflow than the stock fan at 9.8 CFM so giving a 40% higher margin over the stock fan for safety and/at higher temp printing. As the Noctua NF-A6x25 is a 12V fan spinning at 2100rpm and the Noctua ULNA is just a resistor in a wire to reduce the voltage so the fan spins at 1600rpm, I used a Buck convertor to reduce the 24V of the printer to 8V equating to the ~1600rpm of the NF-A6x25 fitted with a ULNA. With the 40% overhead you could even go lower on the Buck controller if all you wanted to do was maintain the same airflow as the stock fan. ## ABOUT THE DESIGN ## I wanted a design that gave a smooth airflow and balanced transition from the round profile of the fan to the square profile of the hot end while not impacting access to the extruder nozzle for bed leveling so I placed the fan accordingly. However I then felt that the extra weight of the fan hanging further out needed additional support so the fan mount wraps around the hot end mounting plate and seems to do the job nicely. I didn’t want to chop up the Noctua leadwire and wanted a neat way to hide the fan connector so I moved the part cooling fan outboard a little and added a cavity behind it to route the part cooling fan wires through and coil the Noctua fan leadwire and connector into. Doing this I felt moved the part cooling fan too far away from the extruder nozzle to continue using the stock air guide so I designed a new one of those too with a more guided and smoothed airflow. ## HOW I ASSEMBLED IT ## 1. Assemble the fan to the mount moulding. Because of tool access through the printer's Y-axis and hot end mount I recommend attaching the Noctua fan to the fan mount using the self-tapping screws supplied with the fan before assembling the assembled mount and fan to the hot end bracket. The mount uses the stock screws throughout and the stock hex/Allen key is (just) long enough to reach through the fan to the top mounting screw. As I only printed it in PLA+, I glued a double layer of aluminium foil to the inside of the mount adjacent to the thermistor block to try to protect the mount moulding from heat. Whether needed or not I’ve not had any problems with distortion at higher PLA+ temps. Then I detached the stock fan guard and attached the new fan assembly to the hot end mounting plate using the stock screws. 2. Make up the wiring loom and set the Buck converter output. Being a 12V fan, I wired the Noctua fan via a LM2596 Buck converter (which as I wrote above I set to give a 8V output from the 24V input from the PSU) assembled into a rail mounted box I downloaded from Thingiverse, cut off the hot end loom cable ties, cut into the cable sheath and threaded the wires through to the hot end. I cut the female connector off the end of the Noctua extension cable supplied with the fan, cut my loom wires from the Buck converter to length, soldered all the wires up and protected them with heat shrink. As the hot end fan runs all the time and following advice that others have published I connected the new fan wires directly into the control board PSU input header rather than the control board hot end fan output header as I’d read of instances where the board had been fried through changing the hot end fan. 3. Remove the stock fan and fan guard and attach the new fan. I disconnected the old fan wires from their header on the control board and pulled them through the sheath, removing the old fan from the printer. I connected the Noctua fan connector to the extension lead connector, coiled the connector and excess leadwire into the cavity I’d designed behind the part cooling fan, assembled the part cooling fan and new air guide to the fan mount to hide everything in place, tidied up the sheath and fitted new cable ties. Finally I printed the fan cover with the new assembly to make sure it still printed nicely and clipped it in place over the fan. ## FAN GUARD CLIPPING ## Because I didn't want the fan guard rattling, I deliberately designed the clips to keep tension on the fan mount flange. Depending on the layer height you choose for both parts, you may need to tweak the clipping edges of the fan mount flange with a scrape of a knifeblade or a brush of fine sandpaper to tune the clipping for your print. ## EDIT (1): PRINTING THE FAN GUARD IN PETG ## While I've proven to myself that the clipping of the fan guard works well in PLA+, a friend of mine has tried it in PETG and found that PETG, though stronger, is too brittle. If anyone else has same problem I may do a version with less aggressive clip features. Let me know and I'll work with you to find a solution. ## THE DOWNSIDE ## As I’ve already fitted a Bigtreetech SKR Mini E3 V2.0 the steppers are almost silent so unfortunately this mod does come with one downside - it highlights just how noisy the rest of the fans on the Ender-3 are so that is where my next project will focus ...replacing them. Enjoy the mod and though I don't make any promises, I hope it works for you as well as it does for me.
With this file you will be able to print Ender 3 60mm Hot End Fan Mount with your 3D printer. Click on the button and save the file on your computer to work, edit or customize your design. You can also find more 3D designs for printers on Ender 3 60mm Hot End Fan Mount.