Ender 3 Cura print area fixes
thingiverse
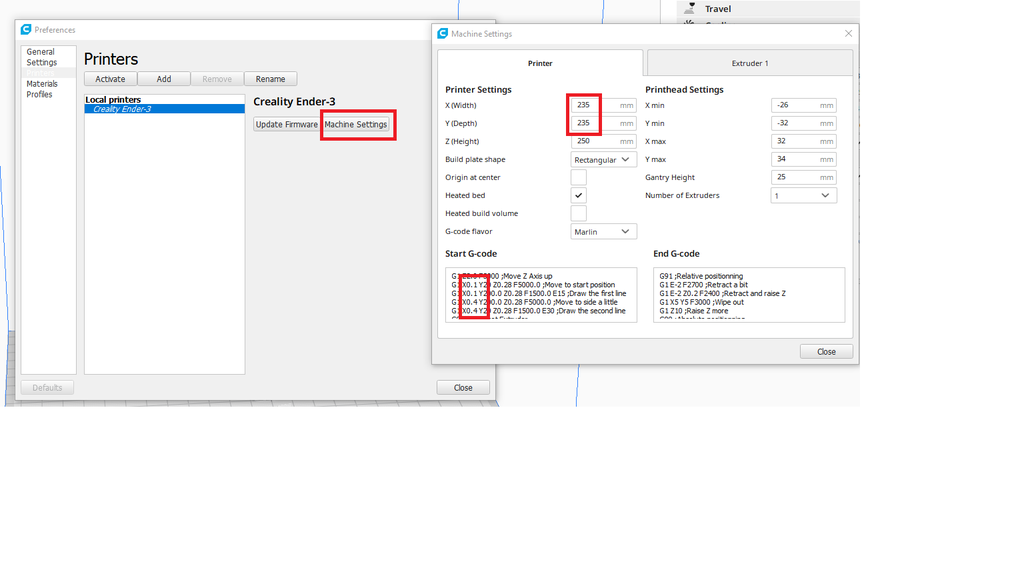
Well, Cura has been upgraded again, and yet again it's screwed up everyone's Ender 3. For some reason the people at Ultimaker don't like Ender 3 owners making use of all their printer's printable area. If you look at the image above you will see the changes you need to reclaim your Ender 3's printable area from Cura. What do the setting changes do? The first is the print bed size, the print bed on the Ender 3 is actually 235 mm square, Cura sets this to 220mm square, I guess Ultimaker are trying to prevent the print head snagging on the bed clips. Personally I think most people who own a 3d printer are smart enough to position their bed clips as needed, they don't need some software nannying them. I doubt there are many prints out there that take up the entire bed area, so there is usually somewhere to move the bed clips to so they are not in the way. Also the clips don't need to be pushed all the way onto the bed to do the job. If you have a glass Ender 3 bed, then you might like these tiny, low profile clips, that take up hardly any space rather than the chunky bulldog clips that the Ender is supplied with.. https://www.amazon.co.uk/sourcingmap-26mmx14mm-Picture-Spring-Hanger/dp/B0747NBBQK/ref=sr_1_9?keywords=photo+frame+clips&qid=1580565160&sr=8-9 The second, and more annoying 'feature' of Cura is the position of the purge line that is printed on the left of the bed at the start of each print. For some reason this is placed 10mm inboard of the print bed edge. When I first got my Ender, and used Creality's own slicer, it made the purge line right on the edge of the bed leaving all the space for the print. Well the Creality slicer is just a very old version of Cura, with lots of missing features, so I sensibly upgraded to the latest version of Cura and rather perturbed by the fact it liked printing the purge line quite a bit further to the right of the bed edge. By making the changes to the 'Start G-code' that runs at the beginning of every print you can easily move the purge line back over to the edge of the bed where it belongs. Simply change the 4 occurrences of the purge line x co-ordinates to remove 10 millimeters , so the left line moves to 0.1 mm, and the second line to 0.4 mm. Just remember, if you make these changes, the next time you upgrade Cura, These settings will be lost, as well as the BLTouch initialization, if you have one installed.
With this file you will be able to print Ender 3 Cura print area fixes with your 3D printer. Click on the button and save the file on your computer to work, edit or customize your design. You can also find more 3D designs for printers on Ender 3 Cura print area fixes.