Ender 3 - Direct Drive Adapter
prusaprinters
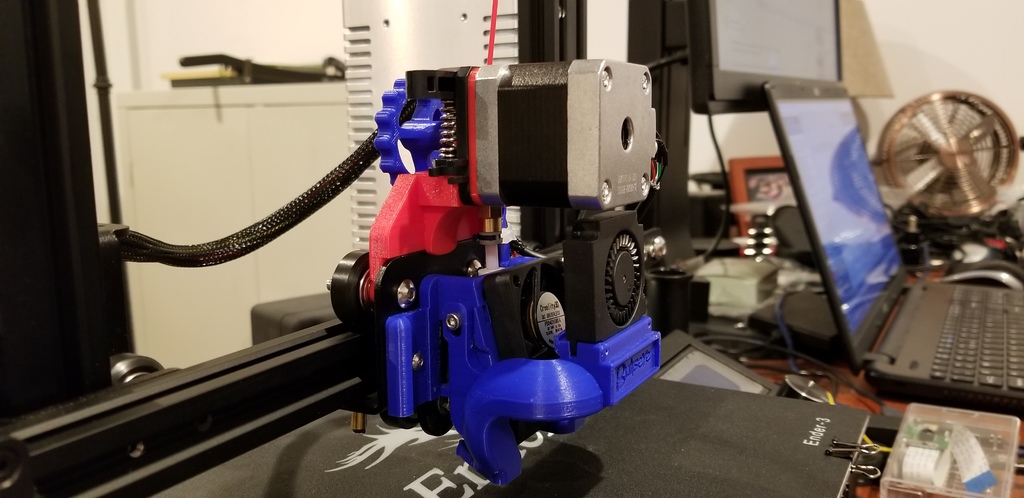
<p>This is a direct driver filament adapter that I created for my Ender 3. I reused pretty much all my stock parts, except I needed to replace 2 of the stepper mount screws with M3-20 to account for the new mount depth. Everything fits really nice, and I'm even able to continue using ReplayMD's <a href="https://www.thingiverse.com/thing:2776404">filament knob v2</a> and the <a href="https://www.thingiverse.com/thing:2759439">Petsfang Bullseye Duct</a>. Although I did need to trim the cable guide from the Petsfang fan base.</p> <p>Notes:</p> <ul> <li>The 2 red components in the pictures are the ones required to convert your stock Ender 3 to direct drive.</li> <li>This has been tested by <a href="/make:609713">rbalandis</a> and works fully with the <a href="https://store.micro-swiss.com/collections/cr-10-ender-2-3-tronxy-cr-10-pro">Mico Swiss</a> hotend</li> </ul> <p><strong>Updates:</strong></p> <p><em>2019.02.15</em> - I added a cable chain end by request. This terminates johnniewhiskey's <a href="https://www.thingiverse.com/thing:2920060">Ender 3 Cable Chain</a> directly to the z axis assembly so both ends of the chain are perfectly aligned and alleviate the unnecessary tension on the chain.</p> <p><em>2019.02.03</em> - I added a cable support that attaches to the old stepper mount. I primarily designed this to keep the cable out of the way for video recording from behind, but it also cleans up the cable as well.</p> <h3>Print Settings</h3> <p><strong>Supports:</strong></p> <p>No</p> <p><strong>Resolution:</strong></p> <p>0.2</p> <p><strong>Infill:</strong></p> <p>40%</p> <p><strong>Notes:</strong></p> <p>Wall Thickness of 1.2 - 1.6mm (3-4 walls)</p> <h3>Post-Printing</h3> <p><strong>Adapter Install</strong></p> <p><strong>Print:</strong></p> <p>100% infill for adaptor</p> <p>30% infill for spacer and cable support</p> <p><strong>Required:</strong></p> <ul> <li>2 x M3-20 screws</li> <li>50-60 cm of Old USB cable</li> <li>Small heat shrink tube or electrical tape</li> </ul> <p><strong>Steps:</strong></p> <ol> <li>power off the printer</li> <li>disconnect extruder stepper motor cable and bowden tube</li> <li>remove extruder and stepper motor from mount</li> </ol> <p>(save everything except 2 screws closest to the extruder output) 4. reattach the extruder to the stepper motor with the new 2.5mm spacer in between</p> <p>(compare the direction of the connector to the supplied photos and don't bother including the 2 screws closest to the extruder output) 5. remove the top 2 rollers from the x axis carriage (discard the 2 aluminum spacers) 6. slide the direct drive adapter on where the 2 aluminum spacers were previously located</p> <p>(notice that there is a small lip in the middle that slips over the x axis carriage) 7. cut the bowden tub to size</p> <p>(The idea is to have the extruder perfectly flush with the adapter and to have the bowden tube unable to wiggle up and down. I did this by cutting the tube a bit too long, and continually slicing off a little at a time until everything fit perfectly) 8. using the 2 M3-20 screwes, secure the stepper to the direct drive adapter 9. add approximately 50-60 cm of wire to the stepper extruder cable</p> <p>(splicing an old usb cable or similar 22ga wire into the cable) 10. (optional) I also fed the usb cable through my wire harness to keep things neat 11. use heat shrink or electrical tape to protect connections</p> <p><strong>Cable Support Install</strong></p> <p><strong>Required:</strong></p> <ul> <li>2 x M3*8 Screws</li> <li>2-3 x Zip Ties</li> </ul> <p><strong>Steps:</strong></p> <ol> <li>slide the cable support onto the old stepper motor mount</li> </ol> <p>(it should be parallel to the x-axs rail) 2. screw the M3*8 through 3. attach zip ties though the provided slots</p> <p><strong>Notice the two center wires are swapped...</strong></p> <p>If I missed anything that you guys notice, or if you think anything could be more clear, leave comments and I'll do my best to update.</p> <p>I'll try to post some pictures of my adapter with the stock ender fan mounts too.</p> <p>I hope this works as great for you guys as it's working for me!</p> Category: 3D Printer Parts
With this file you will be able to print Ender 3 - Direct Drive Adapter with your 3D printer. Click on the button and save the file on your computer to work, edit or customize your design. You can also find more 3D designs for printers on Ender 3 - Direct Drive Adapter.