Ender 3 Dual Z-Screw with single stepper
thingiverse
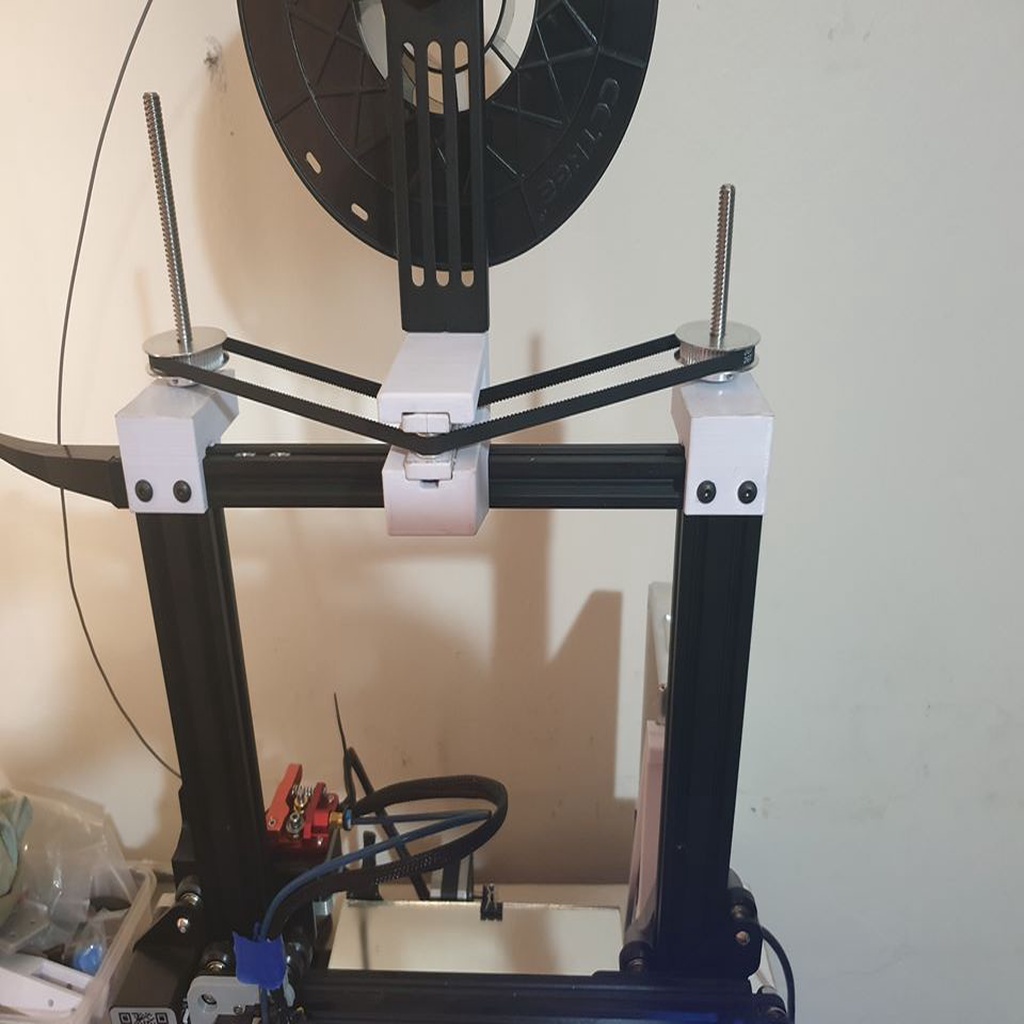
Design an Ender 3 (and Ender 3 Pro) Dual Z-Screw setup, using a single Z stepper without sacrificing Z-Height build volume. This system uses two new lead-screws, each 500mm long, to ensure no loss in the Z-Height. I suspect that 450mm or even 400m lead screws will be sufficient, but it's best to check before making a purchase. Please note that when mounting the tensioner, it's recommended to turn it around 180 degrees so that the tensioner extends towards the rear of the printer (opposite to attached pictures), especially if you have any mods on the hotend (cable guides or direct drive etc). Print two of 'top_left_up_20_MK1.stl' and one of each other file. STLs are laid out in the correct orientation for printing. It's worth noting that the PSU Mounting bracket uses most of the 235x235 build surface area, so it may need to be rotated slightly to fit. If your build plate is set to the stock 220x220, your slicer might not allow you to slice the part. At this time, the mounting holes for the PSU are not perfectly aligned. I have to ream them out a bit to get the PSU mounted to the bracket. A new version will be uploaded when it's available. The Lead-screw bracket and Tensioner require supports while printing; all other files can be printed without supports. All holes in the printed parts may need drilling to ensure bolts fit properly, as some filament contracts more than others. You'll need the following components: 1 x Lead Screw nut 2 x 60 tooth GT2 6mm pulleys. 3 x 608ZZ bearings 2 x 8mm Lock Collars 2 x 500mm lead-screws (this is what I used, but you may be able to get away with 2 x 400mm) 1 x 800mm closed loop GT2 6mm toothed belt 1 x 16 tooth idler pulley for GT2 6mm belt 1 x smooth idler pulley for GT2 6mm belt 18 x M5 by 10mm hex key bolts 18 x M5 V-Slot T-Nuts (I used the slider type, as they're easier to use) 2 x M3 by 20mm hex key bolts (idler pulley mounting bolts for Tensioner Pulley Holder) 4 x M3 by 12mm hex bolts (Lead Screw Nut mounting bolts) 1 x M4 by 30mm hex key bolt (tensioner adjustment) 1 x M4 Riv Nut for tensioner adjustment. You may need to heat the Riv nut a bit to get it seated in the tensioner housing, but be careful not to melt the tensioner bracket. Future modifications will include replacing the 2 lock collars and 2 608zz bearings with 2 Pillow Block Bearings, as well as modifying the PSU bracket for better alignment.
With this file you will be able to print Ender 3 Dual Z-Screw with single stepper with your 3D printer. Click on the button and save the file on your computer to work, edit or customize your design. You can also find more 3D designs for printers on Ender 3 Dual Z-Screw with single stepper.