Ender-3 EZR-Struder Direct-Drive OEM-Extruder Hero-Me-Gen-5
thingiverse
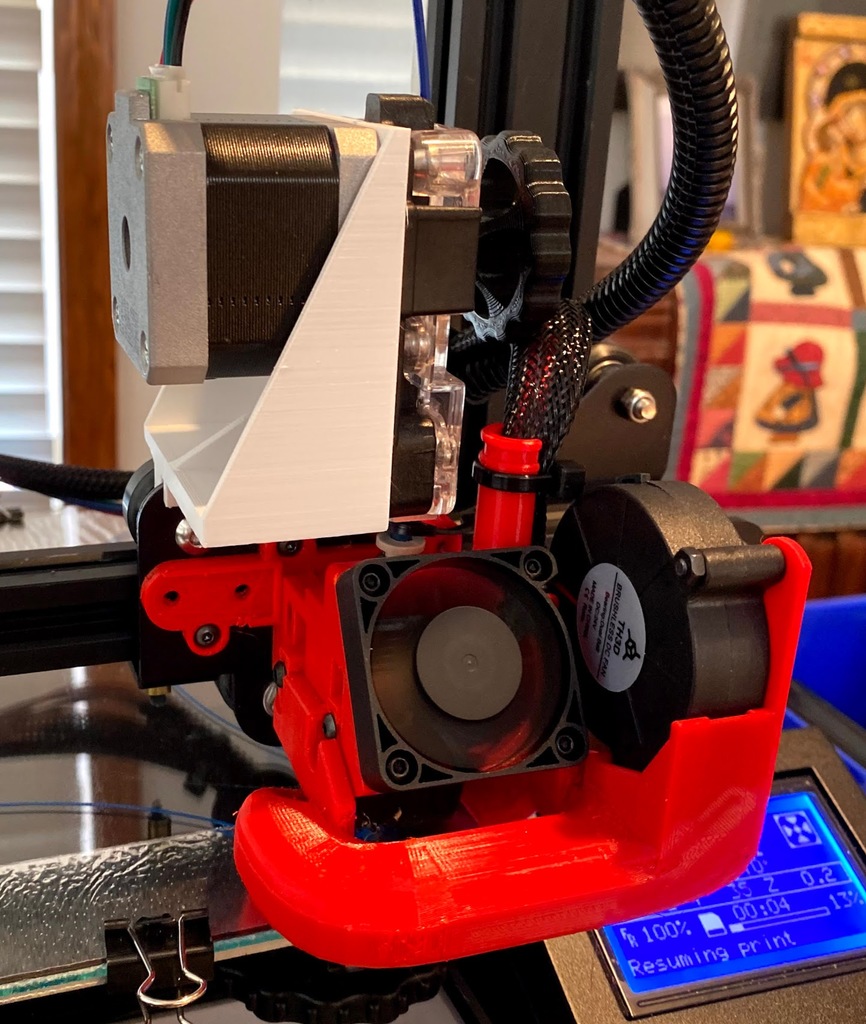
Update: Version 4 (EZR and OEM) is more rigid than version 3. You will have to buy an M5x50 screw for version 4. These brackets (Ender3_EZR-Dir-Dri_HeroMe_V3.stl* with EZR Struder, and Ender3_OEM-Dir-Dri_HeroMe_V3.stl with OEM extruder) are used on an Ender 3 Pro to convert a Bowden tube extruder to a direct drive extruder. An extruder motor extension cable must be purchased. By loosening the EZR Struder (or OEM extruder) hardware, and shifting it in the slots on the mounting bracket (and retightening the hardware), this design is compatible with the Hero Me Gen 5. *Note: For printers with the EZR Struder that do NOT use the Hero Me Gen 5, if the EZR Struder red button interferes with the left vertical channel when the X-axis bumps the X-axis limit switch, bracket Ender3_EZR-Dir-Dri_HeroMe_XStop_V3.stl may be more appropriate. This bracket has a built-in 3 mm spacer that keeps the EZR Struder 3mm farther away from the vertical channel. Here is a video of the EZR Struder shifting from left (with Hero Me Gen 5) to right (without Hero Me Gen 5). https://photos.app.goo.gl/bj3vK1xKugpf2TEt5 Here is a photo showing EZR Struder mounting without Hero Me Gen 5 installed. https://photos.app.goo.gl/5b2gbgk842cmvzxc6 Here is a video showing cable routings with Hero Me Gen 5 installed. https://photos.app.goo.gl/bMis2qV16DUQ3TXy6 These instructions are for mounting the EZR Struder WITHOUT the Hero Me Gen 5. Before Starting Installation > Buy a stepper motor extension cable. They are available on eBay. https://www.ebay.com/itm/2X-6pin-Stepper-Motor-Extension-Cable-for-JGAurora-Anycubic-Creality-3D-printer/153962689764?hash=item23d8e434e4:g:W30AAOSwkMNemhKY > Buy Capricorn tubing. > Buy small conduit from an auto parts store. > Have the EZR Struder, and hardware that came with the EZR Struder available. > Print the bracket. I suggest printing the bracket vertical, 40% infill, and with Cura's "Tree" support option. https://photos.app.goo.gl/Aj8BXNtAiCqLFCDP6 > While the hot end is hot: >> Extrude a little filament from the Ender 3, and then remove the filament from the extruder. >> Remove the nozzle and PTFE tube from the hot end. >> Run PTFE tube through the hot end to clean out any filament. >> Install the nozzle in the hot end. > Unplug the Ender 3 > Place a towel on the printer bed. > NOTE - When using a hex-wrench to LOOSEN or TIGHTEN a screw, only use the short end. If you use the long end (with the ball-shaped end) to tighten or loosen a screw you may damage the hex socket in the screw. Remove Bowden Tube Assembly > Put one hand under the extruder motor while removing the extruder screws so the motor will not fall onto the printer bed. >When handling the EZR Struder be sure to pinch it together when the screws are removed. Working On X-Axis Plate > Loosen the hardware for the lower roller and rotate the cam nut to release the tension on the upper two rollers. > Remove the upper two rollers, spacers, and screws. The rollers will likely be greasy. Place the parts on the towel. > Press the spacers into the 3D printed bracket with the spacers flush with the X-Axis plate. Notice that the spacers protrude out of the bracket in the direction of the rollers. https://photos.app.goo.gl/tjWDnUmDMkDp1n4k8 > Tighten hardware for the two upper rollers, then snug down the hardware for the lower roller. Rotate the cam screw so that the X-Axis plate is snug with the channel, but can be easily shifted side to side. If the X-Axis plate does not shift easily, or shifts too easily, readjust the can nut, and then tighten the hardware for the bottom roller. Mount EZR Struder To Bracket > Mount the EZR Struder, through the top four bracket slots, to the extruder motor. The wire connector should be at the top end of the motor. Snug down the screws but don't tighten them yet. > Use screws and locknuts that came with the EZR Struder to attach the bottom two holes in the EZR Struder and bracket. They should be SNUG but not tight. Hot End > Remove the hot end from the X-Axis plate. > Insert the Capricorn tubing (length will be determined later) into the hot end so that it bottoms out against the nozzle. Do NOT install the fitting at the top of the hot end at this time. The photo below incorrectly shows the fitting already installed. > NOTE - I inserted a screw into the LEFT hot end hole, and started the screw in the RIGHT X-Axis plate hole. That holds the hot end at the correct height, but allows the Capricorn tube to be to the right of the EZR Struder. That makes it easier to determine the appropriate Capricorn tube length to bottom out in the EZR Struder. > Use a Sharpie to mark the length to cut the Capricorn tube so it will bottom out in the EZR Struder. https://photos.app.goo.gl/1FPYpYSb9HtEGjLT8 > Cut the Capricorn tubing at the Sharpie mark. Make sure that you have a clean cut and the tube is not pinched. Use a sharp knife. Do not cut the tube with pliers. > Install the fitting over the Capricorn tubing at the top of the hot end. Mounting And Alignment > With the hot end removed from the X-Axis plate, push the Capricorn tube up into the bottom of the EZR Struder. It should bottom out inside the EZR Struder. > Shift the EZR Struder in the slots to line up with the hot end, and tighten all EZR Struder mounting screws. > Insert and tighten the hot end mounting screws. Wire And Cable Mounting > Connect the stepper motor extension cable from the Ender 3 wire harness to the extruder motor. Apply conduit to the extension cable as required. Add cable ties as required. Recheck > Recheck that all hardware is tight, that the X-Axis plate moves smoothly, and that the cables do not bind when the X-Axis moves. +++++++++++++++++++++ MISCELLANEOUS Version 2 (V2) Changes: > Slots are lengthened to better align the EZR Struder with the hotend when the Hero Me Gen 5 is installed > Gussets were added to the sides of the brackets to make them more rigid. Version 3 (V3) Changes: > The base of each bracket straddles the X-axis bracket and clamps to the X-axis bracket. This increases the rigidity of the bracket. Hero Me Gen 5 Installation (In addition to Hero Me Gen 5 instructions). Additional instructions are required because the Hero Me Gen 5 blocks access the one of the EZR Struder screws. > The Capricorn tube should already be cut to length and inserted into the hoted. > Install the EZR Struder BEFORE installing the Hero Me Gen 5. Loosen the 6 EZR Struder screws so that they are snug but allow the EZR Sruder to be moved sideways in the slots to align with the hotend. > Mount the Hero Me Gen 5 ducting w/hotend but only snug down one hotend screw. > Move the EZR Struder sideways in the slots to align the EZR Struder with the hotend. > Tighten the 5 EZR Struder screws that are accessible. > Remove the Hero Me Gen 5. > Tighten the 6th EZR Struder screw. > Install the Hero Me Gen 5.
With this file you will be able to print Ender-3 EZR-Struder Direct-Drive OEM-Extruder Hero-Me-Gen-5 with your 3D printer. Click on the button and save the file on your computer to work, edit or customize your design. You can also find more 3D designs for printers on Ender-3 EZR-Struder Direct-Drive OEM-Extruder Hero-Me-Gen-5.