Ender 3 MAX - PSU Relocation/Case Kit
thingiverse
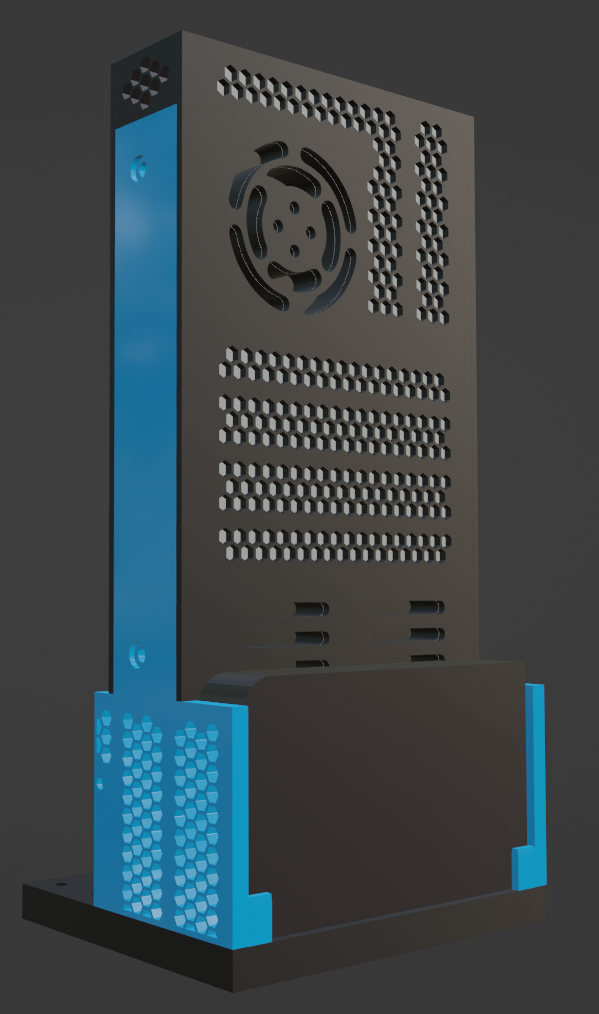
**ATTENTION:** **Notes about the PSU Case:** For whatever reason Cura 5.3.0 thinks the model is hollow and won't print correctly, even with mesh fixes I've tried. Let me know if you find a work around for this! Otherwise, I can comfirm Prusa-2.5.0 shows and prints with no errors. I've been working to try and fix the model. If you'd prefer not to use PrusaSlicer, the pre sliced gcode included should print fine on a standard setup Ender 3 MAX. ------------------------------------------------------------------------------------------------------------------------ **Assembly Instructions:** • First attach the **back plate** to the **bottom plate** using **3x m3-16mm** bolts • Then, put the **side and psu plates** on using **4x m2-20mm**. • Finally just put **2x m2-20mm** bolts to attach the **sides** to the **back plate**. • Run the cables through the bottom and mount it to the case with the **original provided screws**. If you don't have those, they're **m4-20s**. -need to figure out size for t nut and case screws and add instructions. ------------------------------------------------------------------------------------------------------------------------ **NOTES** **PSU+Side Plates:** • Need supports only on screw holes with recessions (shown in pictures) **PSU Case:** • Supports are need for the slots only. The honeycomb pattern does **NOT** require supports. (Also shown in pictures). **Use support enforcers! If using PrusaSlicer, set support type to snug or else it will try to support everything underneath it!** ------------------------------------------------------------------------------------------------------------------------ **About the gcode print files**: • Includes G29 auto bed level, if you don't have a auto leveling system you may want to remove that (not sure if the firmware will just skip it) • The print files are for the **Ender 3 Max** with standard settings (**PLA + 0.4mm nozzle**) • Mine has a direct drive so the flow rate is set to 100%. If that's something you generally need to adjust on your setup I'd definitely just slice them yourself. **PSU Case:** • Print time: approx 10 hours • Infill: 20% • Layer height: .3 • Initial layer height: .32 • Speed: 65mm/s (80 infill, 130 travel) • Supports: Enforced **PSU Plate:** • Print time: approx 3 hours • Infill: 20% • Layer height: .2 • Initial layer height: .3 • Speed: 65mm/s (80 infill, 130 travel) • Supports: Enforced **Back Plate:** • Print time: approx 2.5 hours • Infill: 20% • Layer height: .2 • Initial layer height: .3 • Speed: 65mm/s (80 infill, 130 travel) • Supports: None **Side Plate:** • Print time: approx 1.5 hours • Infill: 20% • Layer height: .2 • Initial layer height: .3 • Speed: 65mm/s (80 infill, 130 travel) • Supports: Enforced **Bottom Plate:** • Print time: approx 4 hours • Infill: 10% • Layer height: .2 • Initial layer height: .3 • Speed: 65mm/s (80 infill, 130 travel) • Supports: None ------------------------------------------------------------------------------------------------------------------------
With this file you will be able to print Ender 3 MAX - PSU Relocation/Case Kit with your 3D printer. Click on the button and save the file on your computer to work, edit or customize your design. You can also find more 3D designs for printers on Ender 3 MAX - PSU Relocation/Case Kit.