Ender 3 Power Supply Case
thingiverse
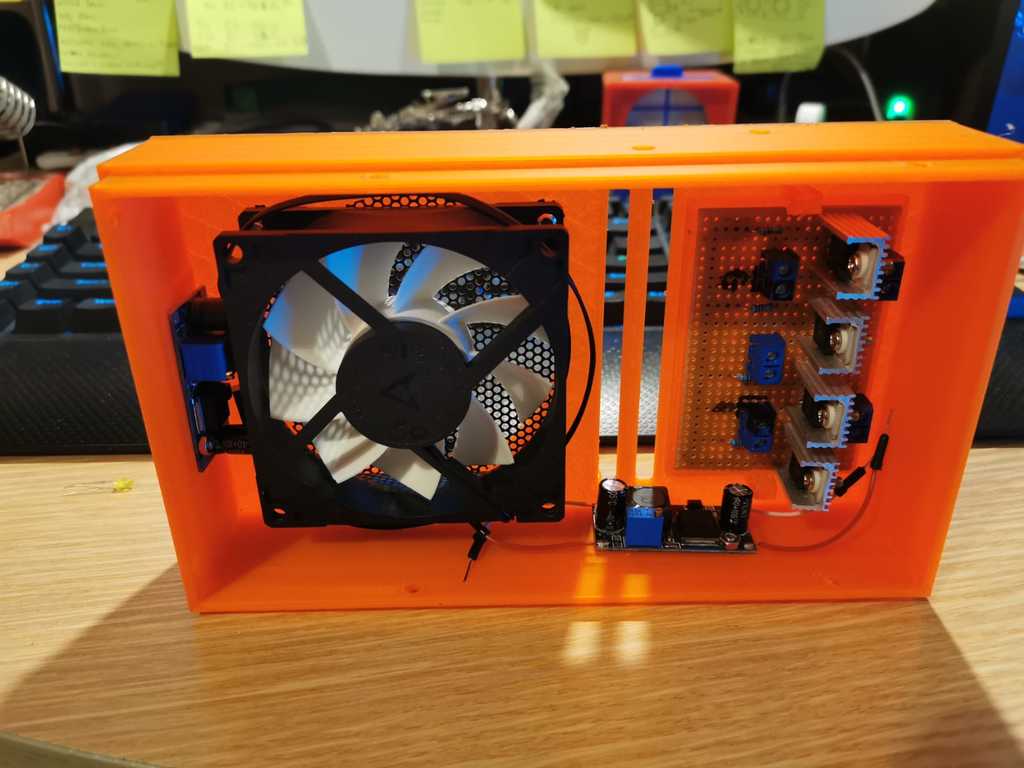
This is a replacement cover for the power supply unit (PSU) for the Creality Ender 3. It will directly replace the metal cover of the PSU but you will need to glue some form of thread onto the inside of the holes. I may update the model if requested to include captive nuts but it was kept simple so it could be printed faster with no supports. The printer footprint will remain the same even though the case is a fair extension to the original, it does not protrude further than the runners on the end of the gantry. When installing this cover the black section at the bottom of the PSU will no longer come up far enough to be bolted on so the second part will replace this. This cover will allow the fitment of an 80mm fan (25mm thick). I used an Arctic silent and when running it is actually silent but still provides significantly more airflow than the original. I tried to use the original fixings for the cover but a couple of them did not quite reach so used some small M3 bolts. Be careful with bolt length as too long bolts may hit components on the board. Even the standard Ender 3 setup has one of the frame bolts pushing a capacitor out of the way which I was not impressed with. The cover has no fan grill but I had a metal 80mm grill from another project which I used. All sorts of grills can be purchased online or salvaged from old computers or other equipment. 80mm fans all have the standard hole spacing. PSU's for the Ender can be 24V or 12V and also the original fan may be 12V or 24V but check the output of the fan header with a multi meter. WARNING!!! WARNING!!! IF YOU ARE CHECKING THIS OUTPUT WITH THE PRINTER RUNNING THERE IS MAINS VOLTAGE (UP TO 400V WITH THE CAPACITORS), ONLY DO THIS IF YOU KNOW ABOUT ELECTRONICS!!! My fan header under load was outputting 24V so I used a buck converter LM2596 to drop the voltage to 12V. Voltage at idle is lower but still above the 12V needed for the new fan. This cover has space for up to 3 buck converters. Fix them in place with M3 nuts and bolts. The top one will need to be fitted before the fan and this is the one I used to drive the fan. The square in the bottom is for a custom PCB. I have made an LED MOSFET driver which clips into this space.If you do make a board for this space try and slide it under the clips rather than pushing it down as the clips do not flex as much as intended. The base can be screwed into the PSU in 2 places giving 4 mounting points. These screw into the standard M4 threads in the metal of the PSU but be careful with the backside mounts as they need to be very short or they will contact the PCB inside. I had to slightly modify the file after my print as the holes were not perfect (as shown in the picture) so I have left these screws out for now. Not as sturdy as it could be but no different from the original. Power cord has been relocated to the back for neatness. Feel free to message me for any more information or change requests. Also I can provide the circuit diagram for my MOSFET driver on request. dongiannone@live.co.uk Check out my YouTube for the basics on building your circuits https://youtu.be/QslTbUwS7mg
With this file you will be able to print Ender 3 Power Supply Case with your 3D printer. Click on the button and save the file on your computer to work, edit or customize your design. You can also find more 3D designs for printers on Ender 3 Power Supply Case.