Ender 3 Pro 3-point Bed Leveling Conversion
thingiverse
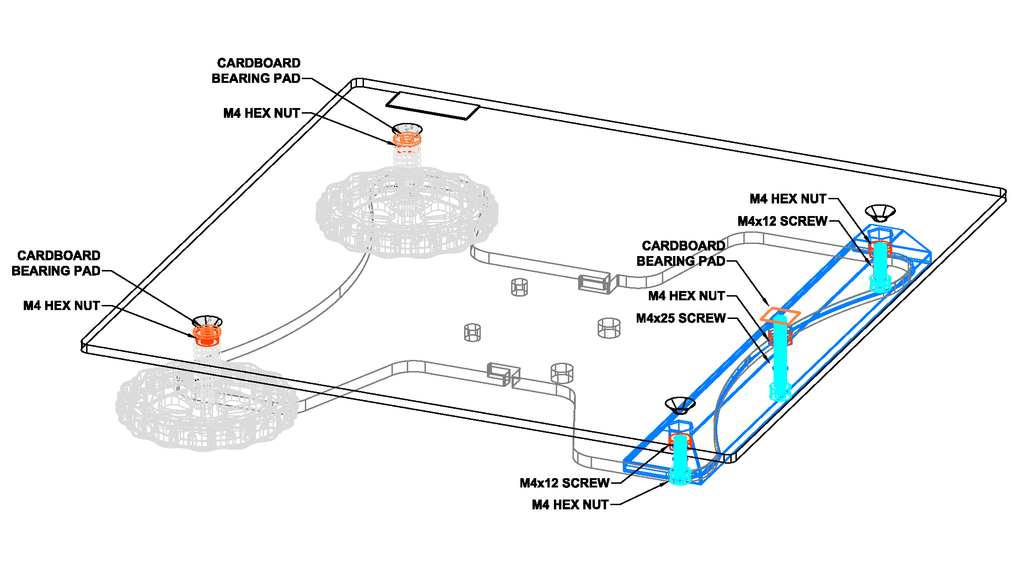
I looked but could not believe something like this wasn't already designed or posted here- its a bridge to convert your Ender3_Pro (or similar) to 3-point bed leveling. Thingiverse search still sucks, so if there is something else like that here, I could not find it. I did the same sort of thing to my Wanhao i3 and its been working for almost 5 years now in 2021. I installed the 1st verison of this on the printer and its been going non-stop for days now. I will disassemble and add pics when I have some down time. I will add more info and pics later, but wanted to post this as soon as it was done, printed and installed so others could use it too. It seriously was a night and day difference in leveling. The $50 conversion kit with new aluminum carrier plate and bed bridge is trick and sexy and all, but why spend 25% of your printer's cost to do what you can do with $3 in flament and hardware! Print the bridge upside down without supports. You may want to add a brim or mouse-easrs to aid in bed adhesion. The screw holes have bridge featurd built in, so don't bother with supports. The nut pockets might be a little tight depending on your slicer settings and hardware. I tweaked them a touch larger in version 2. The center nut hole is deep enough so that you can insert a nylock face down and the end be flush. Adjuster wheel is included to either reusing the original leveling screw or a new M4x20-25 hex bolt or cap head screw. Print base side down. The graduations will let you gauge adjusment in 0.1mm/0.025mm increments, and are recessed for paint filling to increase contrast (its DARK under there!). The Up/Down arrow directions ARE reversed compared to the OEM handwheels. Options for installing the handwheel: - place a nut in the top recess of the wheel and run a screw up from the bottom, thus clamping the wheel tight. - run the original flat head screw through the locknut in the bridge until it bottoms out. Place the screw-nut combo in the birdge. then run a nut partway up the screw, Add a washer, the adjusted and recess a nut in the bottom of the adjuster. run the top nut down to clamp the wheel between the 2 nuts. - hot glue the cap head screw in there. The bridge is relieved to mate up to the carrier plate. The initial prototype was modeled with the fit-up clerances to the parts on the Ender repo on github, and some trimming of the shoulder was needed to fit my carrier plate stamping. The model was updated to take this into account but due to manufacturing variations, some adjustments might be needed. . Parts you will need: 2 - M4x12 screws to attached the bridge 1 - M4x20 or M4x25 hex bolt or cap head screw for the new adjuster 5 - M4 nuts. Nylocks are recommened to make sure stuff stays tight, especially the hand turned adjuster. 2 - M4 sized fibre washers or simply make your own from thin cardboard (from a cereal or craker box) 1 - cardboard bearing pad to go under the middle screw, about 20mmx20mm in size, to protect the PCB traces on the underside of the heated bed. Just about anything will work. Instructions: - Print the bridge. - Remove the build platform from the carrier plate. - Carefully cut the magnetic sheet on the bed plate around the leveling screw heads so you can remove the ones on the right and use a screwdriver to tighten the ones on the left. If you cut a 'tounge' around it, then you can peel it back and lay it back down to fill the hole. If you tear it, don't worry, the magnetic bed sheet will span over these holes. You can superglue the cutouts back if you want too. - Place a fiber washer and nut on each of the left side levelling screws. If you can't find fibre washers, make your own by carefully cutting thin cardboard discs with a hole for the M4 screw and big enough so the nut fully bears against it. - Remove the right side screws from the bed. - Insert the nuts into the pockets and install the center leveling bolt/handwheel. Screw it so its about 4mm higher than the top of the bridge. - Install the bridge to the carrier plate with the the M4x12 screws. - Use a piece of Sctotch or Kapton tape to tape the carboard bearing shim to the bed over the new leveling screw. Scotch clear tape is good to about 100C before it starts to unstick. - Resintall the heated bed with the springs and leveling nuts. Now would be a good time to convert to hard mounts and install a Euclid Probe too. - Install the magnetic build sheet - Lower the bed so the left side is lower than the right. - Power up the printer and Home all like normal. - Mover the nozzle over the singe leveling screw and using your paper strip or feeler gauge, raise the bed. - Move the carraige over the left side leveling bolts and adjust to level the bed side-to-side and front-to-back. - Preheat the printer and recheck level. - Print the 5 dot / 9 dot leveling pattern to tweak the bed leveling. You might find an adjustable Z-endstop bracket remix usefull too. https://www.thingiverse.com/thing:4918753 Euclid Probe for Ender3: https://www.thingiverse.com/thing:4968573 Version 2 Edits: Corrected the test on the handwheel. Replaced bridge discs with bridge features Happy printing!
With this file you will be able to print Ender 3 Pro 3-point Bed Leveling Conversion with your 3D printer. Click on the button and save the file on your computer to work, edit or customize your design. You can also find more 3D designs for printers on Ender 3 Pro 3-point Bed Leveling Conversion.