Ender 3 Pro Direct Drive for Winsinn Dual Gear
thingiverse
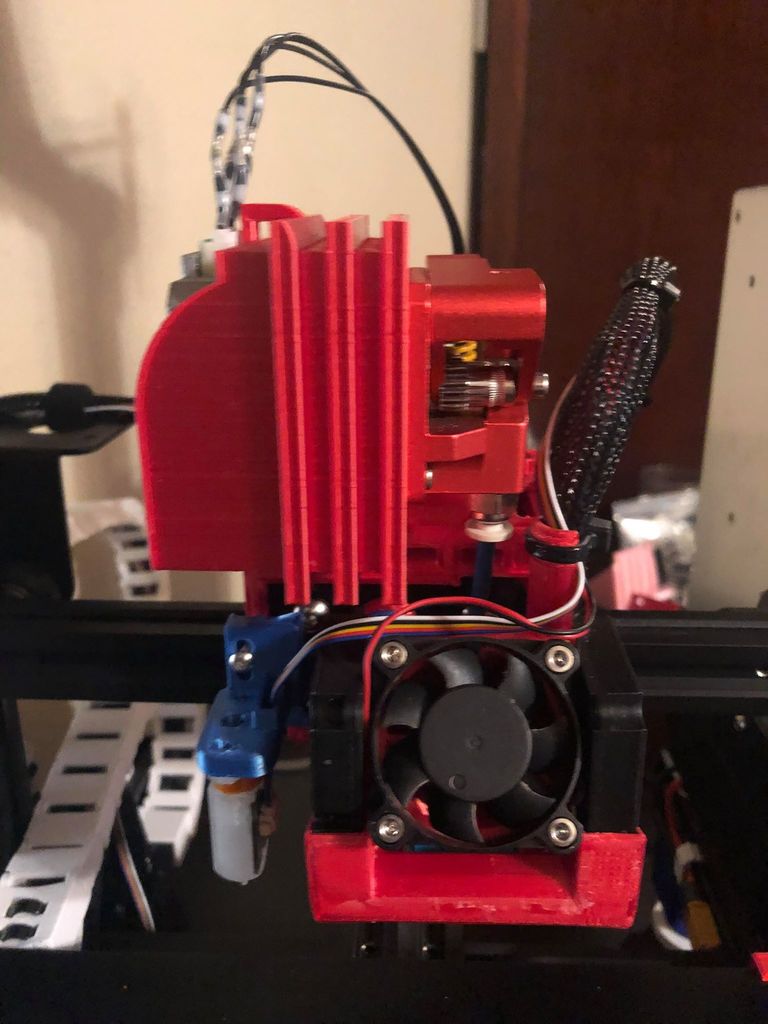
I'm cheap so I designed my own take on a Direct Drive extruder for the Ender 3 Pro with the Winsinn Dual Gear extruder: (https://www.amazon.com/gp/product/B07SY745CF/ref=ppx_yo_dt_b_asin_title_o09_s00?ie=UTF8&psc=1). On my setup I am also using the Hero Me V3 with dual fans which can be found here: (https://www.thingiverse.com/thing:3182917). You will need 2 16mm M3 hex screws along with 2 M3 nylon lock nuts, and a wire extension for the extruder stepper motor. Before you start, if you are planning on print it first and install it after you have installed the mount bracket for the stepper motor/extruder. The mount bracket is made to use the mount screws for the 2 upper rollers. If you already have the Hero Me V3 setup on your printer you can install this without removing the whole thing it just takes a little maneuvering. ***When HERO ME is installed*** On the front side (side with small overhang) you have to start on the right hand side of it first and slide it into position first. The screw on the side will be able to be pulled out just enough to slide it in. When slide down and screw installed then rotate the left side down into place. Then you will be able to install your left side roller screw. After the mount bracket is on, install the rest of your hot end enclosure. Next you will need to measure and cut roughly 70mm of bowden tubing (You will need to trim it down to make it fit properly.) Seat the bowden tube into the hotend with retaining clip. Next put the two nuts in place (one under each arrow). Remove the stepper motor and extruder from the z-axis carriage and install them on the stepper motor housing. ***NOTE: I have not tried the fitment of the factory extruder but I am pretty sure it will fit as well. I would also remove the bowden tube lock and clip for the next part.*** Once you have the stepper assembly together, align the bowden tube and place the stepper assembly down to verify the bowden tube isn't pressing the stepper upwards. If it is trim it a millimeter and try again. When everything sits flush reinstall the bowden tube lock and clip back on the extruder and reinstall the stepper assembly and add the 2 M3x16mm screws. *** With the screws loose you can slide the stepper housing to make the bowden tube as straight as possible.*** Add your stepper motor wire extension or extend the harness and plug stepper back in. ***4/26/20 Update*** I have added a harness guide that requires 4 M3 10mm and nylon lock nuts to install. I am working on it still considering the current design lowers the maximum z-height. You also need 2 zipties to secure the harness to the guide. Check back soon for further Updates. ***I am currently working on a filament spool holder for the filament to come off the front on top. I will Upload those as soon as they are finished.*** ***7/13/20 Update*** Parts 2.0 are compatible with bmg style extruder, unfortunately my Winnsin dual gear broke. So at the moment I am unable to test and verify that it is offset properly for the 2.0 parts. I updated the stepper motor housing to incorporate a wire harness mount for some strain relief on the harness. I also off set the mount position a little more for straighter path into the hot end. Version 1 is still up for those who want it, but is not compatible with 2.0 parts. Mount bracket 2.0 has also been modified to fit properly with the Hero Me gen 5 and also aid with the stepper motor offset for use with the BMG style extruder. ***Note I am currently revising the rest of the harness guide so at the moment I have removed it from the downloads.
With this file you will be able to print Ender 3 Pro Direct Drive for Winsinn Dual Gear with your 3D printer. Click on the button and save the file on your computer to work, edit or customize your design. You can also find more 3D designs for printers on Ender 3 Pro Direct Drive for Winsinn Dual Gear.