Ender 3 Pro Z-Axis Stepper Motor Planetary Gear Upgrade
thingiverse
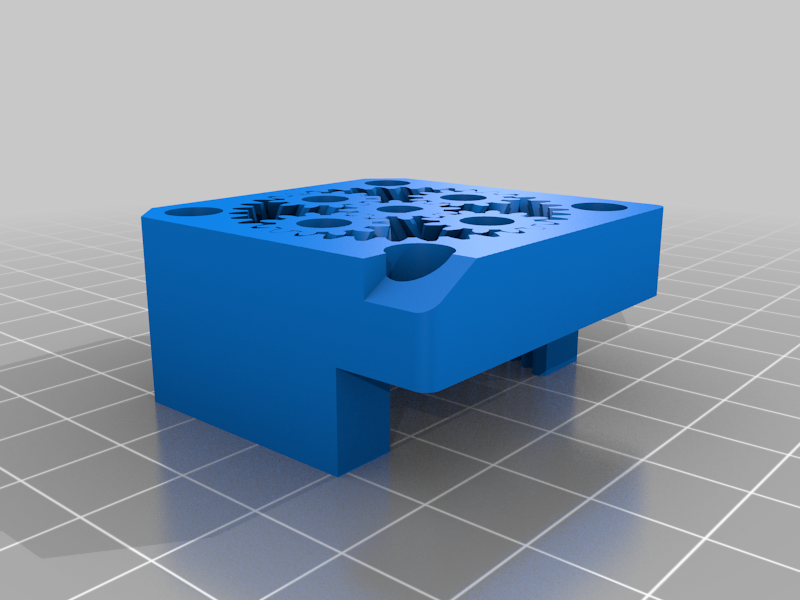
Z-Axis Stepper Motor Planetary Gear Upgrade https://imgur.com/a/36FbEsQ **What this mod does:** The Z-axis stepper motor works at 1.8° steps. The Z-lead screw is quad threaded and every revolution raises the X gantry 8mm. 200 steps in a full circle. 0.04mm per full step. The sun and planet gears have 12 teeth, and the ring gear has 36 teeth. With a fixed ring, this planetary gear ratio is 4:1, i.e., the sun gear turns four times for every revolution of the carrier. With this upgrade, a full step is now 0.01mm. **Files:** https://www.thingiverse.com/thing:4149689 Buildplate arrangement: https://i.imgur.com/pZ9cevi.jpg To minimize backlash, there is very little gear clearance, 0.04mm. https://i.imgur.com/Buexshp.jpg I was able to print the model as is with a 0.2mm nozzle and 0.12mm layer height. If you have any trouble, play with the [Horizontal Expansion](https://ultimaker.com/en/resources/52836-shell) setting in Cura. There is more clearance, 0.06mm, between the carrier axis and the planet gears to prevent binding and breaking. They should move freely. Test fit the print. https://i.imgur.com/cbMc2Pt.mp4 **Installation:** The mod takes the place of the Z-motor bracket and the lead screw coupler. So remove those first. You don't have to remove the X-gantry from the printer, but to prevent it from falling, tilt the printer back or on it's side before removing the leadscrew. We'll be reusing the 2 M3x16 pan head screws, and 2 M4x18 flush head screws that go though the Z-motor bracket so set those aside. Optionally, use two additional M3x16 screws to hold the planet gear to the stepper motor. Attach the new Z-motor bracket to the aluminium rail using the 2 M4x18 flush head screws. https://i.imgur.com/4n11O88.jpg Press fit the stepper motor shaft onto the sun gear. https://i.imgur.com/tOutvVl.jpg Press fit/screw the leadscrew onto the carrier. Optionally, there are two screw holes on the carrier that can be used if the leadscrew is loose. Those holes fit the screws that came off the lead screw coupler. Thread the leadscrew back though the X gantry, leaving plenty of room on the bottom. Place the planetary gear and Z-motor over the new Z-motor bracket. Reuse the two screws from the old Z-motor bracket to attach the assembly to the motor. Lower the carrier onto the planet gears. https://i.imgur.com/Lk9FflD.jpg Finally, we need to send over the commands: M92 Z1600; set zsteps/mm to 1600 M500; save settings I wasn't able to connect the printer to my computer over USB, so I put the commands in the Start G-Code of my test print. **Results:** I used Hatchbox white PLA because it's on hand. The test print is square with a circle cut out of the middle and quartered. I ended the prints prematurely after I stopped noticing layer lines. https://i.imgur.com/EX8KBxO.jpg https://i.imgur.com/5Y0JNqN.jpg https://i.imgur.com/IiXNPv2.jpg Here, I put on a coat of Army gray primer to both bring out the definition and to simulate miniature painting: https://i.imgur.com/cRruxMG.jpg https://i.imgur.com/gpEQz4V.jpg https://i.imgur.com/3AVgsQA.jpg **Notes:** At 0.01mm height * 0.2 nozzle width * 1000 length = 2mm³ of plastic. With 1.75mm diameter filament, that's 0.83mm of filament to print 1 meter. My dnd mini's head may be only 3mm wide. That's 0.00249mm of filament. Two and a half microns -- that's a small bacterium! I'll probably need a geared direct drive extruder upgrade soon, but that seems too heavy for the far side of the X-gantry. So I want to mount the extruder and gears off the X carriage. But to carry over the power, I'm thinking about using a dremel bit extension cable so that I'm still getting the benefits of a geared direct drive, with all the benefits, of keeping the x carriage light. Edit: apparently this already exits -- Flex3Drive. To help with printing: 1. Align the objects closer to the left side of the build plate where the leadscrew is. The right side is wobbly. 2. After preheating, level over the bedsprings instead of over the corners of the buildplate. Each corner moves up or down with the bedspring as the pivot point when the opposite bedspring is adjusted. Regarding X gantry speed. After setting M92 Z1600, the x gantry moves up and down as fast as it used to. To quickly raise or lower the x gantry, pull the leadscrew and carrier out of the planet gears, spin it, then reset it as necessary. What if I upgrade my leadscrew to a single thread to achieve the same effect? That's a valid solution. What is this mod for? Probably not miniatures. This Ender unmodded Ender can print 0.02 which satisfies the resolution I need and the print time is already getting excessive. Here, the aarakocra was printed at 0.04mm layer height and the dwarf at 0.02mm. https://i.imgur.com/YelrihX.jpg For whatever purpose this mod serves, I now have it in my toolkit.
With this file you will be able to print Ender 3 Pro Z-Axis Stepper Motor Planetary Gear Upgrade with your 3D printer. Click on the button and save the file on your computer to work, edit or customize your design. You can also find more 3D designs for printers on Ender 3 Pro Z-Axis Stepper Motor Planetary Gear Upgrade.