Ender 3 rigid bed (tested and working)
thingiverse
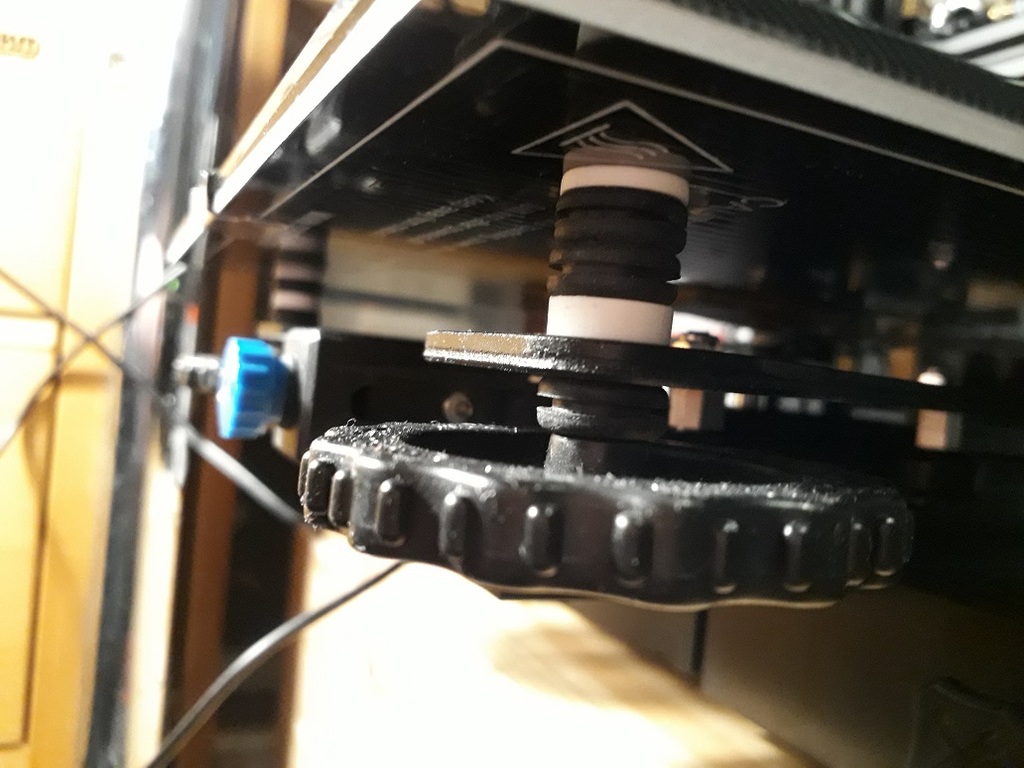
I was tired of having to level the bed almost every time i had made a print and I wanted a sturdier construction, but one that was still adjustable. When I found a bag of rubber cable grommets in my drawer of nice-to-have-stuff, I decided to make my own take on a rigid bed. This bed construction is not fully rigid. It can be adjusted around 4 mm (that's 20/127 of an inch for you imperial guys, if that makes it easier to visualize) and the height dials are firmly held in place even when you apply some forde to the build plate trying to pry a stubborn print loose. My grommets were about 6 mm thick and I would consider 5 mm a minimum as thinner grommets reduce the travel of adjustement too much. After installing it I can make dozens of prints without any levelling as long as I don't have any excessive nozzle wear or change nozzle. And it's dirt cheap compared to adding auto levelling. WARNING! A rigid bed is not as forgiving as the stock springy bed. If the zero of the Z-axis is off and the nozzle makes hard contact with the build surface it may cause damage to the nozzle, heat bed surface, or even the hotend and the X- and Z-axis mountings. PROCEED AT YOUR OWN RISK! Material needed: 12 rubber grommets 6mm inner diameter. Costs around $3.50 for 50 on ebay. (https://www.ebay.com/sch/i.html?_from=R40&_nkw=rubber+grommet+6mm) PLA, ABS, PETG or whatever can handle the temperature of the heatbed. I use PLA when printing PLA at 60 degrees and it works fine. If you run your hotter when printing other materials and the PLA parts gets too soft, just print new parts in that material instead and you should be fine again. Printing: If you just want a full set of pieces, print the CE3PRO_E3v2_rigid_bed.stl. If you dropped a piece and it rolled in behind the bookshelf, there are separate STL files for each one. I printed it with 0.12 mm layer height with a standard 0.4 mm nozzle as this improves the precision and creates a more compact structure less prone to plastic deformation. I've included the FreeCAD file if you need to adjust anything depending on the grommets you bought. Assembly: 1. Remove adjustment wheels and lift the heat bed. 2. Replace the springs with the following parts from top to bottom; A thin washer, two rubber grommets and a thick washer except in the corner where the cable to the bed heater is fastened. In that corner you use another thin washer instead of a thick one. 3. Set the bed down on the carriage. 4. Put each of the four distance tubes in grommets. The tube is there to limit the compression of the grommet, both to make it more rigid and to limit how hard it becomes to turn the wheel. 5. add the grommets with the inserted distance tube on the bolts between the carriage and the adjustment wheel. THE FOLLOWING STEPS ARE VERY IMPORTANT! Always repeat these steps whenever installing a new nozzle as there is almost no give if the nozzle hits the build plate when the printer zeroes in automatically and this may damage the nozzle, hot end or glass bed if it happens. 6. Tighten it all to lower the bed around 3-4 mm (around 1/8") in all four corners. Do not over tighten as this may damage the grommets and the washers. 7. Lower the hotend until the nozzle is positioned about 1-2 mm above the bed turning the Z-axle by hand. 8. Move the Z-axis end stop up until the micro switch clicks. The printer should now be safe to auto home and do a proper bed levelling. Adjusting the wheels will feel sticky due to the rubber grommet, but that's intentional to keep the setting from changing unintentionally. To achieve the best results, use a good glass bed and level it to an absolute zero level by setting the z-axis to 0.1 mm, preferrably and use a 0.1 mm feeler gauge. If you use a piece of printer paper, adjust it so it just touches the paper and the paper can be easily reinserted again without moving the nozzle. Go around the corners of the bed another pass and check each corner again until they don't need any more adjustment. Don't touch the wheel while measuring the bed clearance as even holding your finger on it may alter it a couple of hundreds of a millimeter and throw your measument off. The nozzle should now barely touch the build plate when the printer zeroes the Z-axis and you should be able to get a perfect first layer on your prints.
With this file you will be able to print Ender 3 rigid bed (tested and working) with your 3D printer. Click on the button and save the file on your computer to work, edit or customize your design. You can also find more 3D designs for printers on Ender 3 rigid bed (tested and working).