Ender-3 S1 Stealth Light Bar - Easy to print and do mod. *new version 1.01 link in notes
thingiverse
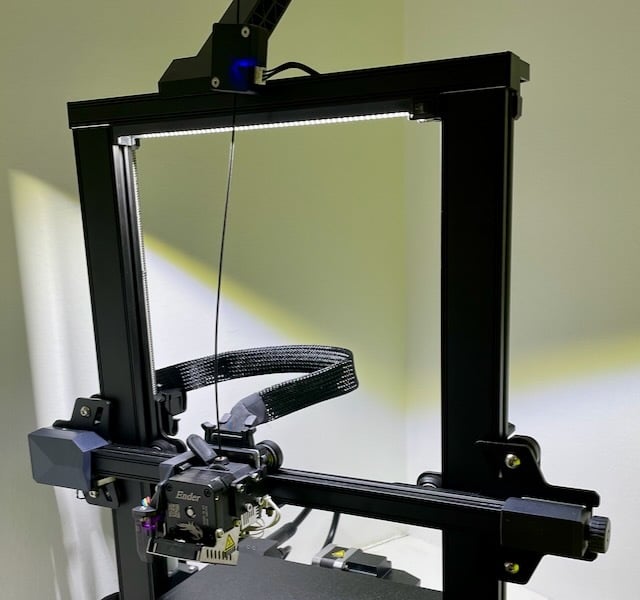
Ender-3 S1 Stealth light bar. *Download new version 1.01 here: https://www.printables.com/model/178925-ender-3-s1-stealth-light-bar-easy-to-print-and-do-mod ( Maintaining on Printables ) Easy to print light bar that uses the built in accessory port for power. This allows for the power cable to be hidden along side the filament sensor wire and it ends up looking like a stock light. It also fits on without interfering with the filament spool mount clip or the side covers. I uploaded two versions. The standard one and one with a hole for a rocker switch. The rocker switch one is very difficult to solder nicely but if you feel like pulling your hair out the switch is nice to have. If you already have no hair then go nuts. Super happy with how it turned out. Pairs nicely with my other S1 thing: https://www.thingiverse.com/thing:5368309 Parts I used: 3 x M3x8 screws with nuts. - Ideally these are bevelled head but the round head one work too. - I used this: - https://leeselectronic.com/en/product/6450-screw-m3x8mm-flat-10pcs.html 25cm of 24v light strip. - I used this: - https://leeselectronic.com/en/product/528724-led-strip-3014-240-led-cool-white-6000k-1m-24vdc.html 75 cm of wire - I used black two conductor 26 gauge wire so it matched the stock ones - I used this: - https://leeselectronic.com/en/product/2118011-2-core-wire-parallel-awg26-b-b-colour.html 1 x mini rocker switch (don't make the switch version. I found it challenging. :P ) - I used this one: - https://leeselectronic.com/en/product/3359-rocker-switch-on-off-125vac-6a-black.html 1 x JST 3 pin 2.5mm Connector - You should use this pre-soldered one. (unless you like a challenge): - https://leeselectronic.com/en/product/28595-jumper-wire-jst-3pin-250mm-m-f.html OR - I used the empty connector and crimp on ends to keep it clean. Painful: - https://leeselectronic.com/en/product/28601-25mm-pin-20pcs-xh-series.html - https://leeselectronic.com/en/product/285960-connectors-jst-xhs-3pin-250mm-m-f.html Build Instructions for non-switch one: 1. Print the non-switch light bar case. 2. Print 3 of these things to hold the m3 nuts in the slot: https://www.thingiverse.com/thing:3050607 3. Attach the light bar to the underside of the frame. 4. Solder the wire to the led strip and slide it in to the light bar guides from the underside. Note which side of the wire is negative/positive. One side has an opening to allow this. 5. Feed the wire back down to the accessory port following the filament sensor wire. It's a bit fiddly but looks great after. 6. Solder the other end or the wire to your JST connector noting the + and - pins as they are labeled on sticker on top of the printer. 7. Plug in the cable, turn on the printer, make sure that light comes on because you have the pins the right way around. Yes, a person I know very well did it the wrong way. 8. Admire your fine new light bar and show your friends or family so they can look at you like there is something wrong with you for your level or excitement. Build Instructions for the switch version with crimped JST pins for a totally stock look: (If you take this one on you'll need to figure out how to wire the switch and leave enough wire to get the led strip inserted. I left very little room for the wiring because I wanted it to look good and match the look of the machine. Think it through beforehand and it will work well.) 1. Confirm that you want to curse me out for the pain taking on this version. Take a couple deep breaths, getter' done, and know that when it's done you will have an awesome light bar. 2. Print the light bar and 3 of the nut holders. (Steps 1 & 2 from the non-switched version) 3. Clip the ends of the mini rocker switch so they fit inside the enclosure once it is inserted. 4. Loosely place the LED strip and switch where they will go on the enclosure so you get an idea of how long your wires need to be. Solder everything together. Note that the switch has clips that press into place but it's easier to not fully insert it until after the light bar has been attached to the frame. *I opted to use more crimp connectors for the attachment cable in my final build but you're on your own for that. See pictures... 5. Attach the light bar to the frame with all the wire/led bits hanging loose. 6. Slide the LED bar into the guide. It's very flexible but be careful not to over-pull your soldered wires. 7. Push the switch all the way in to its mounting hole carefully, nudge al the excess wire into the enclosure to clean it up and make sure you are not shorting anything. A blob of hot glue might help. I opted to add a couple other connectors for the connection wire but it was a pain. (See pictures). Make it look perty. 8. Feed the wire down to the accessory connector following the filament sensor wire. 9. Solder the other end or the wire to your JST connector noting the + and - pins as they are labeled on sticker on top of the printer. Or, if you hate yourself, try the JST crimp pins. They end up looking great, but, um, not fun if your eyes suck and you use needle nose pliers because you don't have the proper tool. 10. Plug in the cable, turn on the printer, make sure that light comes on because you have the pins the right way around. Yes, a person I know very well did it the wrong way. 11. Admire your fine new light bar and show your friends or family so they can look at you like there is something wrong with you for your level or excitement. If you took on this harder version you should explain to your friends or family that it was hard and they should appreciate it as much as you. Nice work!
With this file you will be able to print Ender-3 S1 Stealth Light Bar - Easy to print and do mod. *new version 1.01 link in notes with your 3D printer. Click on the button and save the file on your computer to work, edit or customize your design. You can also find more 3D designs for printers on Ender-3 S1 Stealth Light Bar - Easy to print and do mod. *new version 1.01 link in notes.