Ender 3 Stock PSU Relocation Mount for Dual Z-Motors
thingiverse
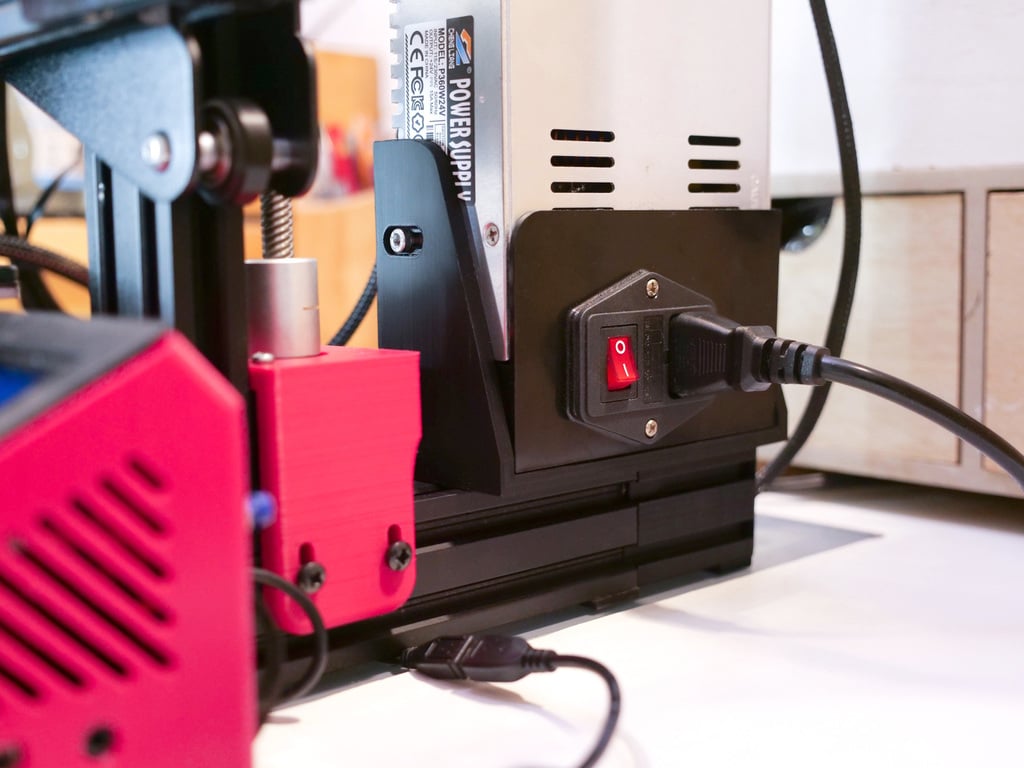
Remixed from ‘Ender 3 Pro - PSU Offset Mount (dual z-axis)’ by emtrax to work with the stock Ender 3 PSU by Cheng Liang This remix retools emtrax’s super slick, ultra functional Meanwell PSU mount to work with the stock Ender 3 power supply which is wider, has different screw positions and requires a cable conduit through the base of the mount. Another functional and aesthetic addition in this remix is an optional printable 4040 extrusion extension that can be seamlessly attached under the mount overhang with 2x 75mm M5 machine screws into the end of the existing frame extrusion. This provides a tidy, concealed conduit for both a PSU ground wire** direct to the printer frame and a clean exit channel for the PSU connection cables that feed through the base of the mount. When installed, together with the mount, the 4040 base extension creates a seamless super-clean look without the typical PSU over-hang that reveals an obvious relocation. The extrusion extension also adds extra realestate for clip-in cable management options like this cool simple solution by J-Max: https://www.thingiverse.com/thing:2666871 See included images for recommended print orientation of parts with minimal tree supports using an overhang angle of 70deg. Installation should be pretty straight forward and hopefully all the included photos help, but incase anyone gets stuck, here’s a detailed step by step guide: 1. Fit the two 8mm M4 screws and t-nuts to the base of the PSU mount, leaving them a little loose so they can slide into the extrusion slots easily. 2. Pry off the plastic end cap from the back of the 4040 frame extrusion to expose the raw metal end 3. Use the 8mm M5 screw to attach one of the terminals from your ground wire** to the top left screw hole in the raw extrusion end. Take care to angle the attached wire toward the inside of the extrusion and slightly down so it’ll fit into the recess in the printed extrusion extension. 4. Before lightning the t-nuts, feed the cable (yellow and red wires + plug) from the base of the PSU through the hole in the bottom of the mount. 5. With the wires now through the hole, position the mount so that the end rails on the base of the mount are flush with the raw end of the frame extrusion, then tighten down the t-nut screws to lock it in place. 6. Remove the rear right hand screw from the back of the PSU (one of the two that attaches the metal PSU case to the black plastic shell), then slot the PSU into the mount, coaxing those red and yellow wires further down through the hole as you go. 7. Align the back of the black plastic PSU shell with the back edge of the mount, and make sure the base of the PSU sits flat and snuggly against the base of the mount. 8. Put the screw you removed from the rear right of the PSU back in through the hole provided in the mount. 9. Take the 6mm M4 screw and fasten it to the case through the similar hole at the front end of the mount. You may need to push down on the top of the PSU a little to line the screw up with the hole in the case. 10. Thread the unattached end of the ground wire through the hole in the middle of the 4040 printed extension (toward the end with the little foot under it), then through the printed end cap, then click the end cap into place with the ground wire hole oriented toward the bottom. 11. Insert the two 75mm M5 screws into the holes in the extrusion extension and push them all the way in until they’re flush with the other end of the extrusion (there should be 15mm or so of screw still protruding at the head end). If the holes in the printed extension are a bit tight you can easily drill them out with a 5mm or 3/16” drill bit to make it easier to push the screws through. 12. Push the printed extension in under the mount with the little foot oriented down. As the extension gets closer to the raw extrusion of the frame you may need to bend and wiggle the red and yellow wires a little to get them to sit well in the slot designed for them in the extension. 13. Once the wires are in their right places, and the printed extension meets flush with the end of the frame extrusion, screw the two 75mm M5 screws in the rest of the way to firmly secure the extension to the frame. 14. Use the 6mm M4 screw to firmly fasten the terminal on the other end of the ground wire** to the spare screw hole at the upper left of the back of the metal PSU case. 15. Plug the red and yellow wires back into the printer, plug the mains IEC cable back into the PSU and you’re ready to go! ** Removing the two screws that secure the Ender 3 power supply to the frame in its factory mounted position inadvertently severs the ‘earth’ or ‘ground’ connection between the PSU and frame. It’s important to restore this connection during the relocation process by running a simple and easy ground wire from the back of the PSU case to the raw metal end of the base frame extrusion. See required hardware list below (very inexpensive) and build photos to see how easy it is to do - just strip a little off each end of the wire, twist the loose wires a little so they’re easy to insert into the terminals (you can tin with a soldering iron if you want, but not entirely necessary). Slide wire ends into the terminals and crimp tight. If you don’t have a crimper you can get by squeezing firmly with a pair of pliers, then placing a flat head screw driver along the plier-flattened part of the connector and tapping with a hammer a couple of times for deeper, firmer crimp. **Hardware required:** 2x 8mm M4 machine screws (for securing the mount with t-nuts) 2x M4 t-nuts 2x 75mm M5 machine screws (to attached 4040 profile extension) 1x 6mm M4 machine screw (to attach ground wire to PSU) 1x 8mm M5 machine screw (to attached ground wire to printer frame) 1x 8mm M4 machine screw (to attach the front end of the PSU to the new mount) **30cm of 14-18AWG electrical hookup wire (for ground wire) **2x Fork or ring shaped electrical terminals (to crimp to each end of the ground wire)
With this file you will be able to print Ender 3 Stock PSU Relocation Mount for Dual Z-Motors with your 3D printer. Click on the button and save the file on your computer to work, edit or customize your design. You can also find more 3D designs for printers on Ender 3 Stock PSU Relocation Mount for Dual Z-Motors.